Overview : IoT reference architecture
A complete IoT solution is made of different parts. First of all, we need to ingest all the events and data sent from devices and it’s a such big problem because in the Internet of Things era we have to think at “scale” with hundreds, thousands, million and … billion of devices. In this scenario, we have to use an ingestion system that is able to scale and handle incoming data very quickly without slowing down the entire process : we talk about “telemetry” pattern.
After acquiring data, the ingestion system must provide them to the business engine (aka back end) of our solution that could have a “hot” path for analyzing data as a stream in real time and a “cold” path for storing data and analyzing them for future analysis : we can consider it a “big data” problem. Both paths could expose these information to the end user that can monitor the devices and what they are “saying” from the real world. The same information are very useful as input for a machine learning system that can help us for predictive analysis to understand how data could evolve in the future based on current incoming values and take preventive actions.
In this scenario, we can’t forget the opposite path from our cloud based system to the devices. In most cases we need to interact with them using the “command” and “notification” patterns; with commands we are able to “speak” to the devices so that they can execute some actions on our behalf and with notifications we can provide some information they need during their lifetime. Our solution needs a system who provides us the above opposite path and in most cases it could be the same ingestion system already capable to handle the huge number of devices in the field at large scale. For this reason, we can generalize saying that we need a “gate” for the devices to the cloud and vice versa and it can be simply called Cloud Gateway.
All the devices could be able to access this gateway directly if they are IP capable (for example using an Ethernet or WiFi connection) so with TCP/IP stack support; for very low constrained devices with PAN (Personal Area Network) protocols support (for example using Bluetooth Low Energy, Zigbee, Z-Wave but you can consider AllJoyn framework too) we need a field gateway who acts as a local gate for accessing to the cloud. This gateway has the protocol translation role (from low level and local protocols to wide area protocols) and could be able to execute local storing, filtering and processing actions on received data before sending them to the cloud. Of course, it could be the entry point for our local system for all commands and notifications received from cloud to deliver to devices.

IoT reference architecture (from IoT Hub documentation)
After the above brief analysis on all main parts of an IoT solution, we can say that the main part is the Cloud Gateway related to handle a huge number of devices at scale and a lot of incoming messages per second into the system.
For this reason, big companies started to develop their solutions to provide such a gateway and simplify the ingestion and communication part of an IoT solution. On September 29th, Microsoft announced its Azure IoT Hub and on October 9th, Amazon replied with its AWS IoT platform : based on my experience on IoT Hub and what I read about AWS IoT, I’d like to compare these two Cloud Gateway implementations only describing their features; it’s up to you what’s the platform that fits well for your IoT business.
A brief introduction : IoT Hub vs AWS IoT
IoT Hub is the new entry in the Microsoft Azure offer; it’s a service that enables bi-directional communication between devices and our business engine (aka back end) in the cloud. The communication channel is reliable and secure and the authentication is per-device using credentials and access control.
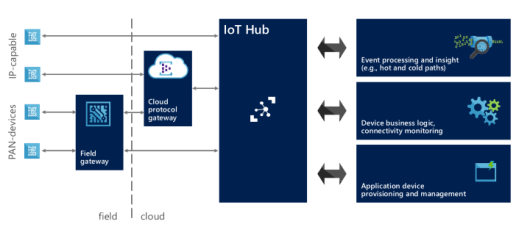
IoT architecture with IoT Hub
Thanks to its bi-directional nature, the messages between devices and cloud travel in both directions along the established channel. Each device has two endpoints to interact with IoT Hub :
- D2C (device to cloud) : the device uses this endpoint to send messages to the cloud both as telemetry data, outcome for a received command or request for execution;
- C2D (cloud to device) : the device receives commands on this endpoint for executing the requested action. The IoT Hub generates a feedback at application level to confirm that the command is acquired by the device and it’s going to be executed;
On the cloud side, the IoT Hub exposes two similar endpoints :
- C2D (cloud to device) : the back end system can use this endpoint to send messages (for example commands) to the devices. This endpoint acts like a queue and each message has a TTL (Time To Live) so that it’s removed from the queue if the timeout expires (it’s useful to have commands executed in a short period of time and not executed too late when an offline device comes back online but the execution isn’t needed at that time because it could be harmful). The back end system can receive a confirmation message or delivery fault to understand if device has received command or not;
- D2C (device to cloud) : it’s an Event Hubs compatible endpoint used by the back end system to retrieve messages from device (telemetry data or outcome for commands). On a different path, there are feedbacks on command delivery (successful or not). “Event Hubs compatible” means that we can use an Event Hub client to receive messages from this endpoint (for example using an Event Processor Host implementation);
IoT Hub has an identity registry where it stores all information about provisioned devices. This information aren’t related to devices metadata (they are up to you in your IoT solution that uses IoT Hub, for example manufacturer and firmware/software version info) but are related to identity and authentication. It provides monitoring information like connection status (connected/disconnected) and last activity time; you are also able to enable and disable the devices using this registry. Of course, IoT Hub exposes another endpoint (device identity management) to create, retrieve, update and delete devices.
AWS IoT has the same objectives as IoT Hub but reaches them in a different way.

AWS IoT data services
The main concept in this IoT platform is the device “state”. The devices (named things) are able to report their state by publishing messages to the message broker through topics; the broker deliveries received messages to all client subscribed on the specific topics. In the above description we can recognize all MQTT protocol related concepts like publish/subscribe pattern and topics and it’s true because AWS IoT is strongly based on this protocol.
The device state is strictly related to the thing shadow object that stores and retrieves state information. The state (named last reported state) sent from device is stored in the related thing shadow and an application can request a change to the device state (named desired state) writing to the things shadow so that the desired state is replicated to the real device by the message broker; after changing its internal state, the device replies with the new state that is stored as new reported state in the thing shadow. From an implementation point of view, the thing shadow is a JSON document and it means that the payload for all exchanged messages is always a JSON document too; real devices send reported state and receive desired state with this data representation format.
AWS IoT provides the telemetry data to the system publishing states from devices to cloud; the platform provides the command pattern changing the desired state for a thing shadow (of course changing the state for a device means to request an action).
Finally, AWS IoT has a thing registry that contains devices related information and allows to add custom attributes that are part of the devices metadata (for example manufacturer, serial number, …). The interaction with the thing registry to create, delete and update things is enabled with the AWS CLI (Command Line Interface) that provides all such operations.
SDKs : languages and platforms supported
Even if we can access to the IoT Hub using open standard protocols (like HTTP and AMQP as we’ll see in the next chapters), Microsoft provides different SDKs for different languages and platforms. Of course, we have .Net SDK for pure .Net Framework applications and UWP (Universal Windows Platform) applications running on Windows 10 devices (included the IoT version, Windows 10 IoT Core); other SDKs are for Java and NodeJS (JavsScript) developers. The great news is related to the availability of an SDK for C (ANSI C99) for portability and broad platform compatibility; it can be used on very low constrained devices with only C language support.
With .Net SDK we also have the service part used in the back end system to handle identity registry and send messages to the device; only for NodeJS applications there is a dedicated codebase.
All SDKs are open source and available on GitHub.
AWS IoT enables devices to access to the cloud using standard protocols (like HTTP and MQTT) but Amazon provides some SDKs to simplify developers life. First of all, an SDK for embedded C language (ANSI C99) that is cross platform and that can be used on different hardware and operating systems (for low constrained devices with RTOS too). The SDK adds an abstraction layer on top of all actions needed for accessing the message broker that are related to the security of the channel, the MQTT based communication for publishing and subscribing messages to topics and finally all the operations related to thing shadows for updating, retrieving and deleting them. A NodeJS SDK is also available for powerful platforms and finally another SDK just only for Arduino Yun board.
The SDKs are all open source and available on GitHub at following links for embedded C, NodeJS and Arduino Yun.
Security and Authentication
The connection established between devices and IoT Hub is TLS (Transport Layer Security) based so that the communication is encrypted to guarantee data confidentiality; the server is authenticated thanks to its own X.509 certificate sent to the device during the TLS handshaking.
The device and service authentication is handled with access control and credentials. With access control, the IoT Hub defines a set of permissions to grant access to all exposed endpoints; these permissions are related to read-only identity registry, read/write identity registry, device connection to the related endpoints for device to cloud communication and finally service connection to the related endpoints for cloud to device communication. We can grant permissions with hub-level shared access policies (default policies are already defined) or with per-device security credentials that grant the device connection permission on endpoints related to the specific device.
The authentication is provided by IoT Hub verifying a token (sent from the device) against the shared access policies and device identity registry security credentials. As for many other services on Azure, the token is a SAS (Shared Access SIgnature) token with same format and it’s processed starting from resource URI (the endpoint path), the expiry time, the policy name and an HMAC-SHA256 signature string. The symmetric keys (primary and secondary) related to the device credentials are never sent on the communication channel.
AWS IoT relies on TLS protocol so that the communication with the message broker is encrypted and the client is authenticated using the mutual authentication (so with X.509 client certificate too). The certificates can be created, activated and revoked using the AWS CLI or the AWS online console; of course we can also use a certificate that is already in our possession. Once we have the certificate, we need to attach it to a policy and the thing itself.
AWS IoT doesn’t support an identity principals based on X.509 certificates only but it supports IAM service (users, groups and roles) and Amazon Cognito service. As guide lines, the X.509 should be used with MQTT based application, the IAM service with HTTP and Cognito with end user applications (for example on smartphones) thanks to the support for different identity providers (like Facebook, Google and so on).
Protocols : AMQP, MQTT, HTTP and the others
Today, AMQP 1.0 is already the official supported protocol for all Azure services under Service Bus umbrella like queues, topics/subscriptions and event hubs. Microsoft focused on this protocol (as part of the committee for the standard) and decided to adopt it for IoT Hub too. Of course, HTTP protocol is supported too. We could consider AMQP the better choice for majority of scenarios to avoid polling nature of HTTP (from device) due to the lack of server push feature (available with AMQP)
It’s possible to support additional protocols using the Azure IoT Protocol Gateway framework that provides protocol adaptation from a different protocol (MQTT or any other custom protocol) to AMQP with direct access to the IoT Hub. This is an open source project (available on GitHub) that has a built in support for MQTT 3.1.1 but provides a simple programming model for building protocol adapters for other protocols. Additional features of the protocol gateway are custom authentication, message transformations, compression/decompression and encryption/decryption of traffic. Finally, it can be deployed locally such as field gateways or as Cloud Services worker role on Azure.
MQTT (3.1.1), we spoken about, is the official supported protocol for AWS IoT that the message broker uses for publishing and subscribing messages on topics. Even if MQTT is a standard, the broker supports it with some variations : for example it doesn’t support retained messages, persistent sessions and QoS level 2. For more information on this support and main differences, we can find a deep description on official AWS IoT protocols page. The HTTP protocol is supported too even if it’s limited to publish messages using a REST API (POST method only).
Hardware : the set of certified boards
Related to hardware platforms, Microsoft started the Microsoft Azure Certified for IoT program for trusted partners with tested and certified offerings. All these platforms are able to access to the IoT Hub using already mentioned SDKs in all supported different languages. Today we have Intel, Raspberry Pi, Freescale (with Kinetis K64F MCU based on ARM mbed platform), Texas Instruments (with CC3200 based on TI-RTOS), MinnowBoard, BeagleBoard, Seeed, Resin.io and Arrow (with Qualcomm board). Of course, this program is open and all companies can be part of it with a huge opportunity to make their platforms compatible with the Azure IoT offer.

Microsoft Azure Certified Internet of Things
As Microsoft, Amazon provides some starter kits to move quickly from idea to prototype. There are well known high level boards like the Qualcomm Dragonboard (C and NodeJS), BeagleBone (C and NodeJS), Intel Edison (C and NodeJS) and some boards with very low constrained devices like Renesas (with Micrium OS), Microchip and finally TI CC3200 (with TI-RTOS). All the high level boards enable AWS IoT on Linux as operating system and we have compatibility for both C and NodeJS SDKs; the constrained devices board enable AWS IoT on specific OS for embedded systems (like Micrium OS and TI-RTOS).

AWS IoT Starter Kits
Of course you can simply use your own hardware using the C language SDK or using JavaScript if you can run NodeJS.
Messages : exchanging data on the wire
The IoT Hub messages exchanged on the wire reflect a lot of features of the underlying AMQP protocol. A message has an opaque payload to carry data in user defined formats (for example binary, XML, JSON and so on) and one or more properties both at system (interpreted by IoT Hub) and application level. In the set of the system properties we can recognized message id and correlation id that are useful for request/reply pattern implementation (as supported by AMQP protocol natively). Using the HTTP protocol, the payload is carried inside the HTTP body and the properties as HTTP headers.
Other than using the message broker for custom topics, the AWS IoT enables the interaction with thing shadows. The thing shadow is a JSON document used to store and retrieve current state information for a device. All the available operations (update, get and delete) are supported through both MQTT and a RESTful API over HTTPS. Regarding MQTT usage, there are some reserved topics in the message broker to interact with thing shadows that make available the request/reply pattern on top of MQTT.
Prices, Quotas and Throttling
The IoT Hub price is defined starting from the IoT Hub unit concept related to the maximum number of device connected and the number of messages transmitted per day. Each unit allows to handle up to 500 devices and we can allocate a maximum number of 200 units. Of course, the IoT Hub provides operation throttles for all types of operation like identity registry operations, device connection and finally device to cloud and cloud to device operations. To try out the IoT Hub for free there is a free tier who enables to connect up to 10 devices with a maximum of 3,000 messages per day (from all devices). Pay attention that current price reflects a preview discount of 50%. For more information here.
The AWS IoT pricing is based on million messages exchanged quota. The total cost is evaluated both on publishing and delivering messages from/to devices and applications. A message is a 512-byte block of data processed by AWS IoT. To start trying the platform we can create a account and use the free tier who gets you started with 250,000 free messages (published or delivered) per month, for 12 months without limitations on the number of connected devices. For more information here.
Next ? What’s after ingestion ?
If you consider only the ingestion role of the IoT Hub you could ask what we can do with all data received from our devices. The simpler answer is to develop a back end application on your own for reading messages from the IoT Hub (using an Event Processor Host for example) and process them (analyzing, storing, showing, …). Of course, Microsoft Azure provides a lot of other services out of box like Stream Analytics which may be coupled with the output event hubs compatible endpoint to receive all data and execute real time analysis on them to raise alert or produce messages for other systems like Service Bus (queues and topics). The Machine Learning service is available to get data and execute predictive analysis with a lot of available predefined models (or we can create a custom model related to our business). The Power BI provides us a great way to show information to the end users. Of course, we can add all storage services (SQL, NoSQL, blob, cache) for long term or short term storage. To simplify developing your IoT solution, Microsoft has the Azure IoT Suite that provides some out of box solutions (up today only one solution is available for remote monitoring) that use different services (Stream Analytics, Machine Learning, Power BI, DocumentDB, ASP.NET Web site) to enable you to start rapidly (create, update, delete and monitoring devices from a web interface) and customize the solution as you need.
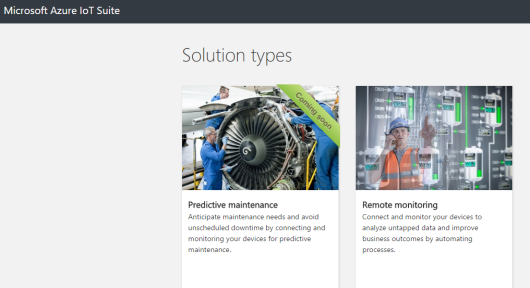
Azure IoT Suite
Amazon offers the same type of integration between the AWS IoT service and all the other available services and it’s possible thanks to the Rules Engine. We can define one or more rules that has some conditions and related actions. For each rule we can grant permission and attach it to a policy; in this way when the rules engine receives messages from the message broker published on specific topic (from a thing), the action (related to the rule) is executed. This engine provides the integration with all other services like DynamoDB (as NoSQL database) for storing information, Lambda to invoke function code for extracting useful data, S3 for storing file and finally Kinesis to process data as stream in real time.

AWS IoT to AWS services
Conclusion
One big problem … handling million of devices and messages per second … monitoring and controling them remotely … more platforms to do it in the simpler manner “without reinvent the wheel” … the choice is up to you ! What’s the better solution for your IoT business ?
Microsoft and Amazon developed their platforms with different choices starting from the underlying protocols used for communication : AMQP vs MQTT. Microsoft already used AMQP for all services under Service Bus umbrella so it seems to be a logical choice for IoT Hub. Regarding Amazon, I can only suppose that the choice is related to the acquisition of 2lemetry company that developed its IoT platform using MQTT (of course, it’s only a supposition). Both the platforms support HTTP that is a well known protocol used by developers for a lot of cloud applications.
The mechanisms to provide “telemetry” pattern could be considered quite similar but the mechanism for “command” pattern with a request/reply path is quite different; it’s a built in feature for AMQP but needs an additional layer on top of MQTT.
The way to “think” the interaction with devices is different; it’s based on messages exchanges in the IoT Hub and more strictly related to the device state concept in AWS IoT thanks to the thing shadows. On the first side we have a message who can carry application data and commands for actions; on the other side we have the state representation through a JSON document (of course carried inside an MQTT message). It’s like to have one more data abstraction layer in AWS IoT.
The security implementations are quite similar considering TLS protocol usage and the identity is handled in a different way but with almost the same results.
Regarding the hardware and SDKs, thanks to the C language support for both IoT platforms we have quite similar solutions. Of course, Microsoft adds the .Net and UWP based SDK.
Pricing is completely different and it could be one reason for your choice depending on your IoT business.
I’d like to leave you with two brief official videos where the above platforms are showed : the “Overview of Azure IoT Hub” at AzureCon 2015 and “Introducing AWS IoT” at AWS re:Invent 2015.
Last but not least a comparison table with main features for both platforms.
|
Microsoft Azure IoT Hub |
Amazon AWS IoT |
| Protocols |
HTTP, AMQP, MQTT and custom protocols (using protocol gateway project) |
HTTP, MQTT |
| Communication Patterns |
Telemetry, Command |
Telemetry, Command (state change) |
| Certified Platforms |
Intel, Raspberry Pi 2, Freescale, Texas Instruments, MinnowBoard, BeagleBoard, Seeed, resin.io |
Broadcom, Marvell, Renesas, Texas Instruments, Microchip, Intel, Mediatek, Qualcomm, Seeed, BeagleBoard |
| SDK / Language |
.Net and UWP, Java, C, NodeJS |
C, NodeJS |
| Security |
TLS (only server authentication) |
TLS (mutual authentication) |
| Authentication |
Per-device with SAS token |
X.509 certificate client authentication, IAM service, Cognito service |
| Pricing |
Paying for IoT Hub unit related to number of devices and messages per days |
Paying million messages traffic (published from devices + delivered to devices) |
[Update October 15th 2015]
I just like to highlight the more complete comparison table by Toby McClean inspired by my article to add the last big company IoT platform : IBM IoT Foundation (on Bluemix). You can find this table here.
[Update February 5th 2016]
Yesterday, the Azure IoT Hub was released as GA and there are some changes on its offer starting from the natively support for MQTT 3.1.1 protocol. You can find more information at this new blog post.

