IoTHub

A routing IoT gateway to the Cloud

Let’s start with an on-premise solution …

Imagine that you have an embedded solution (or if you like it … an IoT solution) with a bunch of tiny devices which are connected to an on-premise server which receives telemetry data from them and is able to execute some elaboration in order to show information in real time on a dashboard and control the devices.

Imagine that your solution is based on the AMQP protocol and perhaps your on-premise server is running a messaging broker for gathering data from devices as messages through the local network.

Imagine that, due to your very constrained devices, the security in the network is guaranteed only at data level by encrypting the body of every single AMQP message. It’s possible that due to their complexity and need of more resources (CPU and memory) you can’t use sophisticated algorithms (i.e. DES, 3DES, AES, …) on your devices but only simple ones (i.e. TEA, ..).

Your solution is just working great in your environment.

… but now we want to move it to the Cloud

Imagine that for some reasons you need to change the on-premise nature of your solution and you want to connect the devices directly to the cloud with a very strict rule : nothing to change on the devices. At least you can change some configuration parameter (i.e. server ip, …) but not the way and the protocol they are using for communication.

The first simple solution could be moving your messaging broker from the on-premise server on a IaaS in the Cloud; just changing connection parameters on your devices and all continue to work as before.

The big problem now is that your data are sent through the public network and your security is based on a simple encryption algorithm applied only on the payload of the messages. For this reason, you start to think about using SSL/TLS in order to have security at connection level on top of TCP/IP, data encryption and server authentication.

Start to think about it but then … wait … I can’t use SSL/TLS on my tiny devices … they don’t have the needed resources in terms of CPU and memory … and now ?

Fog computing and IoT gateway : the solution ?

You know about “fog computing” (the new buzz word after IoT ?) and that you can solve your problem using an IoT gateway. Having this gateway could mean to have an intelligent piece of software which is able to gather data from the local network, process them in some way and then send them to the Cloud. The gateway could give you more features like filtering on data (sending only part of them), offline handling (if the Cloud isn’t reachable) and complex local processing but … wait … you don’t want it … you just want that data arrives to the Cloud in the same way as before (to the on-premise server) and for now you don’t need other additional great features.

Could we have a very simple IoT gateway with only the two following features we need :

  • SSL/TLS protocol support on behalf of the tiny devices;
  • traffic routing from devices to the Cloud in a transparent way;

The answer is … yes ! You have such solution and it’s provided by the Qpid Dispatch Router project from the ASF (Apache Software Foundation).

I already wrote about it in some previous articles [1] [3] so let me just show how you can use the router in a way that solve your “porting” problem.

The router just needs the right configuration

In order to show in a very simple way how to configure the router for our objective, we can use the Azure IoT Hub as Cloud platform for the IoT. As all the Azure messaging services like Service Bus and Event Hub, the IoT Hub needs an encrypted connection based on the SSL/TLS protocol … so it’s the problem we want to solve for our non SSL capable devices.

For the sake of simplicity we can run the router on a Raspberry Pi using the Raspbian distribution as OS; you can read about installing the Qpid Dispatch Router on Linux and on the Raspberry Pi in these articles [2] [4].

The main point is the configuration needed for the router in order to connect to an IoT Hub and routing the traffic from devices to it.

First of all we have to consider all the addresses that at AMQP level are used in order to send telemetry data to the hub, receive commands and reply with feedback. All these information are deeply explained here [5] [6].

The routing mechanism used in this configuration is the “link routing” [3] which means that the router creates a sort of “tunneling” between devices and the IoT Hub; it opens the TCP/IP connection with the hub, establishing it with SSL/TLS on top, and then opens the AMQP connection. All the SSL/TLS stuff happens between router and IoT Hub and the devices aren’t aware about it. You can see what happens through the router trace :

pi@raspberrypi:~ $ PN_TRACE_FRM=1 qdrouterd --conf ex06_iothub.conf
Sat Jul 23 11:56:17 2016 SERVER (info) Container Name: Router.A
Sat Jul 23 11:56:17 2016 ROUTER (info) Router started in Standalone mode
Sat Jul 23 11:56:17 2016 ROUTER_CORE (info) Router Core thread running. 0/Router.A
Sat Jul 23 11:56:17 2016 ROUTER_CORE (info) In-process subscription M/$management
Sat Jul 23 11:56:18 2016 ROUTER_CORE (info) In-process subscription L/$management
Sat Jul 23 11:56:18 2016 AGENT (info) Activating management agent on $_management_internal
Sat Jul 23 11:56:18 2016 ROUTER_CORE (info) In-process subscription L/$_management_internal
Sat Jul 23 11:56:18 2016 DISPLAYNAME (info) Activating DisplayNameService on $displayname
Sat Jul 23 11:56:18 2016 ROUTER_CORE (info) In-process subscription L/$displayname
Sat Jul 23 11:56:18 2016 CONN_MGR (info) Configured Listener: 0.0.0.0:5672 proto=any role=normal
Listening on 0.0.0.0:5672
Sat Jul 23 11:56:18 2016 CONN_MGR (info) Configured Connector: ppatiernoiothub.azure-devices.net:5671 proto=any role=on-demand
Sat Jul 23 11:56:20 2016 POLICY (info) Policy configured maximumConnections: 0, policyFolder: '', access rules enabled: 'false'
Sat Jul 23 11:56:20 2016 SERVER (info) Operational, 4 Threads Running
Connected to ppatiernoiothub.azure-devices.net:5671
[0x19dc6c8]: -> SASL
[0x19dc6c8]:0 -> @sasl-init(65) [mechanism=:ANONYMOUS, initial-response=b"anonymous@raspberrypi"]
[0x19dc6c8]: -> AMQP
[0x19dc6c8]:0 -> @open(16) [container-id="Router.A", hostname="ppatiernoiothub.azure-devices.net", max-frame-size=65536, channel-max=32767, idle-time-out=60000, offered-capabilities=:"ANONYMOUS-RELAY", properties={:product="qpid-dispatch-router", :version="0.6.0"}]
[0x19dc6c8]: <- SASL
[0x19dc6c8]:0 <- @sasl-mechanisms(64) [sasl-server-mechanisms=@PN_SYMBOL[:EXTERNAL, :MSSBCBS, :ANONYMOUS, :PLAIN]]
[0x19dc6c8]:0 <- @sasl-outcome(68) 
[0x19dc6c8]: <- AMQP
[0x19dc6c8]:0 <- @open(16) [container-id="DeviceGateway_1766cd14067b4c4b8008b15ba75f1fd6", hostname="10.0.0.56", max-frame-size=65536, channel-max=8191, idle-time-out=240000]

At this point, the devices can connect locally to the router and when they asked for all the AMQP links related to the IoT Hub addresses, they will be tunneled by the router : the AMQP “attach” performatives are routed to the IoT Hub through the connection with the router. The communication then continues on this link in terms of message transfers directly between IoT Hub and devices but all encrypted until the router through the SSL/TLS protocol.router_iothub

The router configuration is something like that :

listener {
 addr: 0.0.0.0
 port: 5672
 authenticatePeer: no
}

ssl-profile {
 name: azure-ssl-profile
 cert-db: /opt/qdrouterd/Equifax_Secure_Certificate_Authority.pem
}

connector {
 name: IOTHUB
 addr: <iotHub>.azure-devices.net
 port: 5671
 role: on-demand
 sasl-mechanisms: ANONYMOUS
 ssl-profile: azure-ssl-profile
 idleTimeoutSeconds: 120
}

# sending CBS token
linkRoute {
 prefix: $cbs/
 connection: IOTHUB
 dir: in
}

# receiving the status of CBS token request
linkRoute {
 prefix: $cbs/
 connection: IOTHUB
 dir: out
}

# sending telemetry path and command replies from device to hub on : devices/<DEVICE_ID>/messages/events
# ATTENTION ! Here we need CBS Token
linkRoute {
 prefix: devices/
 connection: IOTHUB
 dir: in
}

# receiving command on device from hub on : devices/<DEVICE_ID>/messages/deviceBound
# ATTENTION ! Here we need CBS Token
linkRoute {
 prefix: devices/
 connection: IOTHUB
 dir: out
}

The main points in the configuration are :

  • a listener entity which defines that the router accept incoming AMQP connections on port 5672 (not encrypted);
  • the ssl-profile entity in order to configure the parameter for SSL/TLS connection to the IoT Hub and specifically the CA certificate to use for server authentication;
  • the connector entity which defines the way the router connects to the IoT Hub (address and port) using the above SSL profile;

After above parameters there is a bunch of linkRoute entities which define what are the addresses that should be link routed by the router from devices to the hub (using the specified connector).

You can find the complete configuration file here.

The Netduino Plus 2 use case

In order to develop an application very quickly on device side I decided to use my knowledge about .Net Micro Framework using a board that hasn’t the SSL/TLS support : the Netduino Plus 2 board.

The simple application is able to send a message to the IoT Hub and receive a new one replying with a feedback. All the code is available here.

In the following pictures you can see the message sent by the board and the command received (with the related feedback) through the Device Explorer tool.

01

02

Conclusion

Of course, the Qpid Dispatch Router project has a greater object than I showed here that could be providing connection to messaging services at scale thanks a more complex router network, with a path redundancy feature to reach a broker or a simple receiver.

In this article, I just showed a different way to use it in order to give more power to tiny devices which aren’t able to connect to AMQP based services due to their limitation (in this case the lack of SSL/TLS support).

If you consider the starting point, the configuration change could be avoided because the router could have same IP address and AMQP listening port as the previous on-premise server .

It means that only adding the router configured for the Cloud connection solves the problem !

[1] Routing AMQP : the Qpid Dispatch Router project

[2] Qpid Dispatch Router installation on your Linux machine

[3] Routing mechanisms for AMQP protocol

[4] My Raspberry Pi runs the Qpid Dispatch Router

[5] Connecting to the Azure IoT Hub using an AMQP stack

[6] Azure IoT Hub : commands and feedback using AMQP .Net Lite

Azure IoT Hub is GA : the news !

Yesterday, the Microsoft Azure IoT Hub was released in GA !

The public preview had a good success with a lot of people (makers) and companies (professional) try to use it for developing their IoT end to end solutions.

In a previous blog post, I have already discussed about its mean features with a comparison with AWS IoT, the Internet of Things platform by Amazon.

Relating to that article, there are the following differences it’s important to focus on :

  • Azure IoT Hub now supports MQTT 3.1.1 natively ! There is no need to use a field gateway for translating MQTT to AMQP (or HTTP) to communicate with the Hub. Now, your MQTT enabled devices can connect directly to the Cloud and you can use the SDK provided by Microsoft (with an API abstraction layer on top of MQTT) or any MQTT library (and M2Mqtt is a good choice for C# applications). Of course, the connection must be always encrypted with SSL/TLS protocol. More information at official documentation page here.
  • The pricing is changed : first of all, the pricing isn’t related to the number of devices (as the public preview) but only to the total number of messages/day. The bad news is that starting from April 1st the S1 and S2 plans will have a doubled price. Of course, the Free plan … will be still free !
  • AMQP over WebSockets : the AMQP protocol is supported on WebSockets too (like Event Hubs for example).

With the above two major news, the Azure IoT Hub offer is closer to AWS IoT offer : it supports MQTT and removed the devices limit on pricing.

News are not only on the Cloud side but on devices side too !

In the last months, a lot of OEMs and hardware companies worked hard to support Windows 10 for IoT Core and Azure IoT Hub connection on their platforms. Today the number of Azure Certified IoT Partners is literally increased !

 new_iothub_partners

It’s great to see that the Hub ecosystem is growing … now we have to wait for real IoT solutions based on it !

To start learning about Azure IoT Hub, I advice you the link to the Azure IoT Hub Learning Path which will guide you through all the steps needed to use the Hub in the best way.

My chat about IoT on TecHeroes show !

techeroes_channel9

On December 2nd I had a session at WPC 2015 in Milan speaking about Microsoft Azure IoT Hub.

During the conference I had a chat with Erica Barone (Microsoft Italia Evangelist) about IoT in general and more specific about the Microsoft offer on Azure with IoT Hub and IoT Suite. The chat was recorded as a new episode of the TecHeroes show published on Channel9.

Today it’s there !

It’s in italian and I’m sorry for all my foreign friends 😦

WPC 2015 Milan : Azure IoT Hub and IoT Suite

wpc2015

Organized by Overnet, in collaboration with Microsoft, WPC is the most important italian conference focused on Microsoft technologies. This year it will be covered in two full immersion days on December 1st and 2nd with 70 sessions in 8 tracks.

I’m honoured to be part of the speakers team this year as Microsoft MVP on Windows Embedded and IoT; on December 2nd, I’ll have a session about Microsoft Azure IoT Hub with an overview of the new Azure cloud gateway and the related Azure IoT Suite.

For sure, the conference will be great for contents and networking with all experts about Microsoft technologies. Don’t forget the “Ask The Expert” corner with a “bunch” of Microsoft MVPs ready to answer your questions.

All information and details about the registration and the conference on the official web site.

Let’s imagine Azure IoT Hub internal architecture

Today, thanks to the Microsoft Azure IoT Hub we can focus on developing our Internet of Things “end to end” solution at an application level perspective without concerning about the communication problems, the interconnection and messages exchange between the devices and  the service backend.

Before the advent of the IoT Hub we needed to setup all the communication channels to achieve the bidirectional paths from/to devices to/from Cloud. In that scenario, the best choice could be to use the Microsoft Azure Service Bus with Queues, Topics/Subscriptions and Event Hubs instances.

In the next paragraphs I’ll try to imagine (at very high level) what the IoT Hub service provides internally for us and how it sets up all the mentioned channels; we could mimic the related architecture using a bunch of Service Bus entities. During my explanation, I’ll use terms like “may” and “should” because I don’t know how it works for real, I can only imagine it and thinking as I need to implement it from scratch.

I consider this post as a conclusion of my previous “trilogy” on how to connect to the Azure IoT Hub using an AMQP stack, that is useful to understand how it works internally; these articles covered how to connect from a device perspective, how to handle command and feedback and finally how to get telemetry from devices.

The telemetry path

The first “simple” path we need to setup for an IoT solution is the telemetry one related to messages flow from devices to the Cloud without any response or feeback in the opposite direction. To support the ingestion of million events/second the IoT Hub “should” use an Event Hub like mechanism and it “may” be true because the D2C endpoint (at the service side) is defined as “Event Hub compatible” and we can read from it using a “pure” Event Hub client (like “low level” Event Hub Receiver or “high level” Event Processor Host).

iot_hub_internals_telemetry

As explained in this blog post, at AMQP level the devices sends data using a link connected to the following node as D2C endpoint (at device side) :

/devices/<DEVICE_ID>/messages/events

and the same node is exposed as “Event Hub compatible” at D2C endpoint at Cloud side (as already mentioned at this blog post). The related information ar available on the Azure portal to build the endpoint connection string.

eventhubcompatible

It should be clear that the telemetry path is achieved using an Event Hubs like channel.

The command path …

For handling commands from service to device, we need a channel for sending them and another one to receive feedback about their delivery (accepted, rejected, expired, …).

As explained in this blog post, the command path is achieved using a link to the following node at service side :

/messages/devicebound

and this node at device side :

/devices/<DEVICE_ID>/messages/deviceBound

The command path “should” be a queue on both sides (devices and service) with a related TTL (time to leave) and dead letter queue for expired or rejected messages by devices.

As we can see, the sending path “/messages/devicebound” hasn’t any information about the target device. To do that, the service need to set the To AMQP system property to the following value. An internal mechanism “shoud” route the command to the right queue related to the destination device analyzing the message and reading the above To property.

iot_hub_internals_command

It means that the internals “shoud” provides a queue on service side for sending commands and a queue for each device for receiving them.

… and feedback path

When the device accepts or rejects the message received on its C2D endpoint, the IoT Hub internals generates a feedback that is sent to another possible queue mapped on the following path :

/messages/servicebound/feedback

In this case, the device information related to the feedback are inside the body of the message itself in JSON format as described in the following post.

iot_hub_internals_feedback

In this case, the feedback path “should” be implemented with a queue on service side.

Conclusion

As you can see, the IoT Hub “should” provision a bunch of “Service Bus – like” entities for us inside a unique namespace related to the IoT Hub itself. Before this new services, we needed to setup all the event hubs and queues instance by ourselves … today IoT Hub provides the entire architecture.

iot_hub_internals

As I said … it’s only my imagination but … a possible high level solution to implement IoT Hub internally. It’s only an analogy game with a “home made” solution as you can see from the following Twitter conversation about this post by Clemens Vasters and Olivier Bloch from Service Bus and IoT Hub teams in Microsoft.

iot_hub_internals_twitter

Azure IoT Hub and IoT Suite : my chat with DotNetPodcast team

podcast_iot_hub_banner

For all italians people (or all my foreign friends who can understand italian ;-)) I’d like to announce another podcast about the Internet of Things on DotNetPodcast.

This is my third podcast on this stuff and I want to thank the DotNetPodcast team (Roberto Albano, Antonio Giglio, Massimo Bonanni) who invited me another time. It’s a pleasure for me.

This time I speak about the new Microsoft Azure managed service for the IoT world : the IoT Hub.

Why the need for the IoT Hub, what are its main features, connectivity and supported protocols, security, SDKs and certified hardware and how it fits well in an end to end IoT solution built using the Azure IoT Suite. Finally a brief comparison with the competitor AWS IoT from Amazon. These are the main points of my chat that you can find here.

I hope you’ll enjoy it !

Azure IoT Hub : get telemetry data using AMQP stack and Azure SB Lite

To complete the last two article series (data from device to cloud, command/feedback from cloud to device) on using AMQP protocol stack to interact with Azure IoT Hub, we need to get telemetry data from the devices.

When devices send data through their D2C endpoints, these data flow into the IoT Hub system and are made available to the service through its D2C endpoint that is Event Hubs compatible which means we can use any Event Hubs client to get data from it.

eventhubcompatible

On the new Azure portal we can see a lot of information about that in the related “Messaging” tab for our IoT Hub. The main information are :

  • Partitions : the number of partitions through which data from devices are ingested by the IoT Hub;
  • Event Hub compatible name : it’s the name of the event hub;
  • Event Hub compatible endpoint : it’s the complete path (with namespace) of the event hub;
  • Retention time : it’s the time the messages are retained inside the event hub;
  • Consumer groups : the available consumer groups for reading messages from event hub using related receivers (there is always the $Default consumer group);

To read from this event hub endpoint we can use any shared access policy that has the ServiceConnect permission. The portal provides us a default policy named “service” with its related shared access key. Using three of the above information we are able to build the connection string needed to connect to this auto-generated event hub :

Endpoint={Event Hub-compatible endpoint};SharedAccessKeyName={iot hub policy name};SharedAccessKey={iot hub policy key}

Of course, other than the above connection string we have to use the Event Hub compatible name.

Now … how the get data from event hub ? What’s the code we have to write ?

The simpler way to do that is to use the Event Processor Host provided by Microsoft as Nuget package that instantiates receivers for us on all available partitions and handle their leases providing us a checkpoint feature. The “only” big problem we have with this awesome software component is that it works only on .Net Framework so we can use it on PC based and Web based service applications.

UWP apps ? : AMQP and Azure SB Lite the solution

What can we do for UWP apps ? What we can do if we want to monitor telemetry data from an UWP app on Windows 10 without bridging data from a Web application ?

As in the previous articles the solution is to use a good C# implementation of AMQP protocol stack as AMQP .Net Lite but in this case, to avoid AMQP stuff, we can use the Azure SB Lite library (available on Nuget too) that wraps the protocol stack and exposes same official Service Bus SDK APIs to access to Event Hubs (other than queues and topics/subscriptions).

If you know the above APIs to interact with Event Hubs, the following code will be familiar to you :

static string ConnectionString = "Endpoint=[EVENT_HUB_COMPATIBLE_ENDPOINT];SharedAccessKeyName=[IOT_HUB_POLICY_NAME];SharedAccessKey=[IOT_HUB_POLICY_KEY]";
static string eventHubEntity = "[EVENT_HUB_COMPATIBLE_NAME]";
static string partitionId = "[PARTIION_ID]";
static DateTime startingDateTimeUtc;

static void Main(string[] args)
{
   ServiceBusConnectionStringBuilder builder = new ServiceBusConnectionStringBuilder(ConnectionString);
   builder.TransportType = TransportType.Amqp;

   MessagingFactory factory = MessagingFactory.CreateFromConnectionString(ConnectionString);

   EventHubClient client = factory.CreateEventHubClient(eventHubEntity);
   EventHubConsumerGroup group = client.GetDefaultConsumerGroup();

   startingDateTimeUtc = new DateTime(2015, 10, 31, 16, 00, 00);
            
   EventHubReceiver receiver = group.CreateReceiver(partitionId, startingDateTimeUtc);
            
   while (true)
   {
        EventData data = receiver.Receive();
        Debug.WriteLine("{0} {1} {2}", data.PartitionKey, data.EnqueuedTimeUtc.ToLocalTime(), Encoding.UTF8.GetString(data.GetBytes()));
   }

   receiver.Close();
   client.Close();
   factory.Close();
}

The above example is using Azure SB Lite and connecting to my current IoT Hub, it produces the following output :

iot_hub_event_hub_sample

Without having the Event Processor Host available on UWP apps, the bid deal is to create one or more receivers on all partitions by ourselves and handling the checkpoint on what is the position inside the stream we have already read. In that case, it’s useful to save the last reading date/time and use it as offset for starting a new read on the stream.

Conclusion

If you scaried to develop a monitoring UWP application because the related IoT Hub SDK doesn’t work on it … don’t worry you always have a solution that is based on using the underlying AMQP protocol stack. In that case, the solution is simpler thanks to the work I already done for the community with the Azure SB Lite. Of course, the choice to use and UWP application on a Windows 10 device instead of a .Net / Web application for monitoring your telemetry data is up to you and depends on the scenario, so it can make sense or not.

Azure IoT Hub : commands and feedback using AMQP .Net Lite

In the previous article, I described how it’s possibile to send telemetry data from a device and receive commands (sending feedback) from the cloud (to the device itself) using AMQP .Net Lite library connecting to the Azure IoT Hub. This approach is useful for some platforms that aren’t supported by the official SDKs like the .Net Micro Framework due to the Task and async/await programming model used in the C# implementation.

Covered the device side, it’s now time to see how we can use the same AMQP .Net Lite library on the service side. You could ask … “Why ?!! We have the great Microsoft.Azure.Devices Nuget package that provides the ServiceClient class to handle the connection, sending commands and receive feedback to/from devices !!”

You are right ! It’s true but … only if your service runs in a Web or a .Net Framework based application. If you try to install the above package in an UWP application you receive the following error !

nuget_uwp_error

As we can see, the official package uses some libraries that aren’t compatible with UAP like Microsoft.AspNet.WebApi.Core and Microsoft.Azure.Amqp. Tha latter sounds strange to me! It seems to be another AMQP stack implementation from Microsoft that can only run on .Net Framework. What are the differences with AMQP .Net Lite library? I’m sorry but I don’t know … the above stack isn’t open source and we can’t deep into it. However, there is a big and great difference that should be considered as a strength for AMQP .Net Lite : it works on all .Net platforms (micro, compact and full), on WinRT/UWP and Mono !

For this reason and using AMQP .Net Lite library we have a solution on developing an IoT Hub service inside a UWP application, a scenario that isn’t officially supported by Microsoft. As I love to say we can do that “knowing some AMQP protocol concepts and a bunch of IoT Hub node paths” !

IoT Hub service endpoints

Inside the IoT Hub architecture, the service has two endpoints to communicate with devices :

  • C2D (cloud to device) : the back end system can use this endpoint to send messages (for example commands) to the devices. This endpoint acts like a queue and each message has a TTL (Time To Live) so that it’s removed from the queue if the timeout expires (it’s useful to have commands executed in a short period of time and not executed too late when an offline device comes back online but the execution isn’t needed at that time because it could be harmful). The back end system can receive a confirmation message or delivery fault to understand if device has received command or not;
  • D2C (device to cloud) : it’s an Event Hubs compatible endpoint used by the back end system to retrieve messages from device (telemetry data) and feedback on command delivery (successful or not). “Event Hubs compatible” means that we can use an Event Hub client to receive messages from this endpoint (for example using an Event Processor Host implementation);

At AMQP level the endpoints are accessible from different entity paths; if you know Service Bus queues, topics/subscriptions and event hubs we can think them in the same way.

The entity path for sending command to devices is defined in the following way :

/messages/devicebound

while the entity path for receiving feedback (on commands sent) from devices is the following :

/messages/servicebound/feedback

As for the previous article, it means that after creating a connection and a session to our IoT Hub host we need to create two links to above entities (or nodes as defined in the AMQP spec). Using the programming model provided by AMQP .Net Lite library we have :

  • A SenderLink to the /messages/devicebound node;
  • A ReceiverLink to the /messages/servicebound/feedback node;

Authentication : sending the SAS token

The authentication mechanism is the same as device side. In this scenario, we need to send two SAS token on the two different AMQP nodes for sending command and receiving feedback.

The SAS token audience and resource URI for sending command are the same and defined in the following way :

string audience = Fx.Format("{0}/messages/devicebound", HOST);
string resourceUri = Fx.Format("{0}/messages/devicebound", HOST);

string sasToken = GetSharedAccessSignature(SHARED_ACCESS_KEY_NAME, SHARED_ACCESS_KEY, resourceUri, new TimeSpan(1, 0, 0));
bool cbs = PutCbsToken(connection, HOST, sasToken, audience);

For receiving feedback, they are the following :

string audience = Fx.Format("{0}/messages/servicebound/feedback", HOST);
string resourceUri = Fx.Format("{0}/messages/servicebound/feedback", HOST);

string sasToken = GetSharedAccessSignature(SHARED_ACCESS_KEY_NAME, SHARED_ACCESS_KEY, resourceUri, new TimeSpan(1, 0, 0));
bool cbs = PutCbsToken(connection, HOST, sasToken, audience);

Sending command

Using the SenderLink instance the device sends data calling the simple Send() method and passing it a Message class instance contains the data to send.

The sender link is created inside a new AMQP Session (using the related class of AMQP .Net Lite library) and the great news is that, thanks to the multiplexing feature of AMQP protocol, we can use the same session for both sender and receiver links all inside the same TCP connection.

The corresponding class in the official SDK is the ServiceClient class that provides the SendAsync() method. Regarding the original Message class (included into official SDK, not AMQP .Net Lite), it exposes the Ack property with following possible values :

  • none (default) : the service doesn’t want any feedback on command received by the device;
  • positive : the service receives a feedback message if the message was completed;
  • negative : the service receives a feedback message if the message expired (or max delivery count was reached) without being completed by the device;
  • full : the service receives both positive and negative feedbacks;

For more information you can refer to the previous article with a clear explanation of the message life cycle.

Using the AMQP .Net Lite library we don’t have an Ack property on the Message class but we need to use the application properties collection at AMQP level. The Ack property (at high level) is translated in an application property named “iothub-ack” (at AMQP level) which can have the above possible values. If we don’t set this application property, it means the same as “none” value so no feedback.

static private void SendCommand()
{
    string audience = Fx.Format("{0}/messages/devicebound", HOST);
    string resourceUri = Fx.Format("{0}/messages/devicebound", HOST);

    string sasToken = GetSharedAccessSignature(SHARED_ACCESS_KEY_NAME, SHARED_ACCESS_KEY, resourceUri, new TimeSpan(1, 0, 0));
    bool cbs = PutCbsToken(connection, HOST, sasToken, audience);

    if (cbs)
    {
         string to = Fx.Format("/devices/{0}/messages/devicebound", DEVICE_ID);
         string entity = "/messages/devicebound";

         SenderLink senderLink = new SenderLink(session, "sender-link", entity);

         var messageValue = Encoding.UTF8.GetBytes("i am a command.");
         Message message = new Message()
         {
              BodySection = new Data() { Binary = messageValue }
         };
         message.Properties = new Properties();
         message.Properties.To = to;
         message.Properties.MessageId = Guid.NewGuid().ToString();
         message.ApplicationProperties = new ApplicationProperties();
         message.ApplicationProperties["iothub-ack"] = "full";

         senderLink.Send(message);
         senderLink.Close();
    }
}

As we can see, the sending path “/messages/devicebound” hasn’t any information about the target device. To do that, the service need to set the To AMQP system property to the following value :

/devices/<DEVICE_ID>/messages/devicebound

where <DEVICE_ID> is the id assigned to the device when we create it inside the identity registry.

Finally, it’s importat to notice that the C2D endpoint queue can hold at most 50 messages.

Receiving feedback

Using the ReceiverLink instance the service can receive feedback from the device calling the Receive() method.

static private void ReceiveFeedback()
{
     string audience = Fx.Format("{0}/messages/servicebound/feedback", HOST);
     string resourceUri = Fx.Format("{0}/messages/servicebound/feedback", HOST);

     string sasToken = GetSharedAccessSignature(SHARED_ACCESS_KEY_NAME, SHARED_ACCESS_KEY, resourceUri, new TimeSpan(1, 0, 0));
     bool cbs = PutCbsToken(connection, HOST, sasToken, audience);

     if (cbs)
     {
          string entity = "/messages/servicebound/feedback";

          ReceiverLink receiveLink = new ReceiverLink(session, "receive-link", entity);

          Message received = receiveLink.Receive();
          if (received != null)
          {
               receiveLink.Accept(received);
               System.Diagnostics.Trace.WriteLine(Encoding.UTF8.GetString(received.GetBody<byte[]>()));
          }

          receiveLink.Close();
     }
}

The received message has a body in JSON format with an array of records (feedback from more different devices) each with following properties :

  • OriginalMessageId : it’s the MessageId of the original command (message) sent from the service to the device;
  • Description : description result that is related to the possible outcomes (success, message expired, maximum delivery count exceeded, message rejected);
  • DeviceGenerationId : device generation id related to the device that sent the feedback for a specific command;
  • DeviceId : device id related to the device that sent the feedback for a specific command;
  • EnqueuedTimeUtc : timestamp related to the outcome (it means when the feedback was enqueued);

For a single feedback, the JSON should be as following :

[{"originalMessageId":"5aac3169-af00-4536-acdb-cb9ea6b3980e","description":"Success","deviceGenerationId":"635794823643795743","deviceId":"<device_id>","enqueuedTimeUtc":"2015-10-29T07:59:00.9772497Z"}]

The full source code

As for all examples related to my blog posts, I update sample from previous article on GitHub. Now you can find a simple console application and a UWP application that are able to send command to a device and receive related feedback.

Conclusion

It’s clear that for a service running in a Web Application or .Net Framework based application, the best solution is to use the official Nuget package. With this article, I covered the NON officially supported possibility to use an UWP application to control devices through the IoT Hub thanks to the AMQP .Net Lite library and a bunch of AMQP paths.

If you consider the great portability of this AMQP stack implementation, you could control your devices using a .Net Compact Framework app (on Windows Embedded Compact 2013) or … another device based on .Net Micro Framework !

🙂

Connecting to the Azure IoT Hub using an AMQP stack

Accessing to the Azure IoT Hub service is so simple using all the available SDKs that Microsoft provides as open source on GitHub. We can laverage on more different languages for different platforms : from C# for .Net and UWP (Universal Windows Platform) applications to Java, from NodeJS (using JavaScript) to C. In this way, we are able to coverage different hardware from higher level devices like BeagleBoard, Raspberry Pi 2, Minnowboard Max to very low constrained devices like Kinetis K64F (Freescale) and CC3200 (Texas Instruments).

Of course, using directly HTTP and AMQP protocols, we can access to the IoT Hub from other platforms (not certified yet) and it could be the scenario of the .Net Micro Framework because up to now there isn’t an official SDK for it. The current C# client implementation uses Task and async/await programming model very heavily that isn’t supported (yet) by the “little” child in the .Net frameworks family. One choice to connect to the IoT Hub from a .Net Micro Framework board is to use directly the underlying AMQP protocol without the abstraction layer provided by an SDK. In this case you need to know some protocol concepts and a bunch of paths to the IoT Hub entities used for communication between devices and Cloud.

The purpose of this post is to show how to do this using the AMQP .Net Lite library that provides an AMQP protocol stack written in C# for a lot of different platforms like .Net Framework, .Net Compact Framework, .Net Micro Framework, WinRT (so UWP applications too), Mono, Windows Phone and so on; of course it’s available as open source on GitHub.

IoT Hub : connection and device endpoints

The IoT Hub is reachable using an address that has the following format

<IOT_HUB_NAME>.azure-devices.net

that we can retrieve from the Azure portal after creating the new IoT Hub instance service. As for all the services inside the Service Bus family (queues, topics/subscriptions and event hubs) the IoT Hub needs an SSL/TLS connection for data encryption and server authentication; it means that we have to connect to the host address to the default AMQPS (AMQP Secure) port that is the 5671.

We can create a new device inside the registry and get related credentials information using the Device Explorer application you can download here. After getting all needed information we can set them into the code.

private const string HOST = "IOT_HUB_NAME.azure-devices.net";
private const int PORT = 5671;
private const string DEVICE_ID = "DEVICE_ID";
private const string DEVICE_KEY = "DEVICE_KEY";

Using above information we can create an instance of the Address class and using it to establish the connection with the host thanks to the Connection class.

address = new Address(HOST, PORT, null, null);
connection = new Connection(address);

Inside the IoT Hub architecture, each device has two endpoints for accessing the Cloud :

  • D2C (device to cloud) : the device uses this endpoint to send messages to the cloud both as telemetry data and feedback for a received command (on the other endpoint, see below). It means that when we send a command to the device, it replies with a feedback at application level to confirm that the command is acquired and it’s going to be executed. Of course, it’s always true for a rejected command by the device;
  • C2D (cloud to device) : the device receives commands on this endpoint for executing the requested action. As already said, the device sends a confirmation (or rejection) of received command to the cloud using the other endpoint (D2C);

At AMQP level the endpoints are accessible from different entity paths; if you know Service Bus queues, topics/subscriptions and event hubs we can think them in the same way.

The entity path for sending data for telemetry purpose is defined in the following way :

/devices/<DEVICE_ID>/messages/events

where <DEVICE_ID> is the id assigned to the device when we create it inside the identity registry.

The entity path for receiving command from the Cloud is defined in the following way :

/devices/<DEVICE_ID>/messages/deviceBound

and as for the previous entity you need to provide the <DEVICE_ID> in the path.

It means that after creating a connection and a session to our IoT Hub host we need to create two links to above entities (or nodes as defined in the AMQP spec). Using the programming model provided by AMQP .Net Lite library we have :

  • A SenderLink to the /devices/<DEVICE_ID>/messages/events node;
  • A ReceiverLink to the /devices/<DEVICE_ID>/messages/deviceBound node;

Authentication : sending the SAS token

IoT Hub offers a per-device authentication through a SAS token that we can generate starting from device id and device key. After connection establishment we need to send such token to a specific CBS (Claim Based Security) endpoint to authorize the access to the specific entity.

As usual for Azure services, the token has the following format :

SharedAccessSignature sig={signature-string}&se={expiry}&skn={policyName}&sr={URL-encoded-resourceURI}

The big difference is that the skn field is absent in our case using device credentials .To get the SAS token I used the same code from my Azure SB Lite library because it’s processed almost in the same way.

string audience = Fx.Format("{0}/devices/{1}", HOST, DEVICE_ID);
string resourceUri = Fx.Format("{0}/devices/{1}", HOST, DEVICE_ID);
            
string sasToken = GetSharedAccessSignature(null, DEVICE_KEY, resourceUri, new TimeSpan(1, 0, 0));
bool cbs = PutCbsToken(connection, HOST, sasToken, audience);

The PutCbsToken creates a new session and a new link to connect to the specific $cbs node always using the same TCP connection. The content of the message is well defined by the AMQP CBS draft spec. After sending the token we are authorized to access IoT Hub from the device.

Just a note : I’m using the Fx class provided by AMQP .Net Lite library to have the Format method that doesn’t exist in the String class for the .Net Micro Framework.

Sending telemetry data

Using the SenderLink instance the device sends data calling the simple Send() method and passing it a Message class instance contains the data to send.

The sender link is created inside a new AMQP Session (using the related class of AMQP .Net Lite library) and the great news is that, thanks to the multiplexing feature of AMQP protocol, we can use the same session for both sender and receiver links all inside the same TCP connection.

static private void SendEvent()
{
    string entity = Fx.Format("/devices/{0}/messages/events", DEVICE_ID);

    SenderLink senderLink = new SenderLink(session, "sender-link", entity);

    var messageValue = Encoding.UTF8.GetBytes("i am a message.");
    Message message = new Message()
    {
        BodySection = new Data() { Binary = messageValue }
    };

    senderLink.Send(message);
    senderLink.Close();
}

Running the code, we can interact with the device using the Device Explorer application to receive the messages it sends.

dev_exp_iot_hub_1

Receiving command and send feedback

Using the ReceiverLink instance the device can receive command from the service in the Cloud calling the Receive() method. In addition to the sending commands features, the IoT Hub provides a feedback feature at application level for them; it means that the device is able to send a confirmation of received command to the service to accept or reject it. If the device is offline and doesn’t receive the command, the IoT Hub provides a TTL (Time To Live) you can set on every single message so that the command isn’t delivered to the device when it comes back online if the timeout is expired; this feature avoids to deliver a command that makes sense only if it’s executed on the device in a short time.

The device doesn’t need to send the feedback as a message on a specific AMQP node/entity but it’s handled by the IoT Hub when the ReceiverLink accepts or rejects the command. Using AMQP .Net Lite we can call the Accept() or Reject() methods on the ReceiverLink instance; at AMQP level it means that a “disposition” performative is sent to the IoT Hub with an outcome of “accepted” or “rejected”. Receiving this outcome the IoT Hub sends a feedback message to the D2C endpoint on the Cloud service side. With such outcomes the message goes into a completed state (positive feedback to the Cloud) or dead letter state (negative feedback).

static private void ReceiveCommands()
{
    string entity = Fx.Format("/devices/{0}/messages/deviceBound", DEVICE_ID);

    ReceiverLink receiveLink = new ReceiverLink(session, "receive-link", entity);

    Message received = receiveLink.Receive();
    if (received != null)
         receiveLink.Accept(received);

    receiveLink.Close();
}

Pay attention on the available Release() method in the library; in this case the outcome is “released” and the message returns into the command queue (enqueued state) ready to be re-delivered to the device if it calls the Receive() method again. If the device receives the messages more times and always calls the Release() method, the IoT Hub moves it into the dead letter state (removing it from the command queue) if the messages reaches the max delivery count; the same happens if the device doesn’t call neither Accept() nor Reject() methods and the TTL expires.

IoT Hub message lifecycle

IoT Hub message lifecycle

Executing the code and using Device Explorer to send the command we can see the feedback from the device too.

dev_exp_iot_hub_2

The full source code

The full source code I showed in the previous paragraphs is available on GitHub and it has projects for .Net Framework (so you can test very quickly it on your PC), generic .Net Micro Framework (for testing on your real device) and a third project for Netduino 3 WiFi as example of embedded device.

Of course, you can use any other board that support .Net Micro Framework and SSL/TLS protocol that is needed to connect to the IoT Hub. Other then Netduino 3 board, there are the FEZ Raptor and FEZ Spider from GHI Electronics (soon an example using them).

Conclusion

Knowing some AMQP concepts and some node paths you can find in the official IoT Hub Developer Guide, we are able to create an IoT Hub client using whatever AMQP stack implementation that in this example is AMQP .Net Lite; you can understand that it’s what the official IoT Hub client does creating an abstraction layer on top of it.

In this way we can add any other platform (not officially supported) like the .Net Micro Framework to the set of available devices for our Internet of Things solution based on IoT Hub.

An IoT platforms match : Microsoft Azure IoT vs Amazon AWS IoT

Overview : IoT reference architecture

A complete IoT solution is made of different parts. First of all, we need to ingest all the events and data sent from devices and it’s a such big problem because in the Internet of Things era we have to think at “scale” with hundreds, thousands, million and … billion of devices. In this scenario, we have to use an ingestion system that is able to scale and handle incoming data very quickly without slowing down the entire process : we talk about “telemetry” pattern.

After acquiring data, the ingestion system must provide them to the business engine (aka back end) of our solution that could have a “hot” path for analyzing data as a stream in real time and a “cold” path for storing data and analyzing them for future analysis : we can consider it a “big data” problem. Both paths could expose these information to the end user that can monitor the devices and what they are “saying” from the real world. The same information are very useful as input for a machine learning system that can help us for predictive analysis to understand how data could evolve in the future based on current incoming values and take preventive actions.

In this scenario, we can’t forget the opposite path from our cloud based system to the devices. In most cases we need to interact with them using the “command” and “notification” patterns; with commands we are able to “speak” to the devices so that they can execute some actions on our behalf and with notifications we can provide some information they need during their lifetime. Our solution needs a system who provides us the above opposite path and in most cases it could be the same ingestion system already capable to handle the huge number of devices in the field at large scale. For this reason, we can generalize saying that we need a “gate” for the devices to the cloud and vice versa and it can be simply called Cloud Gateway.

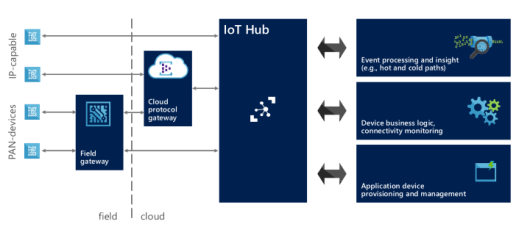
All the devices could be able to access this gateway directly if they are IP capable (for example using an Ethernet or WiFi connection) so with TCP/IP stack support; for very low constrained devices with PAN (Personal Area Network) protocols support (for example using Bluetooth Low Energy, Zigbee, Z-Wave but you can consider AllJoyn framework too) we need a field gateway who acts as a local gate for accessing to the cloud. This gateway has the protocol translation role (from low level and local protocols to wide area protocols) and could be able to execute local storing, filtering and processing actions on received data before sending them to the cloud. Of course, it could be the entry point for our local system for all commands and notifications received from cloud to deliver to devices.

IoT reference architecture (from IoT Hub documentation)

IoT reference architecture (from IoT Hub documentation)

After the above brief analysis on all main parts of an IoT solution, we can say that the main part is the Cloud Gateway related to handle a huge number of devices at scale and a lot of incoming messages per second into the system.

For this reason, big companies started to develop their solutions to provide such a gateway and simplify the ingestion and communication part of an IoT solution. On September 29th, Microsoft announced its Azure IoT Hub and on October 9th, Amazon replied with its AWS IoT platform : based on my experience on IoT Hub and what I read about AWS IoT, I’d like to compare these two Cloud Gateway implementations only describing their features; it’s up to you what’s the platform that fits well for your IoT business.

A brief introduction : IoT Hub vs AWS IoT

IoT Hub is the new entry in the Microsoft Azure offer; it’s a service that enables bi-directional communication between devices and our business engine (aka back end) in the cloud. The communication channel is reliable and secure and the authentication is per-device using credentials and access control.

IoT architecture with IoT Hub

IoT architecture with IoT Hub

Thanks to its bi-directional nature, the messages between devices and cloud travel in both directions along the established channel. Each device has two endpoints to interact with IoT Hub :

  • D2C (device to cloud) : the device uses this endpoint to send messages to the cloud both as telemetry dataoutcome for a received command or request for execution;
  • C2D (cloud to device) : the device receives commands on this endpoint for executing the requested action. The IoT Hub generates a feedback at application level to confirm that the command is acquired by the device and it’s going to be executed;

On the cloud side, the IoT Hub exposes two similar endpoints :

  • C2D (cloud to device) : the back end system can use this endpoint to send messages (for example commands) to the devices. This endpoint acts like a queue and each message has a TTL (Time To Live) so that it’s removed from the queue if the timeout expires (it’s useful to have commands executed in a short period of time and not executed too late when an offline device comes back online but the execution isn’t needed at that time because it could be harmful). The back end system can receive a confirmation message or delivery fault to understand if device has received command or not;
  • D2C (device to cloud) : it’s an Event Hubs compatible endpoint used by the back end system to retrieve messages from device (telemetry data or outcome for commands). On a different path, there are feedbacks on command delivery (successful or not). “Event Hubs compatible” means that we can use an Event Hub client to receive messages from this endpoint (for example using an Event Processor Host implementation);

IoT Hub has an identity registry where it stores all information about provisioned devices. This information aren’t related to devices metadata (they are up to you in your IoT solution that uses IoT Hub, for example manufacturer and firmware/software version info) but are related to identity and authentication. It provides monitoring information like connection status (connected/disconnected) and last activity time; you are also able to enable and disable the devices using this registry. Of course, IoT Hub exposes another endpoint (device identity management) to create, retrieve, update and delete devices.

AWS IoT has the same objectives as IoT Hub but reaches them in a different way.

AWS IoT data services

AWS IoT data services

The main concept in this IoT platform is the device “state”. The devices (named things) are able to report their state by publishing messages to the message broker through topics; the broker deliveries received messages to all client subscribed on the specific topics. In the above description we can recognize all MQTT protocol related concepts like publish/subscribe pattern and topics and it’s true because AWS IoT is strongly based on this protocol.

The device state is strictly related to the thing shadow object that stores and retrieves state information. The state (named last reported state) sent from device is stored in the related thing shadow and an application can request a change to the device state (named desired state) writing to the things shadow so that the desired state is replicated to the real device by the message broker; after changing its internal state, the device replies with the new state that is stored as new reported state in the thing shadow. From an implementation point of view, the thing shadow is a JSON document and it means that the payload for all exchanged messages is always a JSON document too; real devices send reported state and receive desired state with this data representation format.

AWS IoT provides the telemetry data to the system publishing states from devices to cloud; the platform provides the command pattern changing the desired state for a thing shadow (of course changing the state for a device means to request an action).

Finally, AWS IoT has a thing registry that contains devices related information and allows to add custom attributes that are part of the devices metadata (for example manufacturer, serial number, …). The interaction with the thing registry to create, delete and update things is enabled with the AWS CLI (Command Line Interface) that provides all such operations.

SDKs : languages and platforms supported

Even if we can access to the IoT Hub using open standard protocols (like HTTP and AMQP as we’ll see in the next chapters), Microsoft provides different SDKs for different languages and platforms. Of course, we have .Net SDK for pure .Net Framework applications and UWP (Universal Windows Platform) applications running on Windows 10 devices (included the IoT version, Windows 10 IoT Core); other SDKs are for Java and NodeJS (JavsScript) developers. The great news is related to the availability of an SDK for C (ANSI C99) for portability and broad platform compatibility; it can be used on very low constrained devices with only C language support.

With .Net SDK we also have the service part used in the back end system to handle identity registry and send messages to the device; only for NodeJS applications there is a dedicated codebase.

All SDKs are open source and available on GitHub.

AWS IoT enables devices to access to the cloud using standard protocols (like HTTP and MQTT) but Amazon provides some SDKs to simplify developers life. First of all, an SDK for embedded C language (ANSI C99) that is cross platform and that can be used on different hardware and operating systems (for low constrained devices with RTOS too). The SDK adds an abstraction layer on top of all actions needed for accessing the message broker that are related to the security of the channel, the MQTT based communication for publishing and subscribing messages to topics and finally all the operations related to thing shadows for updating, retrieving and deleting them. A NodeJS SDK is also available for powerful platforms and finally another SDK just only for Arduino Yun board.

The SDKs are all open source and available on GitHub at following links for embedded C, NodeJS and Arduino Yun.

Security and Authentication

The connection established between devices and IoT Hub is TLS (Transport Layer Security) based so that the communication is encrypted to guarantee data confidentiality; the server is authenticated thanks to its own X.509 certificate sent to the device during the TLS handshaking.

The device and service authentication is handled with access control and credentials. With access control, the IoT Hub defines a set of permissions to grant access to all exposed endpoints; these permissions are related to read-only identity registry, read/write identity registry, device connection to the related endpoints for device to cloud communication and finally service connection to the related endpoints for cloud to device communication. We can grant permissions with hub-level shared access policies (default policies are already defined) or with per-device security credentials that grant the device connection permission on endpoints related to the specific device.

The authentication is provided by IoT Hub verifying a token (sent from the device) against the shared access policies and device identity registry security credentials. As for many other services on Azure, the token is a SAS (Shared Access SIgnature) token with same format and it’s processed starting from resource URI (the endpoint path), the expiry time, the policy name and an HMAC-SHA256 signature string. The symmetric keys (primary and secondary) related to the device credentials are never sent on the communication channel.

AWS IoT relies on TLS protocol so that the communication with the message broker is encrypted and the client is authenticated using the mutual authentication (so with X.509 client certificate too). The certificates can be created, activated and revoked using the AWS CLI or the AWS online console; of course we can also use a certificate that is already in our possession. Once we have the certificate, we need to attach it to a policy and the thing itself.

AWS IoT doesn’t support an identity principals based on X.509 certificates only but it supports IAM service (users, groups and roles) and Amazon Cognito service. As guide lines, the X.509 should be used with MQTT based application, the IAM service with HTTP and Cognito with end user applications (for example on smartphones) thanks to the support for different identity providers (like Facebook, Google and so on).

Protocols : AMQP, MQTT, HTTP and the others

Today, AMQP 1.0 is already the official supported protocol for all Azure services under Service Bus umbrella like queues, topics/subscriptions and event hubs. Microsoft focused on this protocol (as part of the committee for the standard) and decided to adopt it for IoT Hub too. Of course, HTTP protocol is supported too. We could consider AMQP the better choice for majority of scenarios to avoid polling nature of HTTP (from device) due to the lack of server push feature (available with AMQP)

It’s possible to support additional protocols using the Azure IoT Protocol Gateway framework that provides protocol adaptation from a different protocol (MQTT or any other custom protocol) to AMQP with direct access to the IoT Hub. This is an open source project (available on GitHub) that has a built in support for MQTT 3.1.1 but provides a simple programming model for building protocol adapters for other protocols. Additional features of the protocol gateway are custom authentication, message transformations, compression/decompression and encryption/decryption of traffic. Finally, it can be deployed locally such as field gateways or as Cloud Services worker role on Azure.

MQTT (3.1.1), we spoken about, is the official supported protocol for AWS IoT that the message broker uses for publishing and subscribing messages on topics. Even if MQTT is a standard, the broker supports it with some variations : for example it doesn’t support retained messages, persistent sessions and QoS level 2. For more information on this support and main differences, we can find a deep description on official AWS IoT protocols page. The HTTP protocol is supported too even if it’s limited to publish messages using a REST API (POST method only).

Hardware : the set of certified boards

Related to hardware platforms, Microsoft started the Microsoft Azure Certified for IoT program for trusted partners with tested and certified offerings. All these platforms are able to access to the IoT Hub using already mentioned SDKs in all supported different languages. Today we have Intel, Raspberry Pi, Freescale (with Kinetis K64F MCU based on ARM mbed platform), Texas Instruments (with CC3200 based on TI-RTOS), MinnowBoard, BeagleBoard, Seeed, Resin.io and Arrow (with Qualcomm board). Of course, this program is open and all companies can be part of it with a huge opportunity to make their platforms compatible with the Azure IoT offer.

Microsoft Azure Certified Internet of Things

Microsoft Azure Certified Internet of Things

As Microsoft, Amazon provides some starter kits to move quickly from idea to prototype. There are well known high level boards like the Qualcomm Dragonboard (C and NodeJS), BeagleBone (C and NodeJS), Intel Edison (C and NodeJS) and some boards with very low constrained devices like Renesas (with Micrium OS), Microchip and finally TI CC3200 (with TI-RTOS). All the high level boards enable AWS IoT on Linux as operating system and we have compatibility for both C and NodeJS SDKs; the constrained devices board enable AWS IoT on specific OS for embedded systems (like Micrium OS and TI-RTOS).

AWS IoT Starter Kits

AWS IoT Starter Kits

Of course you can simply use your own hardware using the C language SDK or using JavaScript if you can run NodeJS.

Messages : exchanging data on the wire

The IoT Hub messages exchanged on the wire reflect a lot of features of the underlying AMQP protocol. A message has an opaque payload to carry data in user defined formats (for example binary, XML, JSON and so on) and one or more properties both at system (interpreted by IoT Hub) and application level. In the set of the system properties we can recognized message id and correlation id that are useful for request/reply pattern implementation (as supported by AMQP protocol natively). Using the HTTP protocol, the payload is carried inside the HTTP body and the properties as HTTP headers.

Other than using the message broker for custom topics, the AWS IoT enables the interaction with thing shadows. The thing shadow is a JSON document used to store and retrieve current state information for a device. All the available operations (update, get and delete) are supported through both MQTT and a RESTful API over HTTPS. Regarding MQTT usage, there are some reserved topics in the message broker to interact with thing shadows that make available the request/reply pattern on top of MQTT.

Prices, Quotas and Throttling

The IoT Hub price is defined starting from the IoT Hub unit concept related to the maximum number of device connected and the number of messages transmitted per day. Each unit allows to handle up to 500 devices and we can allocate a maximum number of 200 units. Of course, the IoT Hub provides operation throttles for all types of operation like identity registry operations, device connection and finally device to cloud and cloud to device operations. To try out the IoT Hub for free there is a free tier who enables to connect up to 10 devices with a maximum of 3,000 messages per day (from all devices). Pay attention that current price reflects a preview discount of 50%. For more information here.

The AWS IoT pricing is based on million messages exchanged quota. The total cost is evaluated both on publishing and delivering messages from/to devices and applications. A message is a 512-byte block of data processed by AWS IoT. To start trying the platform we can create a account and use the free tier who gets you started with 250,000 free messages (published or delivered) per month, for 12 months without limitations on the number of connected devices. For more information here.

Next ? What’s after ingestion ?

If you consider only the ingestion role of the IoT Hub you could ask what we can do with all data received from our devices. The simpler answer is to develop a back end application on your own for reading messages from the IoT Hub (using an Event Processor Host for example) and process them (analyzing, storing, showing, …). Of course, Microsoft Azure provides a lot of other services out of box like Stream Analytics which may be coupled with the output event hubs compatible endpoint to receive all data and execute real time analysis on them to raise alert or produce messages for other systems like Service Bus (queues and topics). The Machine Learning service is available to get data and execute predictive analysis with a lot of available predefined models (or we can create a custom model related to our business). The Power BI provides us a great way to show information to the end users. Of course, we can add all storage services (SQL, NoSQL, blob, cache) for long term or short term storage. To simplify developing your IoT solution, Microsoft has the Azure IoT Suite that provides some out of box solutions (up today only one solution is available for remote monitoring) that use different services (Stream Analytics, Machine Learning, Power BI, DocumentDB, ASP.NET Web site) to enable you to start rapidly (create, update, delete and monitoring devices from a web interface) and customize the solution as you need.
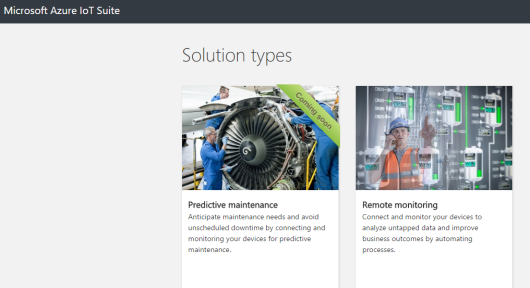
Azure IoT Suite

Azure IoT Suite

Amazon offers the same type of integration between the AWS IoT service and all the other available services and it’s possible thanks to the Rules Engine. We can define one or more rules that has some conditions and related actions. For each rule we can grant permission and attach it to a policy; in this way when the rules engine receives messages from the message broker published on specific topic (from a thing), the action (related to the rule) is executed. This engine provides the integration with all other services like DynamoDB (as NoSQL database) for storing information, Lambda to invoke function code for extracting useful data, S3 for storing file and finally Kinesis to process data as stream in real time.

AWS IoT to AWS services

AWS IoT to AWS services

 Conclusion

One big problem … handling million of devices and messages per second … monitoring and controling them remotely … more platforms to do it in the simpler manner “without reinvent the wheel” … the choice is up to you ! What’s the better solution for your IoT business ?

Microsoft and Amazon developed their platforms with different choices starting from the underlying protocols used for communication : AMQP vs MQTT. Microsoft already used AMQP for all services under Service Bus umbrella so it seems to be a logical choice for IoT Hub. Regarding Amazon, I can only suppose that the choice is related to the acquisition of 2lemetry company that developed its IoT platform using MQTT (of course, it’s only a supposition). Both the platforms support HTTP that is a well known protocol used by developers for a lot of cloud applications.

The mechanisms to provide “telemetry” pattern could be considered quite similar but the mechanism for “command” pattern with a request/reply path is quite different; it’s a built in feature for AMQP but needs an additional layer on top of MQTT.

The way to “think” the interaction with devices is different; it’s based on messages exchanges in the IoT Hub and more strictly related to the device state concept in AWS IoT thanks to the thing shadows. On the first side we have a message who can carry application data and commands for actions; on the other side we have the state representation through a JSON document (of course carried inside an MQTT message). It’s like to have one more data abstraction layer in AWS IoT.

The security implementations are quite similar considering TLS protocol usage and the identity is handled in a different way but with almost the same results.

Regarding the hardware and SDKs, thanks to the C language support for both IoT platforms we have quite similar solutions. Of course, Microsoft adds the .Net and UWP based SDK.

Pricing is completely different and it could be one reason for your choice depending on your IoT business.

I’d like to leave you with two brief official videos where the above platforms are showed : the “Overview of Azure IoT Hub” at AzureCon 2015 and “Introducing AWS IoT” at AWS re:Invent 2015.

Last but not least a comparison table with main features for both platforms.

Microsoft Azure IoT Hub Amazon AWS IoT
Protocols HTTP, AMQP, MQTT and custom protocols (using protocol gateway project) HTTP, MQTT
Communication Patterns Telemetry, Command Telemetry, Command (state change)
Certified Platforms Intel, Raspberry Pi 2, Freescale, Texas Instruments, MinnowBoard, BeagleBoard, Seeed, resin.io Broadcom, Marvell, Renesas, Texas Instruments, Microchip, Intel, Mediatek, Qualcomm, Seeed, BeagleBoard
SDK / Language .Net and UWP, Java, C, NodeJS C, NodeJS
Security TLS (only server authentication) TLS (mutual authentication)
Authentication Per-device with SAS token X.509 certificate client authentication, IAM service, Cognito service
Pricing Paying for IoT Hub unit related to number of devices and messages per days Paying million messages traffic (published from devices + delivered to devices)

[Update October 15th 2015]

I just like to highlight the more complete comparison table by Toby McClean inspired by my article to add the last big company IoT platform : IBM IoT Foundation (on Bluemix). You can find this table here.

[Update February 5th 2016]

Yesterday, the Azure IoT Hub was released as GA and there are some changes on its offer starting from the natively support for MQTT 3.1.1 protocol. You can find more information at this new blog post.