Qpid

Internet of Things : reactive and asynchronous with Vert.x !

vertx_iot

I have to admit … before joining Red Hat I didn’t know about the Eclipse Vert.x project but it took me few days to fall in love with it !

For the other developers who don’t know what Vert.x is, the best definition is …

… a toolkit to build distributed and reactive systems on top of the JVM using an asynchronous non blocking development model

The first big thing is related to develop a reactive system using Vert.x which means :

  • Responsive : the system responds in an acceptable time;
  • Elastic : the system can scale up and scale down;
  • Resilient : the system is designed to handle failures gracefully;
  • Asynchronous : the interaction with the system is achieved using asynchronous messages;

The other big thing is related to use an asynchronous non blocking development model which doesn’t mean to be multi-threading but thanks to the non blocking I/O (i.e. for handling network, file system, …) and callbacks system, it’s possible to handle a huge numbers of events per second using a single thread (aka “event loop”).

You can find a lot of material on the official web site in order to better understand what Vert.x is and all its main features; it’s not my objective to explain it in this very short article that is mostly … you guess … messaging and IoT oriented  🙂

In my opinion, all the above features make Vert.x a great toolkit for building Internet of Things applications where being reactive and asynchronous is a “must” in order to handle millions of connections from devices and all the messages ingested from them.

Vert.x and the Internet of Things

As a toolkit, so made of different components, what are the ones provided by Vert.x and useful to IoT ?

Starting from the Vert.x Core component, there is support for both versions of HTTP protocol so 1.1 and 2.0 in order to develop an HTTP server which can expose a RESTful API to the devices. Today , a lot of web and mobile developers prefer to use this protocol for building their IoT solution leveraging on the deep knowledge they have about the HTTP protocol.

Regarding more IoT oriented protocols, there is the Vert.x MQTT server component which doesn’t provide a full broker but exposes an API that a developer can use in order to handle incoming connections and messages from remote MQTT clients and then building the business logic on top of it, so for example developing a real broker or executing protocol translation (i.e. to/from plain TCP,to/from the Vert.x Event Bus,to/from HTTP,to/from AMQP and so on). The API raises all events related to the connection request from a remote MQTT client and all subsequent incoming messages; at same time, the API provides the way to reply to the remote endpoint. The developer doesn’t need to know how MQTT works on the wire in terms of encoding/decoding messages.

Related to the AMQP 1.0 protocol there are the Vert.x Proton and the AMQP bridge components. The first one provides a thin wrapper around the Apache Qpid Proton engine and can be used for interacting with AMQP based messaging systems as clients (sender and receiver) but even developing a server. The last one provides a bridge between the protocol and the Vert.x Event Bus mostly used for communication between deployed Vert.x verticles. Thanks to this bridge, verticles can interact with AMQP components in a simple way.

Last but not least, the Vert.x Kafka client component which provides access to Apache Kafka for sending and consuming messages from topics and related partitions. A lot of IoT scenarios leverage on Apache Kafka in order to have an ingestion system capable of handling million messages per second.

Conclusion

The current Vert.x code base provides quite interesting components for developing IoT solutions which are already available in the current 3.3.3 version (see Vert.x Proton and AMQP bridge) and that will be available soon in the future 3.4.0 version (see MQTT server and Kafka client). Of course, you don’t need to wait for their official release because, even if under development, you can already adopt these components and provide your feedback to the community.

This ecosystem will grow in the future and Vert.x will be a leading actor in the IoT applications world based on a microservices architecture !

A routing IoT gateway to the Cloud

Let’s start with an on-premise solution …

Imagine that you have an embedded solution (or if you like it … an IoT solution) with a bunch of tiny devices which are connected to an on-premise server which receives telemetry data from them and is able to execute some elaboration in order to show information in real time on a dashboard and control the devices.

Imagine that your solution is based on the AMQP protocol and perhaps your on-premise server is running a messaging broker for gathering data from devices as messages through the local network.

Imagine that, due to your very constrained devices, the security in the network is guaranteed only at data level by encrypting the body of every single AMQP message. It’s possible that due to their complexity and need of more resources (CPU and memory) you can’t use sophisticated algorithms (i.e. DES, 3DES, AES, …) on your devices but only simple ones (i.e. TEA, ..).

Your solution is just working great in your environment.

… but now we want to move it to the Cloud

Imagine that for some reasons you need to change the on-premise nature of your solution and you want to connect the devices directly to the cloud with a very strict rule : nothing to change on the devices. At least you can change some configuration parameter (i.e. server ip, …) but not the way and the protocol they are using for communication.

The first simple solution could be moving your messaging broker from the on-premise server on a IaaS in the Cloud; just changing connection parameters on your devices and all continue to work as before.

The big problem now is that your data are sent through the public network and your security is based on a simple encryption algorithm applied only on the payload of the messages. For this reason, you start to think about using SSL/TLS in order to have security at connection level on top of TCP/IP, data encryption and server authentication.

Start to think about it but then … wait … I can’t use SSL/TLS on my tiny devices … they don’t have the needed resources in terms of CPU and memory … and now ?

Fog computing and IoT gateway : the solution ?

You know about “fog computing” (the new buzz word after IoT ?) and that you can solve your problem using an IoT gateway. Having this gateway could mean to have an intelligent piece of software which is able to gather data from the local network, process them in some way and then send them to the Cloud. The gateway could give you more features like filtering on data (sending only part of them), offline handling (if the Cloud isn’t reachable) and complex local processing but … wait … you don’t want it … you just want that data arrives to the Cloud in the same way as before (to the on-premise server) and for now you don’t need other additional great features.

Could we have a very simple IoT gateway with only the two following features we need :

  • SSL/TLS protocol support on behalf of the tiny devices;
  • traffic routing from devices to the Cloud in a transparent way;

The answer is … yes ! You have such solution and it’s provided by the Qpid Dispatch Router project from the ASF (Apache Software Foundation).

I already wrote about it in some previous articles [1] [3] so let me just show how you can use the router in a way that solve your “porting” problem.

The router just needs the right configuration

In order to show in a very simple way how to configure the router for our objective, we can use the Azure IoT Hub as Cloud platform for the IoT. As all the Azure messaging services like Service Bus and Event Hub, the IoT Hub needs an encrypted connection based on the SSL/TLS protocol … so it’s the problem we want to solve for our non SSL capable devices.

For the sake of simplicity we can run the router on a Raspberry Pi using the Raspbian distribution as OS; you can read about installing the Qpid Dispatch Router on Linux and on the Raspberry Pi in these articles [2] [4].

The main point is the configuration needed for the router in order to connect to an IoT Hub and routing the traffic from devices to it.

First of all we have to consider all the addresses that at AMQP level are used in order to send telemetry data to the hub, receive commands and reply with feedback. All these information are deeply explained here [5] [6].

The routing mechanism used in this configuration is the “link routing” [3] which means that the router creates a sort of “tunneling” between devices and the IoT Hub; it opens the TCP/IP connection with the hub, establishing it with SSL/TLS on top, and then opens the AMQP connection. All the SSL/TLS stuff happens between router and IoT Hub and the devices aren’t aware about it. You can see what happens through the router trace :

pi@raspberrypi:~ $ PN_TRACE_FRM=1 qdrouterd --conf ex06_iothub.conf
Sat Jul 23 11:56:17 2016 SERVER (info) Container Name: Router.A
Sat Jul 23 11:56:17 2016 ROUTER (info) Router started in Standalone mode
Sat Jul 23 11:56:17 2016 ROUTER_CORE (info) Router Core thread running. 0/Router.A
Sat Jul 23 11:56:17 2016 ROUTER_CORE (info) In-process subscription M/$management
Sat Jul 23 11:56:18 2016 ROUTER_CORE (info) In-process subscription L/$management
Sat Jul 23 11:56:18 2016 AGENT (info) Activating management agent on $_management_internal
Sat Jul 23 11:56:18 2016 ROUTER_CORE (info) In-process subscription L/$_management_internal
Sat Jul 23 11:56:18 2016 DISPLAYNAME (info) Activating DisplayNameService on $displayname
Sat Jul 23 11:56:18 2016 ROUTER_CORE (info) In-process subscription L/$displayname
Sat Jul 23 11:56:18 2016 CONN_MGR (info) Configured Listener: 0.0.0.0:5672 proto=any role=normal
Listening on 0.0.0.0:5672
Sat Jul 23 11:56:18 2016 CONN_MGR (info) Configured Connector: ppatiernoiothub.azure-devices.net:5671 proto=any role=on-demand
Sat Jul 23 11:56:20 2016 POLICY (info) Policy configured maximumConnections: 0, policyFolder: '', access rules enabled: 'false'
Sat Jul 23 11:56:20 2016 SERVER (info) Operational, 4 Threads Running
Connected to ppatiernoiothub.azure-devices.net:5671
[0x19dc6c8]: -> SASL
[0x19dc6c8]:0 -> @sasl-init(65) [mechanism=:ANONYMOUS, initial-response=b"anonymous@raspberrypi"]
[0x19dc6c8]: -> AMQP
[0x19dc6c8]:0 -> @open(16) [container-id="Router.A", hostname="ppatiernoiothub.azure-devices.net", max-frame-size=65536, channel-max=32767, idle-time-out=60000, offered-capabilities=:"ANONYMOUS-RELAY", properties={:product="qpid-dispatch-router", :version="0.6.0"}]
[0x19dc6c8]: <- SASL
[0x19dc6c8]:0 <- @sasl-mechanisms(64) [sasl-server-mechanisms=@PN_SYMBOL[:EXTERNAL, :MSSBCBS, :ANONYMOUS, :PLAIN]]
[0x19dc6c8]:0 <- @sasl-outcome(68) 
[0x19dc6c8]: <- AMQP
[0x19dc6c8]:0 <- @open(16) [container-id="DeviceGateway_1766cd14067b4c4b8008b15ba75f1fd6", hostname="10.0.0.56", max-frame-size=65536, channel-max=8191, idle-time-out=240000]

At this point, the devices can connect locally to the router and when they asked for all the AMQP links related to the IoT Hub addresses, they will be tunneled by the router : the AMQP “attach” performatives are routed to the IoT Hub through the connection with the router. The communication then continues on this link in terms of message transfers directly between IoT Hub and devices but all encrypted until the router through the SSL/TLS protocol.router_iothub

The router configuration is something like that :

listener {
 addr: 0.0.0.0
 port: 5672
 authenticatePeer: no
}

ssl-profile {
 name: azure-ssl-profile
 cert-db: /opt/qdrouterd/Equifax_Secure_Certificate_Authority.pem
}

connector {
 name: IOTHUB
 addr: <iotHub>.azure-devices.net
 port: 5671
 role: on-demand
 sasl-mechanisms: ANONYMOUS
 ssl-profile: azure-ssl-profile
 idleTimeoutSeconds: 120
}

# sending CBS token
linkRoute {
 prefix: $cbs/
 connection: IOTHUB
 dir: in
}

# receiving the status of CBS token request
linkRoute {
 prefix: $cbs/
 connection: IOTHUB
 dir: out
}

# sending telemetry path and command replies from device to hub on : devices/<DEVICE_ID>/messages/events
# ATTENTION ! Here we need CBS Token
linkRoute {
 prefix: devices/
 connection: IOTHUB
 dir: in
}

# receiving command on device from hub on : devices/<DEVICE_ID>/messages/deviceBound
# ATTENTION ! Here we need CBS Token
linkRoute {
 prefix: devices/
 connection: IOTHUB
 dir: out
}

The main points in the configuration are :

  • a listener entity which defines that the router accept incoming AMQP connections on port 5672 (not encrypted);
  • the ssl-profile entity in order to configure the parameter for SSL/TLS connection to the IoT Hub and specifically the CA certificate to use for server authentication;
  • the connector entity which defines the way the router connects to the IoT Hub (address and port) using the above SSL profile;

After above parameters there is a bunch of linkRoute entities which define what are the addresses that should be link routed by the router from devices to the hub (using the specified connector).

You can find the complete configuration file here.

The Netduino Plus 2 use case

In order to develop an application very quickly on device side I decided to use my knowledge about .Net Micro Framework using a board that hasn’t the SSL/TLS support : the Netduino Plus 2 board.

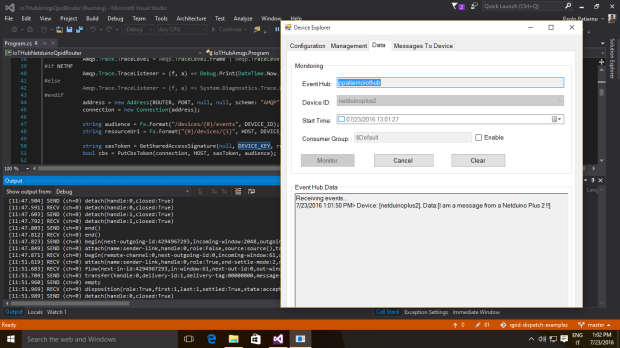
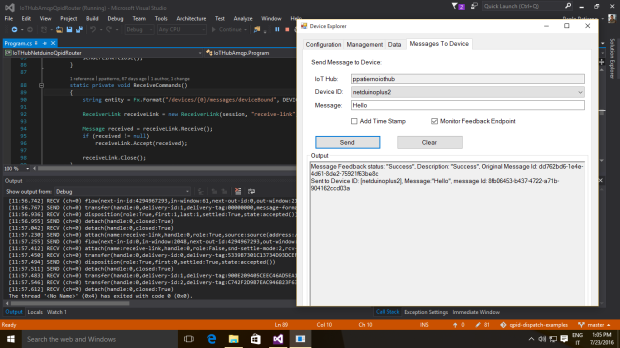
The simple application is able to send a message to the IoT Hub and receive a new one replying with a feedback. All the code is available here.

In the following pictures you can see the message sent by the board and the command received (with the related feedback) through the Device Explorer tool.

01

02

Conclusion

Of course, the Qpid Dispatch Router project has a greater object than I showed here that could be providing connection to messaging services at scale thanks a more complex router network, with a path redundancy feature to reach a broker or a simple receiver.

In this article, I just showed a different way to use it in order to give more power to tiny devices which aren’t able to connect to AMQP based services due to their limitation (in this case the lack of SSL/TLS support).

If you consider the starting point, the configuration change could be avoided because the router could have same IP address and AMQP listening port as the previous on-premise server .

It means that only adding the router configured for the Cloud connection solves the problem !

[1] Routing AMQP : the Qpid Dispatch Router project

[2] Qpid Dispatch Router installation on your Linux machine

[3] Routing mechanisms for AMQP protocol

[4] My Raspberry Pi runs the Qpid Dispatch Router

[5] Connecting to the Azure IoT Hub using an AMQP stack

[6] Azure IoT Hub : commands and feedback using AMQP .Net Lite

My Raspberry Pi runs the Qpid Dispatch Router

This morning my “embedded” soul had an idea for supporting my “messaging” soul and spending some time in a productive way … trying to compile the Qpid Dispatch Router on a different machine with a different architecture : it’s C/C++ code … so it’s portable by definition (even if related to Linux for now) … it uses Python but today this language is available on a lot of different platforms … so it seems to be no problems.

Searching for some embedded stuff in my closet and discarding Cortex-Mx based boards (for obvious reasons regarding Linux lack on them) I got my Raspberry Pi … the first version (ARM11 based … not Cortex-Ax) 🙂

embedded_stuff

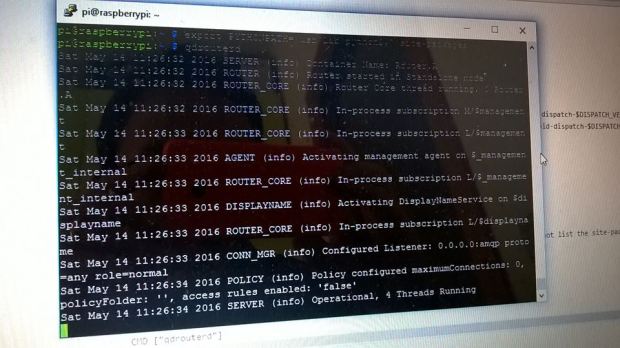
I have the Pi2 as well (I have to by the third version) but I preferred to stop my research for starting immediately. I followed all the steps needed (explained in my previous article) using the Pi as a normal PC (connected via SSH) and after a while for compiling directly on the board, the router was up and running !

router_pi

The only tweak needed was to force cmake to use the Python 2.7 library with following command line :

cmake .. -DCMAKE_INSTALL_PREFIX=/usr -DPYTHON_LIBRARY=/usr/lib/arm-linux-gnueabihf/libpython2.7.so -DPYTHON_INCLUDE_DIR=/usr/include/python2.7 -DPYTHON_EXECUTABLE=/usr/bin/python

because the 3.x version is installed on the Pi as well but we can’t use it for the router.

I know .. it’s not the right way to compile source code for embedded devices and cross-compilation from my PC is the better way to do that but I preferred it in order to go fast and avoid to setup a complete ARM toolchain on the laptop; of course be patient … building the Qpid Proton took me about one hour ! I can suggest you to have a good coffee …

Before starting the router, another simple tweak was needed in order to make persistent the value of the PYTHONPATH environment variable writing the following line to the .bashrc file :

export PYTHONPATH=/usr/lib/python2.7/site-packages

Now I have an idea … Pi with its Linux version is SSL/TLS capable but there are a lot of resources constrained devices which are able to “speak” AMQP but can’t support SSL/TLS connections. Why don’t use the Pi as a “shadow” IoT gateway and it’s security capabilities in order to bring above constrained devices to reach SSL/TLS and AMQP based cloud platforms even if they can’t “speak” SSL/TLS ?

Routing mechanisms for AMQP protocol

In the previous article, we installed the Qpid Dispatch Router and had a quick overview about the available tools inside the installation package for both router management and monitoring.

Now it’s time to start using the router from simple to complex configurations and network topologies with some examples which will involve AMQP senders, receivers and/or brokers. The broker part won’t be always necessary because the AMQP protocol is a “peer to peer” protocol and it works great connecting two clients directly without the “store and forward” mechanism provided by a broker in the middle. For more information about that you can read the first article of this series.

In this article, I’ll use the router with the default configuration showing how a sender and a receiver can connect to it and exchange messages through the router itself.

Routing mechanisms

First of all it’s interesting to say that the router supports two different types of routing mechanisms.

Message routing

When the router receives a message on a link, it uses the address specified in the target terminus when the sender attached the link itself to the route; if this address wasn’t specified, the destination address is get from the “To” property of the message. Based on such information, the router inspects its routing table to determine the route for delivering the message : it could be a link attached by a direct receiver to the router or another router inside the network that will be the next hop for reaching the destination. Of course, the message could be sent to different receivers all interested in the same address. The main point here is that the routing decision is made for each received message and there is always a communication between internal router nodes and external clients.

message_routing

As you can see in the above picture, a link is established between sender and router and between router and receiver. They are two completely distinct links that the router uses for messages exchange between sender and receiver through the routing mechanism on message basis.

For example, it means that there is a different flow control between router (with its internal receiver) and sender and between router (with its internal sender) and receiver : of course, it’s true that if the receiver grants few credits (i.e. 10) but the router (the internal receiver) grants more credits to the sender (i.e. 250 by default), it takes in account this difference. If for any reason the receiver closes the connection (after receiving 10 messages) and sender has already sent more than 10 messages (acknowledged by an “accepted” disposition), the router will reply with a “released” disposition for the next 40 messages because they can’t be delivered to the closed receiver.

Another interesting point is related to the message “settlement” : the router always propagates the delivery and its settlement along the network. On receiving a “pre-settled” message, its nature is propagated to the destination. The same is for “unsettled” messages : in that case, the router needs to track the incoming delivery and send the unsettled message to the destination; when it will receive the disposition (settlement) from the final receiver, it will reply in the same way to the original sender.

The last interesting aspect of message routing is the available routing patterns which define the paths followed by messages across the network :

  • closest : even if there are more receivers for the same address, the message is sent on the shortest path to reach the destination. It means that only one receiver will get the message;
  • balanced : when more receivers are attached to the same address, the messages sent to that address are spread across receivers. It means that each receiver will receive a different message at time in a sort of “competing consumers” way;
  • multicast : it’s something like a “publish/subscribe” pattern where all the receivers will receive the same message published on the address they are attached;

When the receivers for a specific address are all connected to the same router, we could think that “closest” and “balanced” have the same behavior because all the paths have same length and receivers are closed at same level to the router. It’s not so true because with “closest” the router uses a strict round-robin distribution across receivers while with “balanced” it takes into account the number of unsettled deliveries for each receiver and favors the “faster” of them (who settled messages faster than others).

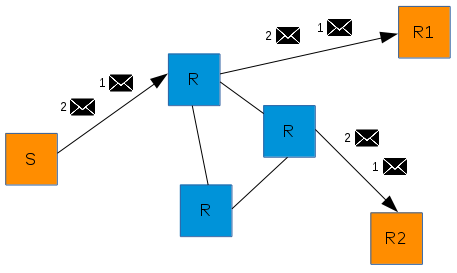
To be more clear, suppose to have a sender S, two receivers R1 and R2 and a routers network with R1 connected to the same router as S and R2 connected to a different router (connected to the previous). We can say that R1 is “one level closed” to S and R2 is “two level closed” to S.

In the following scenario, with the “closest” distribution all the messages sent by S will be always delivered to R1.

closest_routing

“closest” message routing

Using the “balanced” distribution, the messages are spread across both receivers and there is nor relation with the path length.

balanced_routing

“balanced” message routing

Finally, with “multicast” distribution all messages are sent to all receivers.

multicast_routing

“multicast” message routing

Link routing

When the router receives an attach request, it’s propagated through the network in order to reach the destination node and establish the real link. When the sender starts to send messages to the router, it propagates that message through the established link to the destination without making any decision at message level. You can think of it as a sort of virtual connection or a tunnel between sender and receiver through a routers network.

link_routing

As you can see in the above picture, the link is established directly between the two peers and all performatives go through it.

From a flow control point of view, it’s directly handled between sender and receiver; any credits granted by the receiver arrives to the sender with a flow performative without any interference by the router in the middle. The link through the router is like a “tunnel” and it seems that the two peers are directly connected.

The same is true for disposition about settlement for “unsettled” messages that the sender receives directly from the receiver.

The concept of different routing patterns doesn’t make sense because in this case there is a direct link between sender and receiver so the router doesn’t make any decision on single message basis but it has only to propagate the frame along the link.

Let’s start … simple !

Now it’s time for a very simple example with a router started using the default configuration and only one sender and one receiver connected to it and attached to the “/my_address” address.

I used the “simple_recv” and “simple_send” C++ client examples for that and you can find them inside the Qpid Proton installation folder.

First of all let’s start the receiver specifying the address and the number of messages it wants to receive (it will grant link credits for that), i.e. 10 messages.

simple_recv_start

Using the qdstat management tool we can see that an endpoint for the “my_address” address is defined with “out” direction (from router to the receiver) with no messages delivered yet.

qdstat_01

After that let’s start the sender in order to send some auto generated messages, i.e. 5 messages.

simple_send_start

As you can see, the messages sent are all settled and confirmed. What’s happened at receiver side ?

simple_recv_messages

All messages sent by sender are now received and the simple application doesn’t close the connection because it’s waiting for the other 5 messages in relation to the 10 credits granted (of course it’s only an application behavior and not related to the router mechanisms).

Inspecting the router with the qdstat management tool we can see that on the output endpoint for the “my_address” address there are 5 delivered messages. What we can’t see is the endpoint on the same address with the opposite “in” direction (from sender to router) because after sending the messages, the sender closed the connection to the router and the endpoint is deleted. You can trust me … it was alive for all the time the sender was sending messages !

qdstat_02

As you can see we have directly connected sender and receiver without the need for a broker in the middle with its “store and forward” mechanism. In the above scenario, when the messages are settled and confirmed to the sender it means that they are really received by the receiver.

Conclusion

With this article I introduced the different mechanisms for messages routing that the Qpid Dispatch Router provides. For every scenarios we can choose the better way and what we need in order to distribute messages in a useful way for our distributed application. We saw a simple example on connecting sender and receiver through the router without the need for a broker in the middle. In the next articles, I’ll increase the complexity starting to use non default configuration files and exploring different way to connect routers with clients and brokers.

Qpid Dispatch Router installation on your Linux machine

In the previous article I introduced the Dispatch Router from the Apache Qpid project, its main features, capabilities and the scenarios where it could be useful in order to develop high scalable AMQP based messaging solutions.

The first step for starting to use the router is the installation step and I’ll explain how to do that in this short post. I’ll use some personal Docker files in order to build fully functional images but the you can find the official ones in the router GitHub account here.

Qpid Proton : the dispatch router foundation

This router is based on the Qpid Proton project, a messaging library developed in C, C++ and Java (pure ProtonJ implementation) with bindings for other different languages like Python, PHP and Ruby; in order to work properly, the router needs only the base ProtonC implementation and the Python binding.

First of all, we need the main compiler tools like gcc, cmake and make. The UUID library is needed for unique identifier generation (i.e. container name, message id, …) and the OpenSSL library for encryption and for handling SSL/TLS connections. Furthermore, the last library version leverages on the Cyrus library for the SASL protocol used for supporting different authentication mechanisms on the AMQP protocol.

To simplify the installation process, I wrote two Docker files available here on GitHub both for Fedora and Ubuntu you can use as reference for reproducing the steps on your machine or to generate a Docker image.

Now it’s router time

The Qpid Dispatch Router uses the same tools (like gcc, cmake, make, …) needed for Qpid Proton; if you can compile the messaging library without problems then you are ready to compile and install the router as well.

At time I’m writing this article the official released version is the 0.5 with the 0.6 version under beta. We can use both this versions : in the former case we can download the released package, in the latter we can clone the official GitHub repository and recompile the bits from there having in this way the latest updated code and features under development. The new 0.6 version has gone through major architectural changes to make it highly scalable; furthermore, the router configuration is now more intuitive and easy to understand than the previous versions.

Even in that case I wrote both Docker files for the official released version and for compiling the bits (on both Fedora and Ubuntu of course) in order to have a Docker image and the router up and running in a related container.

Let’s start the router

To check the installation process we can start the router with the simple “qdrouterd” command; it is launched automatically in the case of starting the Docker image.

qdrouterd

Typing that command, the router starts with the default configuration file. We will dig into in the next articles to understand the meaning of all main available configuration options for tuning the router behavior.

In the above output, the main points are :

  • The router instance is named Qpid.Dispatch.Router.A;
  • The router operates in “standalone” mode which means that it doesn’t cooperate with other routers and won’t be used in a routers network;
  • It exposes a management endpoint we can use in order to interact with the router itself and changing its internal configuration. It’s a pure AMQP endpoint on which the available operations are defined by the AMQP management specification (which is in draft, here). For all developers who don’t know it well, you can think that as a sort of RESTful interface with CRUD operations for managing resources but instead of having HTTP as transport protocol, it used AMQP and its semantics;
  • A listener is started on all network available interfaces and listening for connections on the standard AMQP port (5672, so not encrypted);
  • The instance is using 4 threads for handling messages traffic and all other internal operations;

The package tools

Other then the router itself, the project provides a couple of tools useful for showing main running information and for interacting with it.

The “qdstat” tool shows all statistics information, endpoints and router traffic.

qdstat

As we can see from the above picture (-l option is for showing router AMQP links), the router is exposing the $management endpoint and a local temporary endpoint that is used for communicating with the qdstat tool.

Indeed, when we start the tool, it opens an AMQP connection to the router and attaches a link on the management endpoint for sending requests as you can see in the following picture with traffic capture (using Wireshark).

qdstat_management

At same time another link is attached for a temporary local endpoint used for receiving information to show on the console.

qdstat_temp_endpoint

When the tool sends a request to the router through a transfer performative, it specifies the local reply address using the “Reply-To” AMQP property.

The “qdmanage” tool is a general purpose AMQP management tool that we can use to interact with a running router and changing its internal configuration. It’s very useful because even if our router starts with a static configuration written in the related file, we can change it dynamically at runtime to adapt the router behavior to our ongoing use case.

For example we can show all the active connections on the router.

qdmanage

In this case, there are no connections other than the one related to the tool itself which connects to the router via AMQP in order to query and receive the related information.

Conclusion

With this post now we have installed the dispatch router stuff on our machine (or on a Docker image) and checked that it runs properly with the default configuration at least. We peeked the tools available with the installation and all related operations and information provided in order to interact with the router at runtime. Starting from the next article we’ll see how to use the router in different scenarios with an increasing complexity, from a standalone router to a routers network.


Routing AMQP : the Qpid Dispatch Router project

Speaking about the AMQP (Advanced Message Queuing Protocol) protocol, a lot of people think that it’s only about messaging between clients and brokers. There are a bunch of MOMs (Message Oriented Middleware) which support this protocol to enable clients to send and receive messages so to exchange data each other. We can think about open source projects like the Apache ActiveMQ and Apache ActiveMQ Artemis brokers or commercial products from big companies like JBoss A-MQ (Red Hat), Azure Service Bus (Microsoft) and MQ Light (IBM).

Not all people know that AMQP is also a peer to peer protocol which enables clients to communicate each other without a messaging broker in the middle. Furthermore, we can use this protocol in order to connect clients to a server : more generally speaking, an AMQP endpoint can be a “pure” client (which starts a connection) or a server (which listens for connections).

The typical MOM features

An AMQP server seems to be exactly what a broker is but it’s not so true. Of course, a broker listens for connection requests from clients so acts as a server but it’s a MOM and adds a bunch of concepts. First of all, it provides a “store and forward” capability because every message received from producers is stored in a queue or a topic/subscription entity and after that it’s ready to be delivered to consumers which get messages at their own pace. It provides asynchronous communication between them decoupling senders and receivers and the messages can be stored in memory or as usual in a permanent storage (like a database or a log file).

What does it mean in terms of message acknowledgement having a queue or topic/subscription between a producer and a consumer ? Basically, it means that the producer knows when the message is arrived to the broker but not when it’s consumed by the consumer (it could be offline or it’s consuming messages at a different pace). In order to have this information, it’s needed to setup a “reply to” queue where the consumer can put an acknowledge message for the producer : if you think about that, also in that case the consumer knows that the acknowledge message is arrived to the broker but not yet to the producer.

Of course, it’s the typical scenario in the “integration business” where different enterprise systems exchange data in such a way. It’s also true that in the new “Internet of Things business”, the devices in the field and the services in the cloud communicate in that way for telemetry and command/control purposes.

Sometimes this kind of communication isn’t acceptable and the producer wants to know exactly when its message is arrived to destination (consumer) without another entity in the middle, the broker, which takes responsibility on messages delivery. Furthermore, there are other patterns that aren’t possible using brokers only.

Qpid Dispatch Router : what is this ?

In order to add more and different features in an integration and/or IoT scenario made of clients, servers and brokers, the Apache Foundation developed a new interesting project under the Qpid umbrella : the Qpid Dispatch Router.

As the official documentation says, “The router is an intermediary for messages but it is not a broker. It does not take responsibility for messages”. When a producer sends a message to a broker, it takes responsibility for it and will deliver the message itself when a consumer will ask for it. The router simply propagates the AMQP traffic between nodes and it means that if producer and consumer are directly connected (in a peer to peer fashion) through the router, they are the only ones responsible for message acknowledgement.

Other than in “stand-alone” mode, the best configuration for using router is in a “network of routers”; let’s consider more routers connected each other in a specific topology : clients can connect on that network asking to send/receive on specific AMQP addresses and communicate through routers that can choose the best path for message delivery (algorithms similar to OSPF or IS-IS from the networking world are used). It’s possible thanks to their internal “routing tables” which are constantly updated using a specific router protocol. All the routers exchanges updating/hello messages about a new router connected (or about a router went offline) and new clients attached/detached to specific addresses. In that way, the network can change dynamically in terms of routers connections and paths between clients for sending/receiving messages on different/new addresses.

Of course, a network of routers is also useful for connecting to one or more brokers/servers : thanks to routers, a broker/server could handle a few TCP connections in order to communicate with a huge number of clients. It’s possible because we can use few routers directly connected to the broker/server and having a lot of clients connected to such routers (that could be part of a huge network). These clients aren’t directly connected to the broker/server but can communicate with it through the routers; it determines a reduction of connections from clients to broker/server.

Another great advantage is to expose a server/broker outside of a private network. Without routers, in the above scenario we need to enable port traversal from outside our NAT firewall to allow external clients to connect to server/broker inside the LAN. It means enabling incoming connection that is not so good due to security concerns. Using a router inside the private network, it’s able to connect to the server/broker (they are in the same LAN) and to connect to an external router (outside the LAN) : in that way we don’t need to open any port on NAT firewall, we have an outgoing connection from the router inside the LAN. All clients can connect to the external router and having their traffic routed to the server/broker into the private network leveraging on connection between the routers.

Conclusion

Using AMQP routing could be considered as “different” way to do messaging or as a new possibility for adding features and patterns to the typical MOM scenarios. In the next articles we’ll dig into it with some examples starting from a simple stand-alone router to a network of routers; we’ll see the available configurations for enabling clients/servers/brokers communication through them.

Raspberry Pi e Windows Azure Service Bus via AMQP con la libreria Qpid Proton C

Nel corso di questa tutorial vedremo in che modo sia possibile utilizzare la Raspberry Pi come client AMQP (Advanced Message Queuing Protocol) e collegarla al Windows Azure Service Bus che supporta la versione AMQP 1.0.

Ovviamente, la scelta della libreria client da utilizzare è quasi obbligata : Apache Qpid Proton. Tale libreria sviluppata in C fornisce comunque il bindings per altri linguaggi tra cui Java, Python e PHP ma nel corso dell’articolo utilizzeremo solo la versione nativa.

Generalmente, la Raspberry Pi viene utilizzata con la distribuzione Raspbian (basata su Debian) che è a tutti gli effetti una distribuzione Linux. Ciò vuol dire che possiamo installare la libreria Qpid Proton come faremo su un normale distribuzione Ubuntu su un PC oppure su una macchina virtuale ad esempio su Windows Azure.

Connessione alla Raspberry Pi

Tutte le operazioni che seguono possono essere effettuate accedendo direttamente alla Raspberry Pi attraverso un monitor, una tastiera ed un mouse collegati ad essa oppure in remoto attraverso l’utilizzo di SSH.

La seconda soluzione è sicuramente la più comoda, utilizzado un tool come Putty e specificando l’indirizzo IP della nostra board, la porta (tipicamente la 22) ed il tipo di connessione (SSH).

01

02

Installazione dei prerequisiti

Una volta effettuato l’accesso, in primo luogo bisogna installare dei componenti fondamentali tra cui GCC, CMAKE (sistema di build utilizzato da Qpid) e la libreria UUID per la generazione di identificativi univoci.

sudo apt-get install gcc cmake uuid-dev

Poichè Qpid utilizza SSL e il Service Bus necessita di questo prerequisito per la connessione, dobbiamo installare OpenSSL nel nostro sistema (che in realtà potrebbe essere già installato).

sudo apt-get install openssl

La presenza della libreria OpenSSL non include la presenza degli header file e delle librerie statiche necessarie per lo sviluppo. Bisogna quindi installare la libssl-dev.

sudo apt-get install libssl-dev

Non essendo interessato ad alcun binding con altri linguaggi, possiamo evitare di installare i package per Python, PHP e così via, passando direttamente al download della libreria dal sito ufficiale. Inoltre, non installiamo le dipendenze che riguardano la generazione automatica della documentazione.

Download e compilazione della Qpid Proton

Dal sito ufficiale possiamo ricavare uno dei mirror da cui scaricare la libreria nella sezione “Download” per poi scaricarla usando il tool WGET.

pi@raspberrypi ~ $ wget http://apache.fastbull.org/qpid/proton/0.6/qpid-proton-0.6.tar.gz
–2014-04-16 07:09:52–  http://apache.fastbull.org/qpid/proton/0.6/qpid-proton-0.6.tar.gz
Resolving apache.fastbull.org (apache.fastbull.org)… 194.116.84.14
Connecting to apache.fastbull.org (apache.fastbull.org)|194.116.84.14|:80… connected.
HTTP request sent, awaiting response… 200 OK
Length: 629147 (614K) [application/x-gzip]
Saving to: `qpid-proton-0.6.tar.gz’

100%[======================================>] 629,147     1.00M/s   in 0.6s

2014-04-16 07:09:53 (1.00 MB/s) – `qpid-proton-0.6.tar.gz’ saved [629147/629147]

Dopo il download. estraiamo il contenuto del file.

tar xvfz qpid-proton-0.6.tar.gz

Entriamo nella cartella appena create (qpid-proton-0.6) e creiamo una cartella “build” in cui faremo generare dal tool CMAKE il corrispondente Makefile per la compilazione della libreria.

mkdir build

cd build

cmake -DCMAKE_INSTALL_PREFIX=/usr ..

L’output del comando cmake dovrebbe essere il seguente.

pi@raspberrypi ~/qpid-proton-0.6/build $ cmake -DCMAKE_INSTALL_PREFIX=/usr ..
— The C compiler identification is GNU 4.6.3
— Check for working C compiler: /usr/bin/gcc
— Check for working C compiler: /usr/bin/gcc — works
— Detecting C compiler ABI info
— Detecting C compiler ABI info – done
— PN_VERSION: 0.6
— Found Java: /usr/bin/java
— Java version: 1.7.0.40. javac is at: /usr/bin/javac
— Locations of Bouncycastle 1.47 jars: BOUNCYCASTLE_BCPROV_JAR-NOTFOUND BOUNCYCASTLE_BCPKIX_JAR-NOTFOUND
— Won’t build proton-j-impl because one or more Bouncycastle jars were not found. PROTON_JAR_DEPEND_DIR was: /usr/share/java
— Found OpenSSL: /usr/lib/arm-linux-gnueabihf/libssl.so;/usr/lib/arm-linux-gnueabihf/libcrypto.so (found version “1.0.1e”)
— Looking for clock_gettime
— Looking for clock_gettime – not found.
— Looking for clock_gettime in rt
— Looking for clock_gettime in rt – found
— Looking for uuid_generate
— Looking for uuid_generate – not found.
— Looking for uuid_generate in uuid
— Looking for uuid_generate in uuid – found
— Looking for strerror_r
— Looking for strerror_r – found
— Looking for atoll
— Looking for atoll – found
— Could NOT find SWIG (missing:  SWIG_EXECUTABLE SWIG_DIR)
— Could NOT find Doxygen (missing:  DOXYGEN_EXECUTABLE)
— Looking for include file inttypes.h
— Looking for include file inttypes.h – found
— Can’t locate the valgrind command; no run-time error detection
— Cannot find rspec, skipping rspec tests
— Cannot find both Java and Maven: testing disabled for Proton-J and JNI Bindings
— Configuring done
— Generating done
— Build files have been written to: /home/pi/qpid-proton-0.6/build

Ci sono alcuni warning sull’impossibilità di trovare il runtime Java, Swig e Doxygen. Come già anticipato, non siamo interessato al binding con altri linguaggi ed alla generazione automatica della documentazione per cui possiamo non preoccuparci di tali warning.

L’ultimo step consiste nell’utilizzare il tool MAKE per elaborare il Makefile appena generato da cmake ed installare la libreria nel sistema.

sudo make install

Al termine della compilazione, la libreria è installata nel sistema in corrispondenza della cartella /usr (come specificato nel primo comando CMAKE eseguito) ed in particolare :

  • /usr/share/proton : contiene un esempio di utilizzo;

  • /usr/bin e /usr/lib : contengono i file relativi la libreria vera e propria;

  • /usr/include/proton : contiene gli header file necessari per lo sviluppo di un’applicazione;

Esempio di invio e ricezione su Service Bus

Per poter testare il corretto funzionamento della libreria utilizziamo i semplici esempi di send e receive distribuiti con la libreria stessa durante l’installazione.

cd /usr/share/proton/examples/messenger/

Anche in questo caso possiamo sfruttare il tool CMAKE per la generazione del Makefile necessario alla compilazione (da notare che è necessario l’esecuzione come Super User).

sudo mkdir build

cd build

sudo cmake ..

sudo make all

Al termine della compilazione avremo i due file eseguibili recv e send corrispondenti a due semplici applicativi che permettono di ricevere ed inviare messaggi ad una coda via AMQP.

Per fare questo, creiamo un nuovo namespace per il Service Bus sul portale di Microsoft Azure ed in corrispondenza di questo anche una queue. Nel mio caso, il namespace è qpidproton.servicebus.windows.net e la coda banalmente “myqueue”. Attraverso il portale dobbiamo ricavare due parametri fondamentali per la connessione che sono lo SharedSecretIssuer (tipicamente “owner”) e lo SharedSecretValue.

03

L’indirizzo per la connessione al Service Bus avrà la seguente struttura :

amqps://username:password@namespace.servicebus.windows.net/queue_name

Poichè il Service Bus usa le connessioni SSL, dobbiamo utilizzare AMQPS in luogo del semplice AMQP.

Per inviare un messaggio con testo “Hello” alla queue dobbiamo eseguire l’applicazione send nel modo seguente.

./send –a amqps://username:password@namespace.servicebus.windows.net/queue_name Hello

Per poter ricevere un messaggio dalla stessa queue possiamo utilizzare l’applicazione recv nel modo seguente.

./recv amqps://username:password@namespace.servicebus.windows.net/queue_name

Con un risultato di questo tipo.

Address: amqps://username:password@namespace.servicebus.windows.net/queue_name
Subject: (no subject)
Content: “Hello”

Qpid Proton C su una macchina virtuale Ubuntu Server 12.04 in Windows Azure per l’utilizzo del Service Bus con AMQP : creazione, configurazione, compilazione ed uso

Uno dei protocolli maggiormente utilizzati nell’ambito del messaging che può trovare applicazione anche nell’Internet of Things è l’AMQP (Advanced Message Queuing Protocol), ormai già standard OASIS da alcuni anni e giunto alla versione 1.0.

Il servizio Service Bus offerto da Windows Azure supporta tale protocollo che, essendo standard, garantisce la comunicazione tra client sviluppati su piattaforme diverse. Nel caso di una piattaforma Microsoft non abbiamo alcun problema grazie al Windows Azure SDK (giunto alla versione 2.3) che astrae completamente il protocollo di comunicazione sottostante con il Service Bus (AMQP, SBMP, …) grazie al suo modello di programmazione.

Nel caso in cui ci troviamo a lavorare su un sistema non Microsoft, una delle migliori scelte è quella di adottare le librerie del progetto Apache Qpid ed in particolare la Qpid Proton. Tale libreria sviluppata in C fornisce comunque il bindings per altri linguaggi tra cui Java, Python e PHP.

Nel corso di questo tutorial, vedremo come sia possibile creare una macchina virtuale Ubuntu Server 12.04 su Windows Azure, installare ed utilizzare la libreria Qpid Proton per inviare e ricevere messaggi attraverso il Service Bus con il protocollo AMQP. Ovviamente, tale procedura può essere utilizzata anche nel caso di un qualsiasi sistema Ubuntu 12.04 (anche client e non server) non necessariamente su Windows Azure ma sul nostro PC in locale.

Creazione della macchina virtuale su Windows Azure

In primo luogo dobbiamo creare una macchina virtuale con il sistema operativo Ubuntu Server 12.04 LTS su Windows Azure. Per farlo, è necessario collegarsi al Management Portal e loggarsi con il proprio account. Una volta loggati, selezioniamo sulla sinistra “Virtual Machines” e cliccate su “Create a Virtual Machine”; utilizziamo l’opzione di “Quick create” impostando :

  • DNS Name : il nome DNS da assegnare alla macchina virtuale;
  • Image : l’immagine del sistema operativo da utilizzare che in questo caso è “Ubuntu Server 12.04 LTS”;
  • Size : la “dimensione” della macchina virtuale in base alle nostre necessità;
  • New password/Confirm : password e relativa conferma per l’utente creato di default che si chiama “azureuser”;
  • Region/Affinity Group : la regione (data center) in cui creare la nostra macchina virtuale;

Clicchiamo su “Create a virtual machine” per avviare la creazione della macchina virtuale.

01_create_vm

Al termine del processo di creazione che dura alcuni minuti avremo la conferma.

02_vm_created

Per poterci collegare alla macchina virtuale in remoto, è necessario conoscere l’endpoint per l’accesso via SSH che possiamo trovare cliccando sul nome della macchina virtuale appena creata (nel mio caso ppatiernoubuntu) e poi sul tab “Endpoints” (nel mio caso la porta è la 22).

03_SSH_endpoint

Scarichiamo un client Telnet come Putty per poterci collegare, inserendo l’host name e la porta corretta.

04_Putty

All’apertura della console digitiamo “azureuser” come nome utente e la corrispondente password che abbiamo scelto nella fase di creazione della macchina virtuale.

Installazione dei prerequisiti

Il file README distribuito con la libreria Qpid Proton descrive abbastanza nel dettaglio la procedura per l’installazione della libreria ma fa riferimento al tool YUM che su Ubuntu non abbiamo nativamente a disposizione; in luogo di esso usiamo APT. Inoltre, alcune libreria non hanno esattamente lo stesso nome come descritto nel file README.

In genere, la prima operazione che faccio su una macchina Ubuntu è quella di installare il package “build-essential” con tutti gli strumenti principali per la compilazione, eseguendo il comando :

sudo apt-get install build-essential

Il passo successivo è quello di installare le dipendenze principali tra cui GCC (che avremo già installato grazie al package “build-essential”), CMAKE (sistema di build utilizzato da Qpid) e la libreria UUID per la generazione di identificativi univoci (un pò come il nostro caro Guid).

sudo apt-get install gcc cmake uuid-dev

Poichè Qpid utilizza SSL e il Service Bus necessita di questo prerequisito per la connessione, dobbiamo installare OpenSSL nel nostro sistema (che in realtà potrebbe essere già installato).

sudo apt-get install openssl

La presenza della libreria OpenSSL non include la presenza degli header file e delle librerie statiche necessarie per lo sviluppo. Bisogna quindi installare la libssl-dev.

sudo apt-get install libssl-dev

Non essendo interessato ad alcun binding con altri linguaggi, possiamo evitare di installare i package per Python, PHP e così via, passando direttamente al download della libreria dal sito ufficiale. Inoltre, non installiamo le dipendenze che riguardano la generazione automatica della documentazione.

Download e compilazione della Qpid Proton

Dal sito ufficiale possiamo ricavare uno dei mirror da cui scaricare la libreria nella sezione “Download” per poi scaricarla usando il tool WGET.

azureuser@ppatiernoubuntu:~$ wget http://apache.fastbull.org/qpid/proton/0.6/qpid-proton-0.6.tar.gz
–2014-04-16 07:09:52– 
http://apache.fastbull.org/qpid/proton/0.6/qpid-proton-0.6.tar.gz
Resolving apache.fastbull.org (apache.fastbull.org)… 194.116.84.14
Connecting to apache.fastbull.org (apache.fastbull.org)|194.116.84.14|:80… connected.
HTTP request sent, awaiting response… 200 OK
Length: 629147 (614K) [application/x-gzip]
Saving to: `qpid-proton-0.6.tar.gz’

100%[======================================>] 629,147     1.00M/s   in 0.6s

2014-04-16 07:09:53 (1.00 MB/s) – `qpid-proton-0.6.tar.gz’ saved [629147/629147]

Dopo il download. estraiamo il contenuto del file.

tar xvfz qpid-proton-0.6.tar.gz

Entriamo nella cartella appena create (qpid-proton-0.6) e creiamo una cartella “build” in cui faremo generare dal tool CMAKE il corrispondente Makefile per la compilazione della libreria.

mkdir build

cd build

cmake -DCMAKE_INSTALL_PREFIX=/usr ..

L’output del comando cmake dovrebbe essere il seguente.

azureuser@ppatiernoubuntu:~/qpid-proton-0.6/build$ cmake -DCMAKE_INSTALL_PREFIX=/usr ..
— The C compiler identification is GNU
— Check for working C compiler: /usr/bin/gcc
— Check for working C compiler: /usr/bin/gcc — works
— Detecting C compiler ABI info
— Detecting C compiler ABI info – done
— PN_VERSION: 0.6
— Could NOT find Java (missing:  Java_JAVA_EXECUTABLE Java_JAR_EXECUTABLE Java_JAVAC_EXECUTABLE Java_JAVAH_EXECUTABLE Java_JAVADOC_EXECUTABLE)
— Found OpenSSL: /usr/lib/x86_64-linux-gnu/libssl.so;/usr/lib/x86_64-linux-gnu/libcrypto.so (found version “1..1”)
— Looking for clock_gettime
— Looking for clock_gettime – not found.
— Looking for clock_gettime in rt
— Looking for clock_gettime in rt – found
— Looking for uuid_generate
— Looking for uuid_generate – not found.
— Looking for uuid_generate in uuid
— Looking for uuid_generate in uuid – found
— Looking for strerror_r
— Looking for strerror_r – found
— Looking for atoll
— Looking for atoll – found
— Could NOT find SWIG (missing:  SWIG_EXECUTABLE SWIG_DIR)
— Could NOT find Doxygen (missing:  DOXYGEN_EXECUTABLE)
— Looking for include files INTTYPES_AVAILABLE
— Looking for include files INTTYPES_AVAILABLE – found
— Can’t locate the valgrind command; no run-time error detection
— Cannot find ruby, skipping ruby tests
— Cannot find both Java and Maven: testing disabled for Proton-J and JNI Bindings
— Configuring done
— Generating done
— Build files have been written to: /home/azureuser/qpid-proton-0.6/build

Ci sono alcuni warning sull’impossibilità di trovare il runtime Java, Swig e Doxygen. Come già anticipato, non siamo interessato al binding con altri linguaggi ed alla generazione automatica della documentazione per cui possiamo non preoccuparci di tali warning.

L’ultimo step consiste nell’utilizzare il tool MAKE per elaborare il Makefile appena generato da cmake ed installare la libreria nel sistema.

sudo make install

Al termine della compilazione, la libreria è installata nel sistema in corrispondenza della cartella /usr (come specificato nel primo comando CMAKE eseguito) ed in particolare :

  • /usr/share/proton : contiene un esempio di utilizzo;
  • /usr/bin e /usr/lib : contengono i file relativi la libreria vera e propria;
  • /usr/include/proton : contiene gli header file necessari per lo sviluppo di un’applicazione;

Esempio di invio e ricezione su Service Bus

Per poter testare il corretto funzionamento della libreria utilizziamo i semplici esempi di send e receive distribuiti con la libreria stessa durante l’installazione.

cd /usr/share/proton/examples/messenger/

Anche in questo caso possiamo sfruttare il tool CMAKE per la generazione del Makefile necessario alla compilazione (da notare che è necessario l’esecuzione come Super User).

sudo mkdir build

cd build

sudo cmake ..

sudo make all

Al termine della compilazione avremo i due file eseguibili recv e send corrispondenti a due semplici applicativi che permettono di ricevere ed inviare messaggi ad una coda via AMQP.

Per fare questo, creiamo un nuovo namespace per il Service Bus sul portale di Microsoft Azure ed in corrispondenza di questo anche una queue. Nel mio caso, il namespace è qpidproton.servicebus.windows.net e la coda banalmente “myqueue”. Attraverso il portale dobbiamo ricavare due parametri fondamentali per la connessione che sono lo SharedSecretIssuer (tipicamente “owner”) e lo SharedSecretValue.

05_sb_access

L’indirizzo per la connessione al Service Bus avrà la seguente struttura :

amqps://username:password@namespace.servicebus.windows.net/queue_name

Poichè il Service Bus usa le connessioni SSL, dobbiamo utilizzare AMQPS in luogo del semplice AMQP.

Per inviare un messaggio con testo “Hello” alla queue dobbiamo eseguire l’applicazione send nel modo seguente.

./send –a amqps://username:password@namespace.servicebus.windows.net/queue_name Hello

Per poter ricevere un messaggio dalla stessa queue possiamo utilizzare l’applicazione recv nel modo seguente.

./recv amqps://username:password@namespace.servicebus.windows.net/queue_name

Con un risultato di questo tipo.

Address: amqps://username:password@namespace.servicebus.windows.net/queue_name
Subject: (no subject)
Content: “Hello”