ServiceBus

A new Internet of Things era starts today … the IoT Hub is finally here !

September 29th … what a day for Microsoft and related Internet of Things technologies !

Azure IoT Suite and IoT Hub are finally here ! The IoT Hub is available in public preview and ready to help you to develop your IoT solutions in a very simple manner !

Where you can find all useful information about them ?

First of all the “Azure IoT Suite now available” blog post on official Microsoft web site focused on Internet of Things.

On Microsoft Azure documentation section you can find the dedicated “Azure IoT Developer Center” that will guide you to create a new IoT Hub on the new Azure management portal and connect one or more devices to it.

iot_dev_center

Starting with IoT Hub is very simple if you follow the documentation page here. A lot of examples, how-to guides for sending data from device to cloud and command from cloud to device, handling devices and so on.

Devices are a very interesting story !

There is a certified IoT program with all current hardware platforms and silicon vendors certified for accessing to IoT Hub. Of course, not only Raspberry Pi and MinnowBoard (we know them with Windows IoT Core) but BeagleBoard and Dragon Board 410C too. As embedded developer I love Freescale FRDM-K64F and Texas Instruments CC3200 LaunchPad too. It’s possible for you to become a partner and certify your hardware platform !

iot_hub_partners

To simplify your life, you can follow the main steps at this page for :

  • Select a device (Raspberry Pi 2, MinnowBoard Max, Freescale FRDM-K64F and so on)
  • Select a platform (Linux, Windows, mbed , TI RTOS). The list is filtered based on above selected device
  • Select a language (C, C#, JavaScript, Java). Pay attention … it’s not filtered …but remember you can’t use C# on Freescale FRDM-K64F 😉
  • Configure your IoT Hub with all steps on the new Azure management portal
  • Connect your device with all steps to do it

Great news … all Azure IoT SDKs are open source and available on GitHub !

A great partnership I like too much is with the ARM mbed platform as discussed on the ARM official blog. Currently only the Freescale FRDM-K64F board is supported but it’s a great starting point. On the mbed web site you can find the official Azure IoT account with a lot of source code related to the IoT Hub client implementation and related examples. Of course the client uses AMQP protocol to communicate with IoT Hub and for this reason the Qpid Proton C porting on mbed is available there. Just think … it can be useful to you to access all Service Bus entities (queues, topics/subscriptions, event hubs, …) from mbed enabled boards like the Freescale one. Remember that the Microsoft Band has a Kinetis MCU from Freescale (here the Sparkfun teardown) ! 😉

Of course .Net Micro Framework support on the boards from GHI or Secret Labs aren’t available “out of box” but using the great AMQP .Net Lite library you can use them with IoT Hub. Don’t worry … my open source developer soul is just thinking to a new project library for it 😉 It’s the same for industrial Windows Embedded Compact 2013 devices.

Regarding Azure IoT Suite and all related services for storing messages and predictive analysis there is a dedicated web site you can start to create a full IoT solution from predefined scenarios (with provisioning and monitoring of course) you can customize.

What if you have MQTT based devices or you want to develop new devices using this protocol ? How you can connect them to the Azure IoT Hub ? Don’t worry, Microsoft provides you the “Azure IoT Protocol Gateway” that is a framework for protocol adaptation that supports MQTT v3.1.1. You can deploy it in the Cloud as a worker role or in on-premises environments such as field gateways.

If all above material isn’t enough for you, there are some great videos on Channel9 from AzureCon :

In conclusion, today starts a new IoT era … after people hub and all the other hubs on your Windows Phone … you have the IoT Hub in the Cloud with all your devices !

AMQP isn’t so scary … if you know how to start !

One of the first class citizens in the “IoT protocols city” is the AMQP (Advanced Message Queue Protocol) protocol that is so popular even if it seems that there are few good resources to start understanding how it works under the cover (after a few searching on Google and Bing). Of course, for each protocol the most complete resource is the official specification but more people consider it very difficult to read (if they don’t need to implement it).

To simplify your understanding, I’d like to wrap up some resources useful to you to start studying AMQP protocol.

A good starting point is an old but very useful article by Kelly Sommers (aka “kellabyte” on Twitter) who explains how the AMQP 1.0 specification is completely different from the old AMQP 0.9.1 specification : Clarifying AMQP.

For an overview at high level, I found the articles posted by Chuck Rolke (from Red Hat) on his blog very interesting :

To deep into the protocol about message framing and type system you can read my articles :

The great thing is that all examples related to the above blog posts use the AMQP .Net Lite library (an AMQP C# implementation) from Microsoft as client.

Few articles … but very useful.

Of course, I read the official specification because in my humble opinion it’s always the best resource and I’d like to understand how the things work under the cover (in my case it’s all related to Azure Service Bus used in the IoT space that support AMQP protocol).

Last but not least, there is a great discussion on Channel9 about AMQP 1.0 and its general availability in Microsoft Azure Service Bus (it was 2013) between Clemens Vasters and David Ingham that we can consider the AMQP gurus without any doubts.

If you have other resources to enrich the above list, please don’t hesitate to contact me !

[Update October 2nd 2015]

Very nice and interesting article titled AMQP as network protocol by Ted Ross (from RedHat) with a brief overview on the protocol, multiplexing, flow control and delivery features.

Clemens Vasters (from the Microsoft Azure Messaging team) is a guru on AMQP protocol and today he published the great presentation Introduction to AMQP 1.0 with an in depth analysis about the architecture and all the related features. It’s a must read for understanding how the protocol works under the hood on the wire.

[Update October 5th 2015]

After its great slide deck about AMQP 1.0 protocol, today Clemens Vasters published a great video series on his Subscribe! blog on Channel9. The video series has the following 6 parts :

If you prefer, the videos are also available as playlist on YouTube here.

What can I say ? No words … it’s Clemens’ stuff 😉

[Update January 18th 2016]

Today my “AMQP Essentials” cheat sheet was published on DZone web site as refcard. It’s a lightweight introduction to the AMQP protocol with all main features in a single short PDF file (6 pages).

Azure SB Lite … finally on Nuget !

azure_sb_lite_nuget

Finally my Azure SB Lite library is online on Nuget but … it was a long story 🙂

The last month, I decided to put this library on Nuget for all people that don’t like to compile source code from CodePlex and want to use it immediately. When I tried to upload the package, I received the “package id alredy used” error ! What ? Why ? Who ? Is there another library with same name ?

After few minutes I found that Sebastian Brandes (Microsoft Evangelist from Denmark) already uploaded it on Nuget in June (of course, he set me as “author”) and it was downloaded by 45 people. I contacted him who explained me that the library was useful to his project (thanks!) and that the right place for all other people was on Nuget (for much friendly usage). Right ! However, we decided that I should be the owner of the package so after about one month (Sebastian was on vacation) and Nuget support … today I re-uploaded the library !

I have to thank Sebastian for all his effort to help me to get the ownership of the package and for using it in his “Internet of Things” demo at Tech Ready conference (only for all Microsoft employees). He promised me to write a blog post and upload demo source code on GitHub.

Finally, I’d like to remember that there are some usage examples on GitHub at following link !

AMQP message accepted : encoding on the wire

We saw the AMQP builtin type system, we sent a message to the broker …. now, how is encoded the receive confirmation from the broker itself ?

In this case, the so called performative is the disposition (format code 0x15, page 71 on official specification) that has some fields all filled in a lot of cases.

amqp_disposition

Of course it has the descriptor 0x00 0x53 and 0x15 as format code and it’s a list 0xC0 with 0x09 bytes distributed on 0x05 fields.

The first field is role that defines the role of the peer that could be sender or receiver. In this case the value is 0x41 that is the “true” value for the boolean type (page 26 of official specification). Why ? What’s the relationship between role and boolean ? The role type is defined as a restricted type that has boolean has source. You can see it like an inheritance because role derives from the existing boolean type restricting and/or changing the mean of the related values using choice (page 73 of official specification). In this case we have that sender is “false” and receiver is “true”. In our case we have 0x41 (true) so the role is the receiver and it’s true because we send a message to the broker (to a queue) and it means that on the other side of the link, the peer is the receiver.

After role, we have first & last fields. Each message sent by the sender has a “delivery-id”. When the receiver sends the disposition to the sender to confirm received message, it needs to set the “delivery-id” of the message itself. It’s possible to define a “delivery-ids” interval so that the receiver can confirm more received messages with a single disposition. The two limits are defined by first and last fields that are of type delivery-number (page 74 of official specification) that is a restricted type with sequence-no as base (it’s a serial number as defined in RFC-1982). In our example the receiver has to confirm only one message so first is 0 and last is null. As you can see, the 0 value is expressed with the byte 0x43 that is a specific and well defined byte used to describe a 0 value (uint0, page 26 of official specification).

Next field is settled that defines the delivery status of the message on the endpoint/peer. This value is also related to the QoS (Quality of Service) and it acts as an aknowledge on messages exchanged. For example, the settled field is in the transfer disposition too; a sender can set it to true and it means to apply a “fire and forget” QoS (the sender sends the message and it isn’t interested to have an acknowledge by the receiver). If the sender set it to false, it expects to receive a disposition with settled to true from receiver (it’s a “at least once” QoS because if the disposition message is lost, the sender re-send the message). Of course, AMQP supports “exactly once” QoS (it isn’t supported by Azure).

In this case its value is 0x41 (true) because it’s defined as a boolean type;

The last field is state that defines the delivery outcome with following possible values :

  • accepted : the message was processed by the receiver;
  • rejected :  indicates an invalid and unprocessable message;
  • released : the message was not (and will not be) processed;
  • modified : message was modified, but not processed;

Due to the above outcomes, a message can go through following state transitions :

amqp_message_states

In our example the message was accepted and the field has the descriptor 0x00 0x53 0x24 where the 0x24 format code defines the accepted outcome (page 89 of official specification) that is a list. In this case the list is empty and it’s defined by the byte 0x45 used to describe an “empty list”.

AMQP on the wire : messages content framing

After the previous post on the AMQP builtin type system, I’d like to show you a different sample frame strictly related to the sending messages. For starting, I used the SASL mechanisms frame as example to understand the encoding/decoding system just because it’s one of the first exchanged frames in the protocol but every day we use AMQP to send messages so understand their encoding is much more important.

An AMQP message on the wire

Consider the following source code that uses AMQP .Net Lite library to send a simple message :

Connection connection = new Connection(address);
Session session = new Session(connection);
SenderLink sender = new SenderLink(session, "sender-" + testName, "q1");

Message message = new Message("Hello");
message.Properties = new Properties();
message.Properties.MessageId = Guid.NewGuid().ToString();
message.ApplicationProperties = new ApplicationProperties();
message.ApplicationProperties["prop1"] = 1; 
message.ApplicationProperties["prop2"] = "value";

sender.Send(message, 60000);

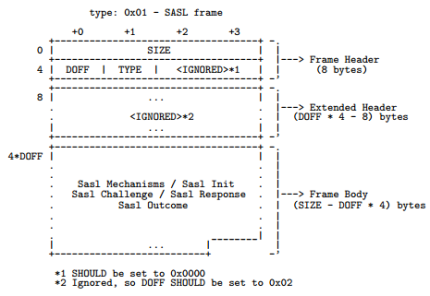
In the above code, we are interested in the encoding and framing used in the AMQP protocol to send the Message object on the wire. As reported on the official specification (page 38), each frame has a format as showed in the following picture (we already saw this format for the SASL frames with some “little” changes).

amqp_frame

As we can see, the real body starts with the so called performative; you can think about it as an “operation” executed against the AMQP broker (opening the connection or the session, attaching the link, transfering a message and so on).

amqp_message_01

In this case, we have the transfer performative for sending messages and the encoded frame is much more complex than the first one (SASL mechanisms).

The objective of this article is to understand how the builtin type system is used to encode the three main parts of an AMQP message.

amqp_message_format

From the above picture we’ll consider :

  • Message properties : system properties well defined by the AMQP specification and used by the broker for manipulation, routing and so on;
  • Application properties : user defined properties to carry data without using the following payload;
  • Application data : user defined payload of the message;

The content of all these parts is encoded using the builtin type system. Starting from the “Message-Properties” section we have the descriptor (0x00 0x53 0x73) where the 0x73 code defines the “AMQP properties list” (page 84 of official specification) that is a list (format code 0xC0) of 39 bytes (0x27) with only one element (0x01). This element is an UTF8 encoded string (0xA1) with size of 36 characters expressed with only one byte (0x24). This string is the “Message-Id” we set in our source code (it’s the autogenerated GUID value). You can see that there is no information to describe that this field is the “Message-Id” field but we know that because it’s the first field of the composite type “AMQP properties list”. If the “Message-Id” field weren’t explicitly set by code, it would be null but encoded inside the properties list itself. This means that all missing fields between two defined fields are encoded as null but inserted inside the list (to guarantee the fields sequence); if all subsequent fields (until the end of the list) aren’t set, they aren’t encoded inside the frame (to avoid a waste of space).

amqp_msg_properties

The “Application-Properties” section starts with its related descriptor (0x00 0x53 0x74) where the 0x74 code defines the “Application properties map” (page 86 of official specification) that is a map (format code 0xC1) of 24 bytes (0x18) with four elements (0x04). A map is a compound type in the AMQP builtin type system we didn’t see yet; it’s a collection with key-value pairs each encoded as defined in the specification.

amqp_map

In our example, we have two pairs (“prop1” = 1 and “prop2” = “value”) so four elements in the map. The name of the first key “prop1” is encoded as a UTF8 string (code 0xA1) with 0x05 a size (five characters for “prop1”) and the related value that is the string “value” is encoded in the same way. Then there is the name of the second key “prop2” and the related value 0x01 that is an integral type expressed with only one byte (format code 0x54, page 27 on official specification).

amqp_app_properties

The last part of the message is the data section (the “Hello” string) that has the descriptor (0x00 0x53 0x77) where the code 0x77 defines an “AMQP value” (page 86 of official specification) that in this case is an UTF8 string (0xA1) with 0x05 characters.

amqp_value

Changing the data as raw binary

The interesting thing is that the data part of an AMQP message could be encoded as an “AMQP value” (as previous), as an “AMQP sequence” (of values) or as pure “Binary” data.

Consider the previous example but with following changes related to the creation of Message instance.

Message message = new Message()
{
    BodySection = new Data() { Binary = Encoding.UTF8.GetBytes("Hello") }
};

Using the BodySection as Data object and the related Binary field the encoding of “Hello” string on the wire is defined as binary (0xA0) with 0x05 following bytes.

amqp_binary_data

Encoding the data in the following way is an advantage for the consumer of the message that needs to understand pure binary data and not “AMQP value” encoding.

Conclusion

The AMQP message format seems to be more complex than any other protocol but deeping into it …. it’s seems to be simpler.

Of course, there is another part in the message we didn’t consider named the “Message Annotations” that are used a lot for customization inside brokers like for Event Hubs inside Microsoft Azure Service Bus.

However, we can’t see them on the wire because we know that Service Bus traffic is encrypted (using SSL/TLS protocol) and the local AMQP broker for testing doesn’t support event hubs for clear reasons 🙂

AMQP protocol : the builtin type system by examples

One of the most interesting features of AMQP protocol is the built in type system that provides a way to represent the AMQP values inside a frame starting from primitive types to custom types (based on our application domain) and composite types (containing fields).

During this article I’ll try to explain in a simple way the main features of the type system but for better understanding you can refer the official AMQP specification available at following link.

AMQP type system : a brief introduction

First of all, any AMQP data is encoded in the following way :

amqp_type

As you can see, it has a constructor followed by untyped bytes. The constructor could be a code to represent a primitive type (named primitive format-code) or a code to represent a described type that is useful to describe custom/complex types in our application domain; a described type consists of a descriptor followed by a primitive format-code.

For example, the encoding for the “Hello world” string is the following :

0xA1 0x0B “Hello World”

where :

  • 0xA1 : it’s the simple constructor with a single byte that represents the primitive format-code for UTF8 encoded strings. This format-code has the higher nibble “A” (named subcategory) that represents a data with variable width defined by a single byte so with size between 0-255 (page 19 on official specification). The lower nibble “1” is named subtype and the entire byte represents the type UTF8 encoded string with a max length of 255 characters (page 29 of official specification);
  • 0x0B : it’s the length of the string (11 bytes). As you can see, the length is represented with a single byte as described by the previous constructor 0xA1;
  • “Hello world” : the UTF8 encoded string represented as AMQP value;

Representing a primitive type like a string is very simple because the constructor is simple itself but describing a custom type is more complex. Using the same example from the official specification, imagine you want to define a custom type “URL” (of course, it’s a string but not all strings are URLs) and to encode an URL as AMQP value. In this case, the constructor doesn’t consist of a single byte (a simple primitive format-code) but it has a descriptor followed by a primitive format-code. The very interesting thing is that the descriptor itself is a valid AMQP value so it’s encoded in the same way ! It means that we need a constructor followed untyped bytes to define a descriptor !

Referring the URL example we have :

0x00 0xA1 0x03 “URL” 0xA1 0x1E “http://example.org/hello-world” 

where :

  • 0x00 : it’s the format-code that defines a descriptor (page 18 of official specification);
  • 0xA1 : it’s the primitive format-code used to define the custom type within the descriptor. Our custom type is defined as the UTF8 encoded string “URL” so a string with max length above 255 characters;
  • 0x03 : it’s the length of the string (3 bytes);
  • “URL” : the UTF8 encoded string used to define the type with the whole descriptor;
  • 0xA1 : it’s the primitive format-code that is part of the constructor for a described type and follows the above descriptor. In this case it represents an UTF8 encoded string with max length of 255 characters;
  • 0x1E : it’s the length of the string (30 bytes);
  • http://example.org/hello-world ” : the UTF8 encoded string represented as AMQP value;

In this way we don’t represent a simple string but a more specific string because we have defined the custom type “URL” followed by the URL value.

Of course, the AMQP type system is more complex and provides a lot of simple and complex type from scalar (integral numbers, booleans, strings and so on) to collections (arrays, lists and maps). To deep into them you can refer to the official AMQP specification.

Inside a sample frame : SASL mechanisms list

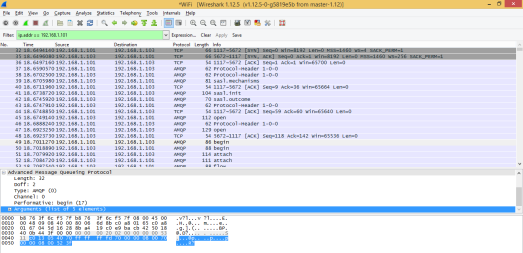
After a quick introduction to the AMQP type system, we can try to analyze a real frame sniffing the AMQP traffic with Wireshark who provides a specific AMQP protocol analyzer. Of course, we can’t collect this traffic if our client connects to Azure Service Bus (queues, topics/subscriptions or event hubs) because this traffic is encrypted with an SSL/TLS connection. For this reason, to have plain (not encrypted) traffic, I used the AMQP broker built in the AMQP .Net Lite library and my Azure SB Lite as client.

01_wireshark_amqp

After TCP handshaking between client and server and after the protocol header exchange, there is the SASL traffic that is used to define the security and authentication layer that will be used for data exchange. The first is the sasl-mechanisms list frame sent from the server to the client to announce the supported authentication mechanisms (for more information, starting from page 113 of official specification).

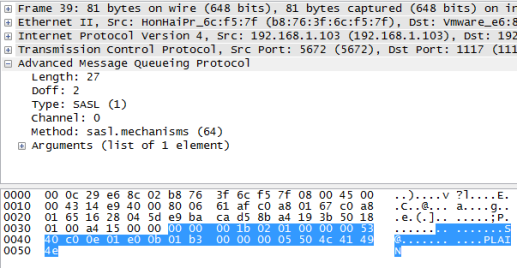
Following a screenshot of such a frame :

02_sasl_mechanisms_frame

The first 8 bytes are part of the AMQP frame header (page 37 of official specification) as it’s defined by the specification so we have :

  • first 4 bytes (0x00 0x00 0x00 0x1B) represent the entire frame length (which is 27 bytes) as decoded by Wireshark plugin;
  • the 5th byte is the DOFF byte (data offset) which represents where the frame data starts (the starting offeset is 4 * DOFF);
  • the 6th byte is the frame type so what’s the content inside the payload. In this case it’s 0x01 that represents a SASL frame;
  • the last 2 bytes of the header are ignored in the case of a SASL frame. In a more generic AMQP frame they represents the channel and it’s the reason why Wireshark plugin decodes them as channel 0 even if it’s a non sense.

After the AMQP frame header we have the frame body that is encoded using the “awesome” builtin type system.

sasl_frame

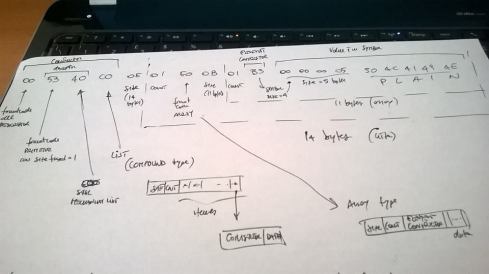
The first byte is 0x00 (descriptor format-code), so it means that we have a not simple constructor that has a descriptor inside it for defining a custom type. What’s this custom type we are describing ? It’s the SASL mechanisms list that contains all the authentication mechanisms supported by the server. This descriptor has 0x53 as primitive format-code that indicates a fixed-one value so an integral value (ulong type on page 26 of official specification) with a size expressed by a single byte (0 – 255). The following value 0x40 represents the custom SASL mechanisms list type as defined in the official specification on page 115. As we can see on this page, it’s a composite type which is a list as we can expected and it’s represented by the following 0xC0 byte (page 29 of official specification).

In the AMQP type system, a list is a polymorphic collection (as compound type) that could contain values with different types (ex. an integral, a boolean, an array …) so it’s encoded as follow :

amqp_compound_type

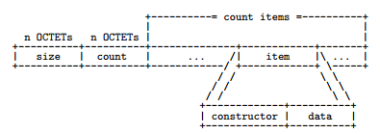
There is the total size of the list in byte (SIZE) and the number of items (COUNT). Each item consists of a constructor and the related data (this is the way for the list to be polymorphic, because each item doesn’t have only the value but the constructor to specify the type too). Returning to our frame we have 0x0E that is the size of the list (14 bytes) followed by 0x01 (the number of items, only one).

But … what’s the single item inside this list ? Of course it starts with the constructor that is represented with 0xE0 and it meas the format-code for an array. In the AMQP type system, an array is a monomorphic collection so that all the items are of the same type. For this reason, it’s encoded in the following way :

amqp_array_type

The encoding is like the list type (SIZE and COUNT) but it has only one constructor to define the single type for all the items inside the collection followed by all the item values themself.

In our frame, we have 0x0B (total size of array in bytes, 11 bytes) and 0x01 (only one element inside the array). After that we have the item constructor represented by 0xB3 format-code that is a “symbol” type (page 29 of the official specification). Symbols are values from a constrained domain; you can think them as enums with a limited number of possible values. The 0xB3 code represents a symbol with a size expressed with 4 bytes, so the following 4 bytes in the frame (0x00 0x00 0x00 0x05) represent a size of 5 bytes for the symbol value.

The symbol value is “PLAIN” and it means that the broker supports only PLAIN authentication method. We can notice that the frame value isn’t encoded as a simple string (primitive format-code 0xA1 we saw previously); a symbol is used because it wants to define an “enum” due to the limited possible values for SASL authentication mechanisms (PLAIN, EXTERNAL, ANONYMOUS and so on).

amqp_sasl_mechanisms_notes

Conclusion

Finally we have decoded the frame and it means we have a list with only one element that is an array of only one element that is the PLAIN symbol !

We could ask why there is a list with an array inside it and not a simple array without external list ! From the official specification (page 22) we can see that a composite type is sent on the wire as a list and it must be always a list. The SASL mechanisms frame is described as a composite type (page 115) so it must be a list.

Inside it we have an array because the broker may support more than one authentication methods and not only one as in this example.

I hope you found this article useful to understand the AMQP type system but you have to consider this blog post as a starting point to deep into the official specification.

Internet of Things “wrap up” : eventi, slides, librerie e … demo con tanto codice !!

Nell’ultimo mese ho sviluppato molto ed ho avuto il piacere di essere speaker a tre eventi nazionali ed uno internazionale in California (ma da remoto).

Sono stato notevolmente impegnato nello scrivere codice e contenuti che ho deciso di riassumere qualora possano tornarvi utili.

DSC_0389 iotday

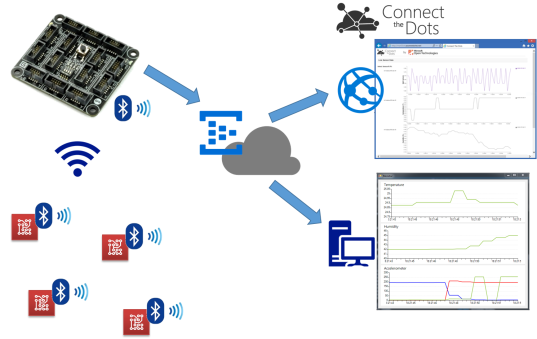
Con le slide ho cercato di descrivere al meglio l’Azure Service Bus focalizzandomi sull’Event Hubs e sul suo utilizzo nell’ambito della telemetria IoT :

A queste slide sono legate delle demo nelle quali ho utilizzato la mia ultima libreria Azure SB Lite, grazie alla quale è possibile accedere al Microsoft Azure Service Bus utilizzando le stesse API dell’SDK “originale” ma sulle piattaforme embedded come .Net Micro Framework e .Net Compact Framework oltre che su Mono (quindi Linux) e WinRT (quindi Windows 8.1 e Windows 10). Essa è basata sulla libreria AMQP .Net Lite di cui nasconde i concetti sul protocollo AMQP.

overall

Per quanto riguarda le demo :

  • BLE2Azure : concept di un IoT gateway da dispositive BLE verso Azure (Event Hubs) realizzato con il .Net Micro Framework e le board FEZ Spider e Netduino 3 Wi-Fi
  • Azure SB Lite Examples : esempi di utilizzo della libreria Azure SB Lite che mi hanno permesso (in quel di Venezia) di spiegare come funziona realmente l’accesso al Service Bus attraverso il protocollo AMQP e scoprire cosa ci sia al di sotto delle semplici APIs.

 Ovviamente non mi fermo qui nonostante il meritato riposo !

🙂

Raspberry Pi e Windows Azure Service Bus via AMQP con la libreria Qpid Proton C

Nel corso di questa tutorial vedremo in che modo sia possibile utilizzare la Raspberry Pi come client AMQP (Advanced Message Queuing Protocol) e collegarla al Windows Azure Service Bus che supporta la versione AMQP 1.0.

Ovviamente, la scelta della libreria client da utilizzare è quasi obbligata : Apache Qpid Proton. Tale libreria sviluppata in C fornisce comunque il bindings per altri linguaggi tra cui Java, Python e PHP ma nel corso dell’articolo utilizzeremo solo la versione nativa.

Generalmente, la Raspberry Pi viene utilizzata con la distribuzione Raspbian (basata su Debian) che è a tutti gli effetti una distribuzione Linux. Ciò vuol dire che possiamo installare la libreria Qpid Proton come faremo su un normale distribuzione Ubuntu su un PC oppure su una macchina virtuale ad esempio su Windows Azure.

Connessione alla Raspberry Pi

Tutte le operazioni che seguono possono essere effettuate accedendo direttamente alla Raspberry Pi attraverso un monitor, una tastiera ed un mouse collegati ad essa oppure in remoto attraverso l’utilizzo di SSH.

La seconda soluzione è sicuramente la più comoda, utilizzado un tool come Putty e specificando l’indirizzo IP della nostra board, la porta (tipicamente la 22) ed il tipo di connessione (SSH).

01

02

Installazione dei prerequisiti

Una volta effettuato l’accesso, in primo luogo bisogna installare dei componenti fondamentali tra cui GCC, CMAKE (sistema di build utilizzato da Qpid) e la libreria UUID per la generazione di identificativi univoci.

sudo apt-get install gcc cmake uuid-dev

Poichè Qpid utilizza SSL e il Service Bus necessita di questo prerequisito per la connessione, dobbiamo installare OpenSSL nel nostro sistema (che in realtà potrebbe essere già installato).

sudo apt-get install openssl

La presenza della libreria OpenSSL non include la presenza degli header file e delle librerie statiche necessarie per lo sviluppo. Bisogna quindi installare la libssl-dev.

sudo apt-get install libssl-dev

Non essendo interessato ad alcun binding con altri linguaggi, possiamo evitare di installare i package per Python, PHP e così via, passando direttamente al download della libreria dal sito ufficiale. Inoltre, non installiamo le dipendenze che riguardano la generazione automatica della documentazione.

Download e compilazione della Qpid Proton

Dal sito ufficiale possiamo ricavare uno dei mirror da cui scaricare la libreria nella sezione “Download” per poi scaricarla usando il tool WGET.

pi@raspberrypi ~ $ wget http://apache.fastbull.org/qpid/proton/0.6/qpid-proton-0.6.tar.gz
–2014-04-16 07:09:52–  http://apache.fastbull.org/qpid/proton/0.6/qpid-proton-0.6.tar.gz
Resolving apache.fastbull.org (apache.fastbull.org)… 194.116.84.14
Connecting to apache.fastbull.org (apache.fastbull.org)|194.116.84.14|:80… connected.
HTTP request sent, awaiting response… 200 OK
Length: 629147 (614K) [application/x-gzip]
Saving to: `qpid-proton-0.6.tar.gz’

100%[======================================>] 629,147     1.00M/s   in 0.6s

2014-04-16 07:09:53 (1.00 MB/s) – `qpid-proton-0.6.tar.gz’ saved [629147/629147]

Dopo il download. estraiamo il contenuto del file.

tar xvfz qpid-proton-0.6.tar.gz

Entriamo nella cartella appena create (qpid-proton-0.6) e creiamo una cartella “build” in cui faremo generare dal tool CMAKE il corrispondente Makefile per la compilazione della libreria.

mkdir build

cd build

cmake -DCMAKE_INSTALL_PREFIX=/usr ..

L’output del comando cmake dovrebbe essere il seguente.

pi@raspberrypi ~/qpid-proton-0.6/build $ cmake -DCMAKE_INSTALL_PREFIX=/usr ..
— The C compiler identification is GNU 4.6.3
— Check for working C compiler: /usr/bin/gcc
— Check for working C compiler: /usr/bin/gcc — works
— Detecting C compiler ABI info
— Detecting C compiler ABI info – done
— PN_VERSION: 0.6
— Found Java: /usr/bin/java
— Java version: 1.7.0.40. javac is at: /usr/bin/javac
— Locations of Bouncycastle 1.47 jars: BOUNCYCASTLE_BCPROV_JAR-NOTFOUND BOUNCYCASTLE_BCPKIX_JAR-NOTFOUND
— Won’t build proton-j-impl because one or more Bouncycastle jars were not found. PROTON_JAR_DEPEND_DIR was: /usr/share/java
— Found OpenSSL: /usr/lib/arm-linux-gnueabihf/libssl.so;/usr/lib/arm-linux-gnueabihf/libcrypto.so (found version “1.0.1e”)
— Looking for clock_gettime
— Looking for clock_gettime – not found.
— Looking for clock_gettime in rt
— Looking for clock_gettime in rt – found
— Looking for uuid_generate
— Looking for uuid_generate – not found.
— Looking for uuid_generate in uuid
— Looking for uuid_generate in uuid – found
— Looking for strerror_r
— Looking for strerror_r – found
— Looking for atoll
— Looking for atoll – found
— Could NOT find SWIG (missing:  SWIG_EXECUTABLE SWIG_DIR)
— Could NOT find Doxygen (missing:  DOXYGEN_EXECUTABLE)
— Looking for include file inttypes.h
— Looking for include file inttypes.h – found
— Can’t locate the valgrind command; no run-time error detection
— Cannot find rspec, skipping rspec tests
— Cannot find both Java and Maven: testing disabled for Proton-J and JNI Bindings
— Configuring done
— Generating done
— Build files have been written to: /home/pi/qpid-proton-0.6/build

Ci sono alcuni warning sull’impossibilità di trovare il runtime Java, Swig e Doxygen. Come già anticipato, non siamo interessato al binding con altri linguaggi ed alla generazione automatica della documentazione per cui possiamo non preoccuparci di tali warning.

L’ultimo step consiste nell’utilizzare il tool MAKE per elaborare il Makefile appena generato da cmake ed installare la libreria nel sistema.

sudo make install

Al termine della compilazione, la libreria è installata nel sistema in corrispondenza della cartella /usr (come specificato nel primo comando CMAKE eseguito) ed in particolare :

  • /usr/share/proton : contiene un esempio di utilizzo;

  • /usr/bin e /usr/lib : contengono i file relativi la libreria vera e propria;

  • /usr/include/proton : contiene gli header file necessari per lo sviluppo di un’applicazione;

Esempio di invio e ricezione su Service Bus

Per poter testare il corretto funzionamento della libreria utilizziamo i semplici esempi di send e receive distribuiti con la libreria stessa durante l’installazione.

cd /usr/share/proton/examples/messenger/

Anche in questo caso possiamo sfruttare il tool CMAKE per la generazione del Makefile necessario alla compilazione (da notare che è necessario l’esecuzione come Super User).

sudo mkdir build

cd build

sudo cmake ..

sudo make all

Al termine della compilazione avremo i due file eseguibili recv e send corrispondenti a due semplici applicativi che permettono di ricevere ed inviare messaggi ad una coda via AMQP.

Per fare questo, creiamo un nuovo namespace per il Service Bus sul portale di Microsoft Azure ed in corrispondenza di questo anche una queue. Nel mio caso, il namespace è qpidproton.servicebus.windows.net e la coda banalmente “myqueue”. Attraverso il portale dobbiamo ricavare due parametri fondamentali per la connessione che sono lo SharedSecretIssuer (tipicamente “owner”) e lo SharedSecretValue.

03

L’indirizzo per la connessione al Service Bus avrà la seguente struttura :

amqps://username:password@namespace.servicebus.windows.net/queue_name

Poichè il Service Bus usa le connessioni SSL, dobbiamo utilizzare AMQPS in luogo del semplice AMQP.

Per inviare un messaggio con testo “Hello” alla queue dobbiamo eseguire l’applicazione send nel modo seguente.

./send –a amqps://username:password@namespace.servicebus.windows.net/queue_name Hello

Per poter ricevere un messaggio dalla stessa queue possiamo utilizzare l’applicazione recv nel modo seguente.

./recv amqps://username:password@namespace.servicebus.windows.net/queue_name

Con un risultato di questo tipo.

Address: amqps://username:password@namespace.servicebus.windows.net/queue_name
Subject: (no subject)
Content: “Hello”

Qpid Proton C su una macchina virtuale Ubuntu Server 12.04 in Windows Azure per l’utilizzo del Service Bus con AMQP : creazione, configurazione, compilazione ed uso

Uno dei protocolli maggiormente utilizzati nell’ambito del messaging che può trovare applicazione anche nell’Internet of Things è l’AMQP (Advanced Message Queuing Protocol), ormai già standard OASIS da alcuni anni e giunto alla versione 1.0.

Il servizio Service Bus offerto da Windows Azure supporta tale protocollo che, essendo standard, garantisce la comunicazione tra client sviluppati su piattaforme diverse. Nel caso di una piattaforma Microsoft non abbiamo alcun problema grazie al Windows Azure SDK (giunto alla versione 2.3) che astrae completamente il protocollo di comunicazione sottostante con il Service Bus (AMQP, SBMP, …) grazie al suo modello di programmazione.

Nel caso in cui ci troviamo a lavorare su un sistema non Microsoft, una delle migliori scelte è quella di adottare le librerie del progetto Apache Qpid ed in particolare la Qpid Proton. Tale libreria sviluppata in C fornisce comunque il bindings per altri linguaggi tra cui Java, Python e PHP.

Nel corso di questo tutorial, vedremo come sia possibile creare una macchina virtuale Ubuntu Server 12.04 su Windows Azure, installare ed utilizzare la libreria Qpid Proton per inviare e ricevere messaggi attraverso il Service Bus con il protocollo AMQP. Ovviamente, tale procedura può essere utilizzata anche nel caso di un qualsiasi sistema Ubuntu 12.04 (anche client e non server) non necessariamente su Windows Azure ma sul nostro PC in locale.

Creazione della macchina virtuale su Windows Azure

In primo luogo dobbiamo creare una macchina virtuale con il sistema operativo Ubuntu Server 12.04 LTS su Windows Azure. Per farlo, è necessario collegarsi al Management Portal e loggarsi con il proprio account. Una volta loggati, selezioniamo sulla sinistra “Virtual Machines” e cliccate su “Create a Virtual Machine”; utilizziamo l’opzione di “Quick create” impostando :

  • DNS Name : il nome DNS da assegnare alla macchina virtuale;
  • Image : l’immagine del sistema operativo da utilizzare che in questo caso è “Ubuntu Server 12.04 LTS”;
  • Size : la “dimensione” della macchina virtuale in base alle nostre necessità;
  • New password/Confirm : password e relativa conferma per l’utente creato di default che si chiama “azureuser”;
  • Region/Affinity Group : la regione (data center) in cui creare la nostra macchina virtuale;

Clicchiamo su “Create a virtual machine” per avviare la creazione della macchina virtuale.

01_create_vm

Al termine del processo di creazione che dura alcuni minuti avremo la conferma.

02_vm_created

Per poterci collegare alla macchina virtuale in remoto, è necessario conoscere l’endpoint per l’accesso via SSH che possiamo trovare cliccando sul nome della macchina virtuale appena creata (nel mio caso ppatiernoubuntu) e poi sul tab “Endpoints” (nel mio caso la porta è la 22).

03_SSH_endpoint

Scarichiamo un client Telnet come Putty per poterci collegare, inserendo l’host name e la porta corretta.

04_Putty

All’apertura della console digitiamo “azureuser” come nome utente e la corrispondente password che abbiamo scelto nella fase di creazione della macchina virtuale.

Installazione dei prerequisiti

Il file README distribuito con la libreria Qpid Proton descrive abbastanza nel dettaglio la procedura per l’installazione della libreria ma fa riferimento al tool YUM che su Ubuntu non abbiamo nativamente a disposizione; in luogo di esso usiamo APT. Inoltre, alcune libreria non hanno esattamente lo stesso nome come descritto nel file README.

In genere, la prima operazione che faccio su una macchina Ubuntu è quella di installare il package “build-essential” con tutti gli strumenti principali per la compilazione, eseguendo il comando :

sudo apt-get install build-essential

Il passo successivo è quello di installare le dipendenze principali tra cui GCC (che avremo già installato grazie al package “build-essential”), CMAKE (sistema di build utilizzato da Qpid) e la libreria UUID per la generazione di identificativi univoci (un pò come il nostro caro Guid).

sudo apt-get install gcc cmake uuid-dev

Poichè Qpid utilizza SSL e il Service Bus necessita di questo prerequisito per la connessione, dobbiamo installare OpenSSL nel nostro sistema (che in realtà potrebbe essere già installato).

sudo apt-get install openssl

La presenza della libreria OpenSSL non include la presenza degli header file e delle librerie statiche necessarie per lo sviluppo. Bisogna quindi installare la libssl-dev.

sudo apt-get install libssl-dev

Non essendo interessato ad alcun binding con altri linguaggi, possiamo evitare di installare i package per Python, PHP e così via, passando direttamente al download della libreria dal sito ufficiale. Inoltre, non installiamo le dipendenze che riguardano la generazione automatica della documentazione.

Download e compilazione della Qpid Proton

Dal sito ufficiale possiamo ricavare uno dei mirror da cui scaricare la libreria nella sezione “Download” per poi scaricarla usando il tool WGET.

azureuser@ppatiernoubuntu:~$ wget http://apache.fastbull.org/qpid/proton/0.6/qpid-proton-0.6.tar.gz
–2014-04-16 07:09:52– 
http://apache.fastbull.org/qpid/proton/0.6/qpid-proton-0.6.tar.gz
Resolving apache.fastbull.org (apache.fastbull.org)… 194.116.84.14
Connecting to apache.fastbull.org (apache.fastbull.org)|194.116.84.14|:80… connected.
HTTP request sent, awaiting response… 200 OK
Length: 629147 (614K) [application/x-gzip]
Saving to: `qpid-proton-0.6.tar.gz’

100%[======================================>] 629,147     1.00M/s   in 0.6s

2014-04-16 07:09:53 (1.00 MB/s) – `qpid-proton-0.6.tar.gz’ saved [629147/629147]

Dopo il download. estraiamo il contenuto del file.

tar xvfz qpid-proton-0.6.tar.gz

Entriamo nella cartella appena create (qpid-proton-0.6) e creiamo una cartella “build” in cui faremo generare dal tool CMAKE il corrispondente Makefile per la compilazione della libreria.

mkdir build

cd build

cmake -DCMAKE_INSTALL_PREFIX=/usr ..

L’output del comando cmake dovrebbe essere il seguente.

azureuser@ppatiernoubuntu:~/qpid-proton-0.6/build$ cmake -DCMAKE_INSTALL_PREFIX=/usr ..
— The C compiler identification is GNU
— Check for working C compiler: /usr/bin/gcc
— Check for working C compiler: /usr/bin/gcc — works
— Detecting C compiler ABI info
— Detecting C compiler ABI info – done
— PN_VERSION: 0.6
— Could NOT find Java (missing:  Java_JAVA_EXECUTABLE Java_JAR_EXECUTABLE Java_JAVAC_EXECUTABLE Java_JAVAH_EXECUTABLE Java_JAVADOC_EXECUTABLE)
— Found OpenSSL: /usr/lib/x86_64-linux-gnu/libssl.so;/usr/lib/x86_64-linux-gnu/libcrypto.so (found version “1..1”)
— Looking for clock_gettime
— Looking for clock_gettime – not found.
— Looking for clock_gettime in rt
— Looking for clock_gettime in rt – found
— Looking for uuid_generate
— Looking for uuid_generate – not found.
— Looking for uuid_generate in uuid
— Looking for uuid_generate in uuid – found
— Looking for strerror_r
— Looking for strerror_r – found
— Looking for atoll
— Looking for atoll – found
— Could NOT find SWIG (missing:  SWIG_EXECUTABLE SWIG_DIR)
— Could NOT find Doxygen (missing:  DOXYGEN_EXECUTABLE)
— Looking for include files INTTYPES_AVAILABLE
— Looking for include files INTTYPES_AVAILABLE – found
— Can’t locate the valgrind command; no run-time error detection
— Cannot find ruby, skipping ruby tests
— Cannot find both Java and Maven: testing disabled for Proton-J and JNI Bindings
— Configuring done
— Generating done
— Build files have been written to: /home/azureuser/qpid-proton-0.6/build

Ci sono alcuni warning sull’impossibilità di trovare il runtime Java, Swig e Doxygen. Come già anticipato, non siamo interessato al binding con altri linguaggi ed alla generazione automatica della documentazione per cui possiamo non preoccuparci di tali warning.

L’ultimo step consiste nell’utilizzare il tool MAKE per elaborare il Makefile appena generato da cmake ed installare la libreria nel sistema.

sudo make install

Al termine della compilazione, la libreria è installata nel sistema in corrispondenza della cartella /usr (come specificato nel primo comando CMAKE eseguito) ed in particolare :

  • /usr/share/proton : contiene un esempio di utilizzo;
  • /usr/bin e /usr/lib : contengono i file relativi la libreria vera e propria;
  • /usr/include/proton : contiene gli header file necessari per lo sviluppo di un’applicazione;

Esempio di invio e ricezione su Service Bus

Per poter testare il corretto funzionamento della libreria utilizziamo i semplici esempi di send e receive distribuiti con la libreria stessa durante l’installazione.

cd /usr/share/proton/examples/messenger/

Anche in questo caso possiamo sfruttare il tool CMAKE per la generazione del Makefile necessario alla compilazione (da notare che è necessario l’esecuzione come Super User).

sudo mkdir build

cd build

sudo cmake ..

sudo make all

Al termine della compilazione avremo i due file eseguibili recv e send corrispondenti a due semplici applicativi che permettono di ricevere ed inviare messaggi ad una coda via AMQP.

Per fare questo, creiamo un nuovo namespace per il Service Bus sul portale di Microsoft Azure ed in corrispondenza di questo anche una queue. Nel mio caso, il namespace è qpidproton.servicebus.windows.net e la coda banalmente “myqueue”. Attraverso il portale dobbiamo ricavare due parametri fondamentali per la connessione che sono lo SharedSecretIssuer (tipicamente “owner”) e lo SharedSecretValue.

05_sb_access

L’indirizzo per la connessione al Service Bus avrà la seguente struttura :

amqps://username:password@namespace.servicebus.windows.net/queue_name

Poichè il Service Bus usa le connessioni SSL, dobbiamo utilizzare AMQPS in luogo del semplice AMQP.

Per inviare un messaggio con testo “Hello” alla queue dobbiamo eseguire l’applicazione send nel modo seguente.

./send –a amqps://username:password@namespace.servicebus.windows.net/queue_name Hello

Per poter ricevere un messaggio dalla stessa queue possiamo utilizzare l’applicazione recv nel modo seguente.

./recv amqps://username:password@namespace.servicebus.windows.net/queue_name

Con un risultato di questo tipo.

Address: amqps://username:password@namespace.servicebus.windows.net/queue_name
Subject: (no subject)
Content: “Hello”

Service Bus for Windows Server 1.1 : errore di installazione di Windows Fabric su Windows in lingua Italiana

E’ stato rilasciato da circa un mese Service Bus for Windows Server, ossia la versione “on premise” del Service Bus che la Microsoft mette a disposizione attraverso Windows Azure. La versione “on premise” permette l’utilizzo di questo servizio su di un PC/server opportunamente configurato per costituire una farm con altri PC nella stessa rete (oppure come unico PC di una farm). In questo modo, abbiamo la possibilità di utilizzare un middleware di messaging senza la necessità di utilizzare il cloud (un pò come abbiamo fatto sino ad oggi con MSMQ, che rappresenta ormai la versione “legacy” del Service Bus).

L’installazione va eseguita attraverso il Web Platform Installer 4.6 all’interno del quale è semplice trovare la voce “Windows Azure Pack : Service Bus 1.1” nella categoria dei prodotti Windows Azure.

01_sb

Cliccando su “Aggiungi” e poi su “Installa”, il gioco sembrerebbe fatto ma purtroppo, per chi come me ha un sistema operativo in italiano…il risultato non è così scontato !

Prima di installare il Service Bus, parte l’installazione di Windows Fabric necessaria al middleware di messaging. Ebbene, è proprio questa installazione che non si completa in maniera corretta.

Dopo aver cercato in rete senza alcun risultato utile, mi sono messo in contatto con Ziv Rafalovich del team Microsoft sul Service Bus che, dopo un fitto scambio di mail, ha capito quale fosse il mio problema, strettamente legato alla nazionalità “italiana” della mia installazione di Windows. A quanto pare c’è un problema noto per il quale è previsto un workaround che riporto di seguito :

Problem – Windows Fabric V1 Setup issue on the ITA Sku

Root cause – In FabricSetup we use: logman creates trace FabricTraces -p {cbd93bc2-71e5-4566-b3a7-595d8eeca6e8} -o “C:\ProgramData\Windows Fabric\Fabric\log\Traces\fabric_traces_129915852913461599” -bs 128 -f bin -max 128 -cnf 00:00:00 -v nnnnnn

This is failing because in Italian the format for time is 00.00.00 and not 00:00:00

Work Around –

1) Change the following registry setting to HH:MM:SS and install windows fabric (without restarting the services/machine). .

> HKEY_USERS\.DEFAULT\Control Panel\International\sTimeFormat = h:mm:ss tt

2) After the installation. Change the registry setting back to h.mm.ss tt as it was in ITA

Cambiando il formato dell’orario prima dell’installazione, permette di completare quest’ultima in maniera corretta, per poi ripristinare tale formato al valore originale.