.Net

GnatMQ : a more community driven future !

When I developed the M2Mqtt library, a lot of people asked me to develop a .Net based MQTT broker as well. It wasn’t my initial intention but at same time I thought that it could be a good idea trying to reuse part of the M2Mqtt client in order to do that : this is the way how GnatMQ was born.

From the beginning I said that it wasn’t a production ready MQTT broker with decent performance for its job but in the last years it turned out that a lot of developers started to use it for their IoT solutions.

Due to my last really busy year and pushed by this issue opened in the GnatMQ repo, this week I decided to create a GnatMQ organization and making this broker more open source then before. I added some developers who asked me to be member of such organization so that they can drive the GnatMQ future better than me : this members proved to contribute to the project in the past pushing PRs on it. Of course, I won’t give up on that, I will always feel like the project’s father and I’ll coordinate such community.

So … it means that GnatMQ isn’t dead … the community and the power of collaboration will move it to the next level, maybe having a really good fully .Net based MQTT broker !


M2Mqtt and GnatMQ are dead ? Long life to them !

In the last months a lot of people asked me if the M2Mqtt and GnatMQ projects are dead because there were no commits for a long time.

I can say … no ! They are not absolutely dead !

I was very busy in the last months, starting my new exciting Red Hat career in the messaging and IoT team, but I want to continue to support the projects as lead and main committer. Of course, I’ll be still busy with my new job but my commitment is to continue to improve the libraries, fixing bugs and adding new features. Just remember that I’ll do it in my spare time so I could not be so quick to reply your suggestions; of course your help with useful pull requests will be great !

As you now, today the M2Mqtt client library is under the official Paho GitHub repo and I have finally deleted the repo on my personal GitHub account.

The GnatMQ, based on M2Mqtt, will continue to live where it’s now here.

I’ll do my best to check the issues and the pull requests provided by the community, happy to know that my projects have a lot of followers and there are a lot of professional solutions using them out there !

As always I invite you to share with me your experience using my libraries in order to mention your solution in the “case studies” section of the official web site.

Thanks !

Azure IoT Hub : get telemetry data using AMQP stack and Azure SB Lite

To complete the last two article series (data from device to cloud, command/feedback from cloud to device) on using AMQP protocol stack to interact with Azure IoT Hub, we need to get telemetry data from the devices.

When devices send data through their D2C endpoints, these data flow into the IoT Hub system and are made available to the service through its D2C endpoint that is Event Hubs compatible which means we can use any Event Hubs client to get data from it.

eventhubcompatible

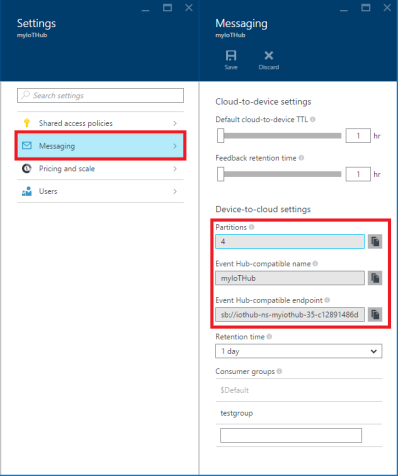
On the new Azure portal we can see a lot of information about that in the related “Messaging” tab for our IoT Hub. The main information are :

  • Partitions : the number of partitions through which data from devices are ingested by the IoT Hub;
  • Event Hub compatible name : it’s the name of the event hub;
  • Event Hub compatible endpoint : it’s the complete path (with namespace) of the event hub;
  • Retention time : it’s the time the messages are retained inside the event hub;
  • Consumer groups : the available consumer groups for reading messages from event hub using related receivers (there is always the $Default consumer group);

To read from this event hub endpoint we can use any shared access policy that has the ServiceConnect permission. The portal provides us a default policy named “service” with its related shared access key. Using three of the above information we are able to build the connection string needed to connect to this auto-generated event hub :

Endpoint={Event Hub-compatible endpoint};SharedAccessKeyName={iot hub policy name};SharedAccessKey={iot hub policy key}

Of course, other than the above connection string we have to use the Event Hub compatible name.

Now … how the get data from event hub ? What’s the code we have to write ?

The simpler way to do that is to use the Event Processor Host provided by Microsoft as Nuget package that instantiates receivers for us on all available partitions and handle their leases providing us a checkpoint feature. The “only” big problem we have with this awesome software component is that it works only on .Net Framework so we can use it on PC based and Web based service applications.

UWP apps ? : AMQP and Azure SB Lite the solution

What can we do for UWP apps ? What we can do if we want to monitor telemetry data from an UWP app on Windows 10 without bridging data from a Web application ?

As in the previous articles the solution is to use a good C# implementation of AMQP protocol stack as AMQP .Net Lite but in this case, to avoid AMQP stuff, we can use the Azure SB Lite library (available on Nuget too) that wraps the protocol stack and exposes same official Service Bus SDK APIs to access to Event Hubs (other than queues and topics/subscriptions).

If you know the above APIs to interact with Event Hubs, the following code will be familiar to you :

static string ConnectionString = "Endpoint=[EVENT_HUB_COMPATIBLE_ENDPOINT];SharedAccessKeyName=[IOT_HUB_POLICY_NAME];SharedAccessKey=[IOT_HUB_POLICY_KEY]";
static string eventHubEntity = "[EVENT_HUB_COMPATIBLE_NAME]";
static string partitionId = "[PARTIION_ID]";
static DateTime startingDateTimeUtc;

static void Main(string[] args)
{
   ServiceBusConnectionStringBuilder builder = new ServiceBusConnectionStringBuilder(ConnectionString);
   builder.TransportType = TransportType.Amqp;

   MessagingFactory factory = MessagingFactory.CreateFromConnectionString(ConnectionString);

   EventHubClient client = factory.CreateEventHubClient(eventHubEntity);
   EventHubConsumerGroup group = client.GetDefaultConsumerGroup();

   startingDateTimeUtc = new DateTime(2015, 10, 31, 16, 00, 00);
            
   EventHubReceiver receiver = group.CreateReceiver(partitionId, startingDateTimeUtc);
            
   while (true)
   {
        EventData data = receiver.Receive();
        Debug.WriteLine("{0} {1} {2}", data.PartitionKey, data.EnqueuedTimeUtc.ToLocalTime(), Encoding.UTF8.GetString(data.GetBytes()));
   }

   receiver.Close();
   client.Close();
   factory.Close();
}

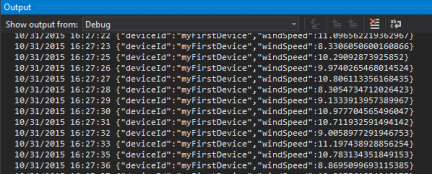
The above example is using Azure SB Lite and connecting to my current IoT Hub, it produces the following output :

iot_hub_event_hub_sample

Without having the Event Processor Host available on UWP apps, the bid deal is to create one or more receivers on all partitions by ourselves and handling the checkpoint on what is the position inside the stream we have already read. In that case, it’s useful to save the last reading date/time and use it as offset for starting a new read on the stream.

Conclusion

If you scaried to develop a monitoring UWP application because the related IoT Hub SDK doesn’t work on it … don’t worry you always have a solution that is based on using the underlying AMQP protocol stack. In that case, the solution is simpler thanks to the work I already done for the community with the Azure SB Lite. Of course, the choice to use and UWP application on a Windows 10 device instead of a .Net / Web application for monitoring your telemetry data is up to you and depends on the scenario, so it can make sense or not.

Azure IoT Hub : commands and feedback using AMQP .Net Lite

In the previous article, I described how it’s possibile to send telemetry data from a device and receive commands (sending feedback) from the cloud (to the device itself) using AMQP .Net Lite library connecting to the Azure IoT Hub. This approach is useful for some platforms that aren’t supported by the official SDKs like the .Net Micro Framework due to the Task and async/await programming model used in the C# implementation.

Covered the device side, it’s now time to see how we can use the same AMQP .Net Lite library on the service side. You could ask … “Why ?!! We have the great Microsoft.Azure.Devices Nuget package that provides the ServiceClient class to handle the connection, sending commands and receive feedback to/from devices !!”

You are right ! It’s true but … only if your service runs in a Web or a .Net Framework based application. If you try to install the above package in an UWP application you receive the following error !

nuget_uwp_error

As we can see, the official package uses some libraries that aren’t compatible with UAP like Microsoft.AspNet.WebApi.Core and Microsoft.Azure.Amqp. Tha latter sounds strange to me! It seems to be another AMQP stack implementation from Microsoft that can only run on .Net Framework. What are the differences with AMQP .Net Lite library? I’m sorry but I don’t know … the above stack isn’t open source and we can’t deep into it. However, there is a big and great difference that should be considered as a strength for AMQP .Net Lite : it works on all .Net platforms (micro, compact and full), on WinRT/UWP and Mono !

For this reason and using AMQP .Net Lite library we have a solution on developing an IoT Hub service inside a UWP application, a scenario that isn’t officially supported by Microsoft. As I love to say we can do that “knowing some AMQP protocol concepts and a bunch of IoT Hub node paths” !

IoT Hub service endpoints

Inside the IoT Hub architecture, the service has two endpoints to communicate with devices :

  • C2D (cloud to device) : the back end system can use this endpoint to send messages (for example commands) to the devices. This endpoint acts like a queue and each message has a TTL (Time To Live) so that it’s removed from the queue if the timeout expires (it’s useful to have commands executed in a short period of time and not executed too late when an offline device comes back online but the execution isn’t needed at that time because it could be harmful). The back end system can receive a confirmation message or delivery fault to understand if device has received command or not;
  • D2C (device to cloud) : it’s an Event Hubs compatible endpoint used by the back end system to retrieve messages from device (telemetry data) and feedback on command delivery (successful or not). “Event Hubs compatible” means that we can use an Event Hub client to receive messages from this endpoint (for example using an Event Processor Host implementation);

At AMQP level the endpoints are accessible from different entity paths; if you know Service Bus queues, topics/subscriptions and event hubs we can think them in the same way.

The entity path for sending command to devices is defined in the following way :

/messages/devicebound

while the entity path for receiving feedback (on commands sent) from devices is the following :

/messages/servicebound/feedback

As for the previous article, it means that after creating a connection and a session to our IoT Hub host we need to create two links to above entities (or nodes as defined in the AMQP spec). Using the programming model provided by AMQP .Net Lite library we have :

  • A SenderLink to the /messages/devicebound node;
  • A ReceiverLink to the /messages/servicebound/feedback node;

Authentication : sending the SAS token

The authentication mechanism is the same as device side. In this scenario, we need to send two SAS token on the two different AMQP nodes for sending command and receiving feedback.

The SAS token audience and resource URI for sending command are the same and defined in the following way :

string audience = Fx.Format("{0}/messages/devicebound", HOST);
string resourceUri = Fx.Format("{0}/messages/devicebound", HOST);

string sasToken = GetSharedAccessSignature(SHARED_ACCESS_KEY_NAME, SHARED_ACCESS_KEY, resourceUri, new TimeSpan(1, 0, 0));
bool cbs = PutCbsToken(connection, HOST, sasToken, audience);

For receiving feedback, they are the following :

string audience = Fx.Format("{0}/messages/servicebound/feedback", HOST);
string resourceUri = Fx.Format("{0}/messages/servicebound/feedback", HOST);

string sasToken = GetSharedAccessSignature(SHARED_ACCESS_KEY_NAME, SHARED_ACCESS_KEY, resourceUri, new TimeSpan(1, 0, 0));
bool cbs = PutCbsToken(connection, HOST, sasToken, audience);

Sending command

Using the SenderLink instance the device sends data calling the simple Send() method and passing it a Message class instance contains the data to send.

The sender link is created inside a new AMQP Session (using the related class of AMQP .Net Lite library) and the great news is that, thanks to the multiplexing feature of AMQP protocol, we can use the same session for both sender and receiver links all inside the same TCP connection.

The corresponding class in the official SDK is the ServiceClient class that provides the SendAsync() method. Regarding the original Message class (included into official SDK, not AMQP .Net Lite), it exposes the Ack property with following possible values :

  • none (default) : the service doesn’t want any feedback on command received by the device;
  • positive : the service receives a feedback message if the message was completed;
  • negative : the service receives a feedback message if the message expired (or max delivery count was reached) without being completed by the device;
  • full : the service receives both positive and negative feedbacks;

For more information you can refer to the previous article with a clear explanation of the message life cycle.

Using the AMQP .Net Lite library we don’t have an Ack property on the Message class but we need to use the application properties collection at AMQP level. The Ack property (at high level) is translated in an application property named “iothub-ack” (at AMQP level) which can have the above possible values. If we don’t set this application property, it means the same as “none” value so no feedback.

static private void SendCommand()
{
    string audience = Fx.Format("{0}/messages/devicebound", HOST);
    string resourceUri = Fx.Format("{0}/messages/devicebound", HOST);

    string sasToken = GetSharedAccessSignature(SHARED_ACCESS_KEY_NAME, SHARED_ACCESS_KEY, resourceUri, new TimeSpan(1, 0, 0));
    bool cbs = PutCbsToken(connection, HOST, sasToken, audience);

    if (cbs)
    {
         string to = Fx.Format("/devices/{0}/messages/devicebound", DEVICE_ID);
         string entity = "/messages/devicebound";

         SenderLink senderLink = new SenderLink(session, "sender-link", entity);

         var messageValue = Encoding.UTF8.GetBytes("i am a command.");
         Message message = new Message()
         {
              BodySection = new Data() { Binary = messageValue }
         };
         message.Properties = new Properties();
         message.Properties.To = to;
         message.Properties.MessageId = Guid.NewGuid().ToString();
         message.ApplicationProperties = new ApplicationProperties();
         message.ApplicationProperties["iothub-ack"] = "full";

         senderLink.Send(message);
         senderLink.Close();
    }
}

As we can see, the sending path “/messages/devicebound” hasn’t any information about the target device. To do that, the service need to set the To AMQP system property to the following value :

/devices/<DEVICE_ID>/messages/devicebound

where <DEVICE_ID> is the id assigned to the device when we create it inside the identity registry.

Finally, it’s importat to notice that the C2D endpoint queue can hold at most 50 messages.

Receiving feedback

Using the ReceiverLink instance the service can receive feedback from the device calling the Receive() method.

static private void ReceiveFeedback()
{
     string audience = Fx.Format("{0}/messages/servicebound/feedback", HOST);
     string resourceUri = Fx.Format("{0}/messages/servicebound/feedback", HOST);

     string sasToken = GetSharedAccessSignature(SHARED_ACCESS_KEY_NAME, SHARED_ACCESS_KEY, resourceUri, new TimeSpan(1, 0, 0));
     bool cbs = PutCbsToken(connection, HOST, sasToken, audience);

     if (cbs)
     {
          string entity = "/messages/servicebound/feedback";

          ReceiverLink receiveLink = new ReceiverLink(session, "receive-link", entity);

          Message received = receiveLink.Receive();
          if (received != null)
          {
               receiveLink.Accept(received);
               System.Diagnostics.Trace.WriteLine(Encoding.UTF8.GetString(received.GetBody<byte[]>()));
          }

          receiveLink.Close();
     }
}

The received message has a body in JSON format with an array of records (feedback from more different devices) each with following properties :

  • OriginalMessageId : it’s the MessageId of the original command (message) sent from the service to the device;
  • Description : description result that is related to the possible outcomes (success, message expired, maximum delivery count exceeded, message rejected);
  • DeviceGenerationId : device generation id related to the device that sent the feedback for a specific command;
  • DeviceId : device id related to the device that sent the feedback for a specific command;
  • EnqueuedTimeUtc : timestamp related to the outcome (it means when the feedback was enqueued);

For a single feedback, the JSON should be as following :

[{"originalMessageId":"5aac3169-af00-4536-acdb-cb9ea6b3980e","description":"Success","deviceGenerationId":"635794823643795743","deviceId":"<device_id>","enqueuedTimeUtc":"2015-10-29T07:59:00.9772497Z"}]

The full source code

As for all examples related to my blog posts, I update sample from previous article on GitHub. Now you can find a simple console application and a UWP application that are able to send command to a device and receive related feedback.

Conclusion

It’s clear that for a service running in a Web Application or .Net Framework based application, the best solution is to use the official Nuget package. With this article, I covered the NON officially supported possibility to use an UWP application to control devices through the IoT Hub thanks to the AMQP .Net Lite library and a bunch of AMQP paths.

If you consider the great portability of this AMQP stack implementation, you could control your devices using a .Net Compact Framework app (on Windows Embedded Compact 2013) or … another device based on .Net Micro Framework !

🙂
Connecting to the Azure IoT Hub using an AMQP stack

Accessing to the Azure IoT Hub service is so simple using all the available SDKs that Microsoft provides as open source on GitHub. We can laverage on more different languages for different platforms : from C# for .Net and UWP (Universal Windows Platform) applications to Java, from NodeJS (using JavaScript) to C. In this way, we are able to coverage different hardware from higher level devices like BeagleBoard, Raspberry Pi 2, Minnowboard Max to very low constrained devices like Kinetis K64F (Freescale) and CC3200 (Texas Instruments).

Of course, using directly HTTP and AMQP protocols, we can access to the IoT Hub from other platforms (not certified yet) and it could be the scenario of the .Net Micro Framework because up to now there isn’t an official SDK for it. The current C# client implementation uses Task and async/await programming model very heavily that isn’t supported (yet) by the “little” child in the .Net frameworks family. One choice to connect to the IoT Hub from a .Net Micro Framework board is to use directly the underlying AMQP protocol without the abstraction layer provided by an SDK. In this case you need to know some protocol concepts and a bunch of paths to the IoT Hub entities used for communication between devices and Cloud.

The purpose of this post is to show how to do this using the AMQP .Net Lite library that provides an AMQP protocol stack written in C# for a lot of different platforms like .Net Framework, .Net Compact Framework, .Net Micro Framework, WinRT (so UWP applications too), Mono, Windows Phone and so on; of course it’s available as open source on GitHub.

IoT Hub : connection and device endpoints

The IoT Hub is reachable using an address that has the following format

<IOT_HUB_NAME>.azure-devices.net

that we can retrieve from the Azure portal after creating the new IoT Hub instance service. As for all the services inside the Service Bus family (queues, topics/subscriptions and event hubs) the IoT Hub needs an SSL/TLS connection for data encryption and server authentication; it means that we have to connect to the host address to the default AMQPS (AMQP Secure) port that is the 5671.

We can create a new device inside the registry and get related credentials information using the Device Explorer application you can download here. After getting all needed information we can set them into the code.

private const string HOST = "IOT_HUB_NAME.azure-devices.net";
private const int PORT = 5671;
private const string DEVICE_ID = "DEVICE_ID";
private const string DEVICE_KEY = "DEVICE_KEY";

Using above information we can create an instance of the Address class and using it to establish the connection with the host thanks to the Connection class.

address = new Address(HOST, PORT, null, null);
connection = new Connection(address);

Inside the IoT Hub architecture, each device has two endpoints for accessing the Cloud :

  • D2C (device to cloud) : the device uses this endpoint to send messages to the cloud both as telemetry data and feedback for a received command (on the other endpoint, see below). It means that when we send a command to the device, it replies with a feedback at application level to confirm that the command is acquired and it’s going to be executed. Of course, it’s always true for a rejected command by the device;
  • C2D (cloud to device) : the device receives commands on this endpoint for executing the requested action. As already said, the device sends a confirmation (or rejection) of received command to the cloud using the other endpoint (D2C);

At AMQP level the endpoints are accessible from different entity paths; if you know Service Bus queues, topics/subscriptions and event hubs we can think them in the same way.

The entity path for sending data for telemetry purpose is defined in the following way :

/devices/<DEVICE_ID>/messages/events

where <DEVICE_ID> is the id assigned to the device when we create it inside the identity registry.

The entity path for receiving command from the Cloud is defined in the following way :

/devices/<DEVICE_ID>/messages/deviceBound

and as for the previous entity you need to provide the <DEVICE_ID> in the path.

It means that after creating a connection and a session to our IoT Hub host we need to create two links to above entities (or nodes as defined in the AMQP spec). Using the programming model provided by AMQP .Net Lite library we have :

  • A SenderLink to the /devices/<DEVICE_ID>/messages/events node;
  • A ReceiverLink to the /devices/<DEVICE_ID>/messages/deviceBound node;

Authentication : sending the SAS token

IoT Hub offers a per-device authentication through a SAS token that we can generate starting from device id and device key. After connection establishment we need to send such token to a specific CBS (Claim Based Security) endpoint to authorize the access to the specific entity.

As usual for Azure services, the token has the following format :

SharedAccessSignature sig={signature-string}&se={expiry}&skn={policyName}&sr={URL-encoded-resourceURI}

The big difference is that the skn field is absent in our case using device credentials .To get the SAS token I used the same code from my Azure SB Lite library because it’s processed almost in the same way.

string audience = Fx.Format("{0}/devices/{1}", HOST, DEVICE_ID);
string resourceUri = Fx.Format("{0}/devices/{1}", HOST, DEVICE_ID);
            
string sasToken = GetSharedAccessSignature(null, DEVICE_KEY, resourceUri, new TimeSpan(1, 0, 0));
bool cbs = PutCbsToken(connection, HOST, sasToken, audience);

The PutCbsToken creates a new session and a new link to connect to the specific $cbs node always using the same TCP connection. The content of the message is well defined by the AMQP CBS draft spec. After sending the token we are authorized to access IoT Hub from the device.

Just a note : I’m using the Fx class provided by AMQP .Net Lite library to have the Format method that doesn’t exist in the String class for the .Net Micro Framework.

Sending telemetry data

Using the SenderLink instance the device sends data calling the simple Send() method and passing it a Message class instance contains the data to send.

The sender link is created inside a new AMQP Session (using the related class of AMQP .Net Lite library) and the great news is that, thanks to the multiplexing feature of AMQP protocol, we can use the same session for both sender and receiver links all inside the same TCP connection.

static private void SendEvent()
{
    string entity = Fx.Format("/devices/{0}/messages/events", DEVICE_ID);

    SenderLink senderLink = new SenderLink(session, "sender-link", entity);

    var messageValue = Encoding.UTF8.GetBytes("i am a message.");
    Message message = new Message()
    {
        BodySection = new Data() { Binary = messageValue }
    };

    senderLink.Send(message);
    senderLink.Close();
}

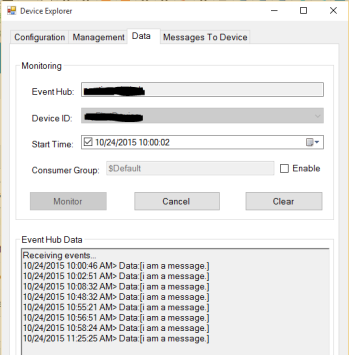
Running the code, we can interact with the device using the Device Explorer application to receive the messages it sends.

dev_exp_iot_hub_1

Receiving command and send feedback

Using the ReceiverLink instance the device can receive command from the service in the Cloud calling the Receive() method. In addition to the sending commands features, the IoT Hub provides a feedback feature at application level for them; it means that the device is able to send a confirmation of received command to the service to accept or reject it. If the device is offline and doesn’t receive the command, the IoT Hub provides a TTL (Time To Live) you can set on every single message so that the command isn’t delivered to the device when it comes back online if the timeout is expired; this feature avoids to deliver a command that makes sense only if it’s executed on the device in a short time.

The device doesn’t need to send the feedback as a message on a specific AMQP node/entity but it’s handled by the IoT Hub when the ReceiverLink accepts or rejects the command. Using AMQP .Net Lite we can call the Accept() or Reject() methods on the ReceiverLink instance; at AMQP level it means that a “disposition” performative is sent to the IoT Hub with an outcome of “accepted” or “rejected”. Receiving this outcome the IoT Hub sends a feedback message to the D2C endpoint on the Cloud service side. With such outcomes the message goes into a completed state (positive feedback to the Cloud) or dead letter state (negative feedback).

static private void ReceiveCommands()
{
    string entity = Fx.Format("/devices/{0}/messages/deviceBound", DEVICE_ID);

    ReceiverLink receiveLink = new ReceiverLink(session, "receive-link", entity);

    Message received = receiveLink.Receive();
    if (received != null)
         receiveLink.Accept(received);

    receiveLink.Close();
}

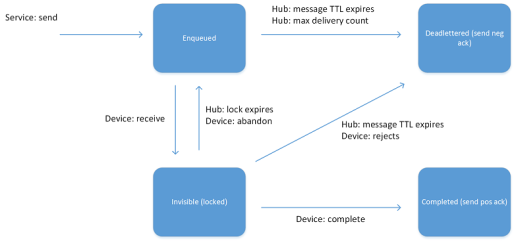
Pay attention on the available Release() method in the library; in this case the outcome is “released” and the message returns into the command queue (enqueued state) ready to be re-delivered to the device if it calls the Receive() method again. If the device receives the messages more times and always calls the Release() method, the IoT Hub moves it into the dead letter state (removing it from the command queue) if the messages reaches the max delivery count; the same happens if the device doesn’t call neither Accept() nor Reject() methods and the TTL expires.

IoT Hub message lifecycle

IoT Hub message lifecycle

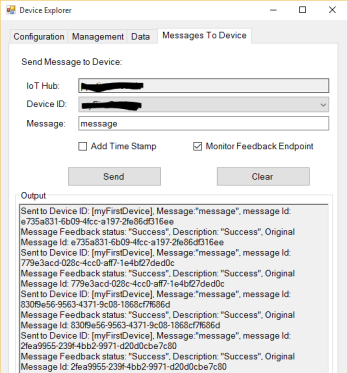
Executing the code and using Device Explorer to send the command we can see the feedback from the device too.

dev_exp_iot_hub_2

The full source code

The full source code I showed in the previous paragraphs is available on GitHub and it has projects for .Net Framework (so you can test very quickly it on your PC), generic .Net Micro Framework (for testing on your real device) and a third project for Netduino 3 WiFi as example of embedded device.

Of course, you can use any other board that support .Net Micro Framework and SSL/TLS protocol that is needed to connect to the IoT Hub. Other then Netduino 3 board, there are the FEZ Raptor and FEZ Spider from GHI Electronics (soon an example using them).

Conclusion

Knowing some AMQP concepts and some node paths you can find in the official IoT Hub Developer Guide, we are able to create an IoT Hub client using whatever AMQP stack implementation that in this example is AMQP .Net Lite; you can understand that it’s what the official IoT Hub client does creating an abstraction layer on top of it.

In this way we can add any other platform (not officially supported) like the .Net Micro Framework to the set of available devices for our Internet of Things solution based on IoT Hub.

GnatMQ and SSL/TLS support : make it up and running !

After the last blog post on the new GnatMQ release with SSL/TLS support, it’s now time to show how to use this new feature.

Asymmetric encryption and SSL/TLS : a brief introduction

Speaking about SSL/TLS security means to speak a lot about asymmetric encryption (even if symmetric encryption is used as well) and X.509 certificates. Regarding asymmetric encryption we know that it’s based on public and private keys compared to symmetric encryption that uses only one shared key. Simplifying how asymmetric encryption works we can say that the message sender needs the public key of the receiver in order to use it for encrypting data. The receiver is the only one to have its private key so that it’s the only one that is able to decrypt a message that was encrypted with its own related public key. It means that public key can be distributed publically but private key must be kept secret. Asymmetric encryption can be used not only to encrypt data but for signing it too. In this case, the sender processes an hash on the message to send using its private key; the receiver can use the corresponding sender public key to verify the signature (the hash) and in this way it can be sure that the message was received from the right sender.

Of course, it’s only a simple and brief introduction on how asymmetric encryption works and I can suggest you to deep into it finding a lot of content online.

How is asymmetric encryption related to SSL/TLS protocol ?

SSL/TLS is a protocol on top of TCP/IP that is used for server authentication (to know that we are speaking with the server we want really to speak), client authentication (check on server side that the client can connect to the server itself) and content encryption (we can guarantee confidentiality on transmitted data). SSL/TLS is based on asymmetric encryption in the following way :

  • the server has a private key for encrypting messages during the first connection phase named SSL/TLS handshake;
  • the server has a related public key distributed publically to all clients want to connect to it;

I said that the server private key is used only during SSL/TLS handshake and not for encrypting all messages exchanged during connection. It’s true because during this phase, client and server exchange some information to generate a symmetric key that they will use during communication to encrypt all exchanged data. Why this step from asymmetric to symmetric encryption ?

Asymmetric encryption is more complex than symmetric and it needs more CPU and memory footprint for executing even if it’s more secure than symmetric. This one is less complex and doesn’t need huge resources for processing. This is the reason why for generating a symmetric key, the client and server use asymmetric encryption with more load during the handshake but they use the generated symmetric key for encrypting all traffic to be much faster during communication.

Now, the big question is : how the client can be sure it’s talking with the server it’d like to talk ? Here the X.509 certificates standard and the Certification Authority concepts come in and of course the second possible usage of asymmetric encryption : the signature.

The server public key must be signed by a trusted third party authority so that the client can trust this public key and check that it’s talking with the right server. A Certification Authority (CA) is a trusted third party that distributes X.509 certificates : you can think about a certificate as a server public key with a signature from CA (with more other information). It means that we can buy a server certificate from a CA directly or we can ask the CA to sign our already generated public key. Of course the CA uses its own private key to process the hash/signature for that public key to obtain a valid X.509 certificate.

How the client is able to check the server certificate validity ? Of course, the client needs the CA certificate (its public key) and can use it to verify the signature on the received certificate from the server.

Now you could ask … who signs the CA certificate ? In this case the CA is considered as a “root” so no other trusted third party over it; for this reason the CA certificate is self signed and it means that it’s signed by the CA itself … you need to trust it ! However you need to know that there are CA certificates not self signed but signed by other CAs; in this way there is the possibility to have CAs who can distribute X.509 certificates to companies but you can’t consider them as “root” because their certificates are signed by other “root” CAs.

After this higher level introduction to SSL/TLS (you need to deep into it for understanding it better), it’s time to “play” with certificates and prepare our GnatMQ broker with the new security feature.

Self-signed CA certificate creation

First of all we need a CA certificate to generate and sign the server certificate. We could buy the server certificate from a trusted third party Certificate Authority such as GoDaddy, Symantec (Verisign), Comodo or GlobalSign but only for testing, we can first generate a self-signed CA certificate and then using it to sign our server certificate. With our CA certificate we are able to impersonate a trusted Certification Authority so that we can sign any other certificate we’d like to use for our servers.

Remember that the certificates story starts from generating a public and private key for asymmetric cryptography. A server public key is signed with a CA private key to obtain a so called “certificate”. In this way the server public key can be distributed publically in a certificate fashion. In the case of a self-signed CA certificate, the CA private key is used to sign the same CA public key to obtain the self-signed CA certificate itself.

To execute all available operations on X.509 certificates (create, sign, convert and so on) there are two main available tools : OpenSSL or Makecert.
During this article we’ll use Makecert that we receive with our Visual Studio 2015 installation (it’s available with previous versions as well).
Of course, the certificate generation operation will generate both private key and public key; the last one will be signed to become a standard X.509 certificate to distribute publically.
Let’s start with the “Developer Command Prompt for VS2015” and check that the Makecert usage is the following :
makecert [options] outputCertificateFile
with a lot of “options” we can specify and the output certificate file.
Let’s execute following command :
makecert -n "CN=MyCARoot" -r -a sha512 -len 4096 -cy authority -sv MyCARoot.pvk MyCARoot.cer
01_gnatmq_ssl
where options have following meaning :
  • -n : specifies the so called Common Name and it’s the subject certificate name that conform to the X.500 standard
  • -r : ask for creation of a self-signed certificate
  • -a : specifies what algorithm must be used to sign (in this case self-signed) the certificate
  • -len : specifies the generated private key length, in bits
  • -cy : specifies the certificate type. Valid values are “end” for end-entity and “authority” for Certification Authority
  • -sv : specifies the name of the generated subject’s private key file

It’s important to notify the the -n parameter can receive more other options like Country Name (C), Organization Name (O), Locality Name (L) and so on; in this case a more complex value could be : “CN=MyCARoot,C=Italy,O=MyCACompany,L=Naples”.

There are a lot of other options you can specify like the expiration date and so on. For more information, you can see the official documentation for Makecert tool.

After executing this command you are prompted to insert the “passphrase” (a password) to protect the private key.

02_gnatmq_ssl
The first time you need to create the password for the private key and the second time you are prompted to insert the previous one to access the private key and (self)signing the certificate.
03_gnatmq_ssl
Now we have the MyCARoot.cer file and the MyCARoot.pvk file. The former is the self-signed CA certificate in the DER (binary) format and the latter is the private key used to signed the generated public key to obtain the above certificate and that will be used to sign any other server certificate.

Create the server certificate

Next step is to create the server certificate and sign it with the above CA certificate (using the related private key of course).
makecert -n "CN=DESKTOP-862CII2" -iv MyCARoot.pvk -ic MyCARoot.cer -pe -a sha512 -len 4096 -sky exchange -sv GnatMQ.pvk GnatMQ.cer
where options have following meaning :
  • -n : specifies the Common Name of the server. It must match the domain name or the PC name (like for this example)
  • -iv : specifies the issuer’s .pvk private key file (so the CA private key file)
  • -ic : specifies the issuer’s certificate file (so the self-signed CA certificate)
  • -pe : marks the generated private key as exportable (we’ll see what it means)
  • -a : specifies what algorithm must be used to sign the certificate
  • -len : specifies the generated private key length, in bits
  • -sky : specifies the subject’s key type.The “exchange” value means the key is used for key encryption and key exchange (what happes during SSL/TLS handshake)
  • -sv : specifies the name of the generated subject’s private key file

04_gnatmq_ssl

As for the CA certificate generation you are prompted to insert the passphrase to protect the private server key. In this case, you are prompted to insert the passphrase for the CA private key too (the Issuer) because it is necessary to access the CA private key for signing the server public key and generate the certificate.

05_gnatmq_ssl

In order to use the server certificate inside the broker we need to export it in the PFX format (predecessor of current PKCS#12). The PKCS#12 evolved from the personal information exchange (PFX) standard and is used to exchange public and private objects in a single file. It means that the single PFX file contains both the public and private key of the server. In this way, it has all needed data to support an SSL/TLS connection for deploying its certificate and encrypt data using the private key. This is the reason way we used the “pe” option in the Makecert command to mark the private key as exportable into the PFX file.

To do this we can use the pvk2pfx tool in the following way :

pvk2pfx -pvk GnatMQ.pvk -spc GnatMQ.cer -pfx GnatMQ.pfx -po <password>

where options have following meaning :

  • -pvk : specifies the name of a .pvk file (broker private key)
  • -spc : specifies the name and extension of the Software Publisher Certificate (SPC) file that contains the certificate (broker certificate)
  • -pfx : specifies the name of the output .pfx file
  • -po : password for the .pfx file

06_gnatmq_ssl

Setup GnatMQ security

Now we are able to use the server certificate to create a GnatMQ instance with SSL/TLS support. You can get the latest version as Nuget package and reference it inside your project. You can use the MqttBroker class instance inside a simple console application or a worker role on Azure; it’s up to you how to use it. For a simple example, the console application is the right choice.

First of all you need to add the generated GnatMQ.pfx file as resource inside your project to make it available in your source code.

07_gnatmq_ssl

The source code is so simple …

class Program
{
    static void Main(string[] args)
    {
        X509Certificate2 serverCert = new X509Certificate2(Resource1.GnatMQ, "<pwd>");

        // create and start broker
        MqttBroker broker = new MqttBroker(serverCert, MqttSslProtocols.TLSv1_0);
        broker.Start();

        Console.ReadLine();

        broker.Stop();
    }
}

In order to use the PFX file you can instantiate the X509Certificate2 class providing it the raw bytes and the password (you specified during PFX file creation). The MqttBroker class has a simple constructor for SSL/TLS support with only two parameters :

  • the server certificate;
  • the SSL/TLS protocol version;

In this way the broker is up and running and can accept only SSL/TLS connections !

Another way to instantiate the class is to use the constructor with other parameters like the RemoteCertificateValidationCallback and LocalCertificateSelectionCallback that you can use to customize the certificate validation and selection process.

Remember that any client you use to connect the broker it needs the self-signed CA certificate and your connection will be protected and encrypted after the server authentication.

Last one thing to know is that the SSL/TLS feature is supported by GnatMQ only for the .Net Framework platform and not for the WinRT (Windows 8.1 and Windows 10) due to the sandboxed execution environment that doesn’t accept incoming SSL/TLS connection (only as client).

Azure SB Lite … finally on Nuget !

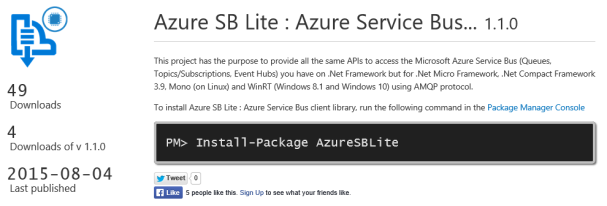
azure_sb_lite_nuget

Finally my Azure SB Lite library is online on Nuget but … it was a long story 🙂

The last month, I decided to put this library on Nuget for all people that don’t like to compile source code from CodePlex and want to use it immediately. When I tried to upload the package, I received the “package id alredy used” error ! What ? Why ? Who ? Is there another library with same name ?

After few minutes I found that Sebastian Brandes (Microsoft Evangelist from Denmark) already uploaded it on Nuget in June (of course, he set me as “author”) and it was downloaded by 45 people. I contacted him who explained me that the library was useful to his project (thanks!) and that the right place for all other people was on Nuget (for much friendly usage). Right ! However, we decided that I should be the owner of the package so after about one month (Sebastian was on vacation) and Nuget support … today I re-uploaded the library !

I have to thank Sebastian for all his effort to help me to get the ownership of the package and for using it in his “Internet of Things” demo at Tech Ready conference (only for all Microsoft employees). He promised me to write a blog post and upload demo source code on GitHub.

Finally, I’d like to remember that there are some usage examples on GitHub at following link !

MQTT & Eclipse Paho : nuove versioni per il client M2Mqtt ed il broker GnatMQ !!

Finalmente la nuova versione M2Mqtt 4.1 è stata rilasciata !

Negli ultimi mesi, la mia libreria è stata messa sotto pressione grazie ai miei amici Olivier Vigliengo (Adeneo) e Nicolas Besson (Microsoft MVP su Windows Embedded, Adeneo). Essi hanno usato il client MQTT per i loro progetti hobbistici, stressandolo non poco !

Dopo un fitto scambio di email e letture di log traces, ho risolto una serie di bug ed aggiunto degli miglioramenti :

  • L’evento di “published” fornisce la flag IsPublished (nell’event args) grazie alla quale poter capire se il messaggio è stato realmente pubblicato oppure no a causa del timeout (l’evento viene sollevato lo stesso);
  • Alcuni cambi “interni” per la gestione degli eventi;
  • Fixato un bug su timeout negativo;
  • Migliorata la stabilità della libreria in condizioni di rete poco affidabile;
  • Fixato un bug sulla gestione delle sessioni;
  • Aggiunte le informazioni di trace sul “queueing” dei messaggi;

Ovviamente, questi cambiamenti hanno avuto il loro impatto anche sul broker GnatMQ che è ancora in Beta ma che mi piacerebbe rilasciare al più presto : spero che le persone che lo usino mi diano dei feedback (sembra che il team di XSocket lo stia usando per fornire il supporto MQTT alla loro piattaforma) 🙂

Come sempre potete trovare M2Mqtt nel progetto Eclipse Paho, su CodePlex e su Nuget. Il broker GnatMQ è disponibile solo su CodePlex. Infine, ho aggiornato anche il progetto M2Mqtt4CE (per Windows Embedded Compact 2013) su CodePlex.

Il meccanismo di “string interning” nel .Net Micro Framework

Consideriamo la seguente semplicissima applicazione console in C# …

 static void Main(string[] args)
 {
   string s1 = &quot;Hello world&quot;;
   string s2 = &quot;Hello world&quot;;

   Console.WriteLine(s1.Equals(s2));
   Console.WriteLine(ReferenceEquals(s1, s2));
   Console.WriteLine(s1 == s2);

   string s3 = String.Intern(Console.ReadLine());

   Console.WriteLine(s1.Equals(s3));
   Console.WriteLine(ReferenceEquals(s1, s3));
   Console.WriteLine(s1 == s3);

   Console.ReadKey();
 }

Il cui output è il seguente …

string_intern_net

Come sappiamo il metodo Equals() e l’operatore “==” verificano che se le due stringhe contengono lo stesso valore pur avendo un reference diverso (s1 ed s2), per cui è ovvio il risultato “True”. Ma come mai la ReferenceEquals() continua a fornire “True” e non “False” considerando che i due riferimenti sono diversi ?

Bene ! Essi non sono diversi in realtà !

Il .Net Framework fornisce un meccanismo di “string interning” ossia un pool all’interno del quale gestisce le stringhe che hanno il medesimo valore evitando di allocare inutilmente ulteriore memoria. Per questo motivo, s1 ed s2 sono in realtà il medesimo riferimento !

E’ ovvio che, quando una stringa viene acquisita dall’esterno ciò non accade ed è quindi necessario chiedere esplicitamente al framework di cercare la stringa acquisita prima nel pool interno ed eventualmente allocarne una nuova se essa non esiste … questo è l’obiettivo dell’istruzione String.Intern().

Proviamo ora ad eseguire il medesimo codice (a meno di alcune modifiche) sul .Net Micro Framework …

 public static void Main()
 {
    string s1 = &quot;Hello world&quot;;
    string s2 = &quot;Hello world&quot;;
 
    Debug.Print(s1.Equals(s2).ToString());
    Debug.Print(ReferenceEquals(s1, s2).ToString());
    Debug.Print((s1 == s2).ToString());

    string s3 = String.Intern(&quot;Hello world&quot;);
    
    Debug.Print(s1.Equals(s3).ToString());
    Debug.Print(ReferenceEquals(s1, s3).ToString());
    Debug.Print((s1 == s3).ToString());
 }

con il seguente risultato …

string_intern_netmf

In questo caso il ReferenceEquals() ci conferma che i due reference sono diversi nel primo caso ma anche utilizzando String.Intern() … come mai ?

Il motivo è semplice … il .Net Micro Framework non supporta il meccanismo di “string interning” e non fornisce un pool interno di stringhe e la risposta è come sempre nell’implementazione nativa. Guardando nel file String.cs, troviamo :

 public static String Intern(String str)
 {
   // We don't support &quot;interning&quot; of strings. So simply return the string.
   return str;
 }

 public static String IsInterned(String str)
 {
   // We don't support &quot;interning&quot; of strings. So simply return the string.
   return str;
 }

Un esplicito commento ci dice che questa funzionalità non è supportata !

Regex portabile fra .Net e .Net Micro Framework … fate attenzione !

Sviluppando su tutte le versioni del .Net Framework (full, compact e micro) mi capita sempre di dover affrontare il problema della portabilità, evitando di utilizzare metodi che non siano disponibili in uno dei tre framework oppure utilizzando le direttive di precompilazione.

Non mi è mai capitato, però, un caso in cui il metodo esista in tutti i framework ma i parametri abbiano un significato diverso … siano addirittura invertiti !!

Il metodo in questione è l’overload di Regex.Split(String, String, RegexOptions) !

La firma è praticamente la stessa confrontando il .Net Framework ed il .Net Micro Framework ma …. con una notevole differenza nei primi due parametri.

Dalla documentazione MSDN del .Net Framework si legge che il primo parametro è la stringa da splittare mentre il secondo è il pattern da applicare.

01

Viceversa, nella documentazione MSDN del .Net Micro Framework si legge che il primo è il pattern ed il secondo è la stringa di input !!

02

Per assicurarmi che l’errore non fosse nella documentazione, ho cercato il codice sorgente del .Net Micro Framework in cui è implementato questo metodo ma purtroppo è arrivata la conferma !

 /// &lt;summary&gt;
 /// Splits the input string at the positions defined by a specified regular expression pattern. Specified options modify the matching operation.
 /// &lt;/summary&gt;
 /// &lt;param name=&quot;pattern&quot;&gt;The pattern to match against&lt;/param&gt;
 /// &lt;param name=&quot;split&quot;&gt;The string to split&lt;/param&gt;
 /// &lt;param name=&quot;options&quot;&gt;The options to utilize during matching&lt;/param&gt;
 /// &lt;returns&gt;The result of splitting the input string against the pattern&lt;/returns&gt;
 public static string[] Split(string pattern, string split, RegexOptions options)
 {
   return new Regex(pattern, options).Split(split);
 }

Assolutamente strano … anche questa volta ho deciso di aprire una issue sul sito ufficiale del .Net Micro Framework su CodePlex !